Flower Trellis Afghan, Where You Place the Stitches Makes the Difference

ScannedImageThe unique thing about crochet is that it all depends upon where you place your hook. Basically there are only a couple of stitches, but a very look happens when the stitches are placed in different places.0001830918_small2

1_Page_042_Image_0002_medium2

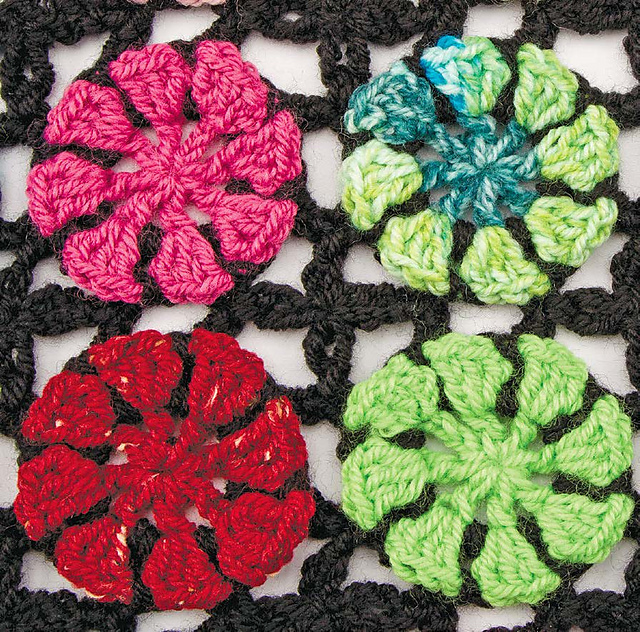
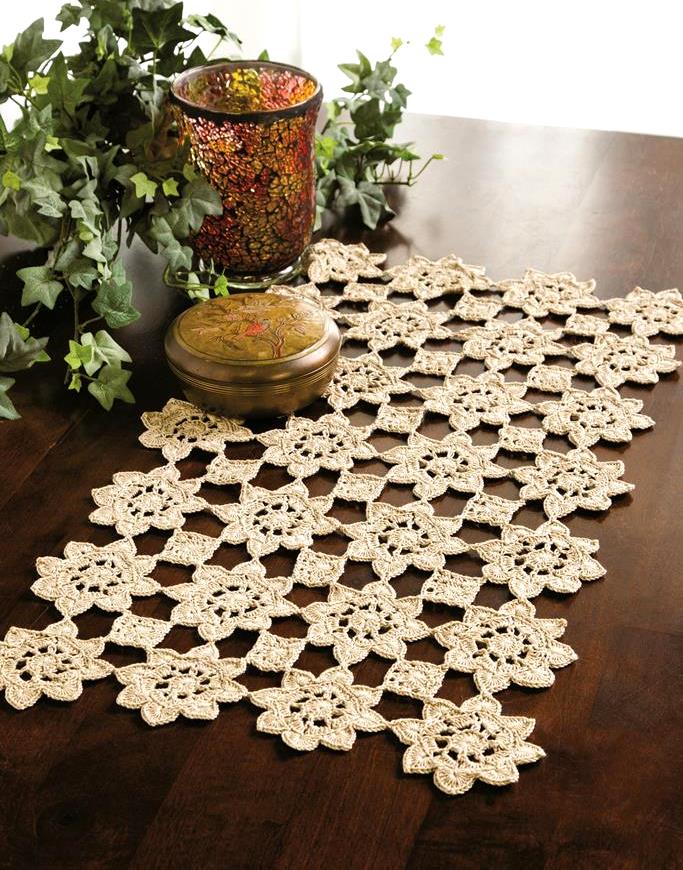
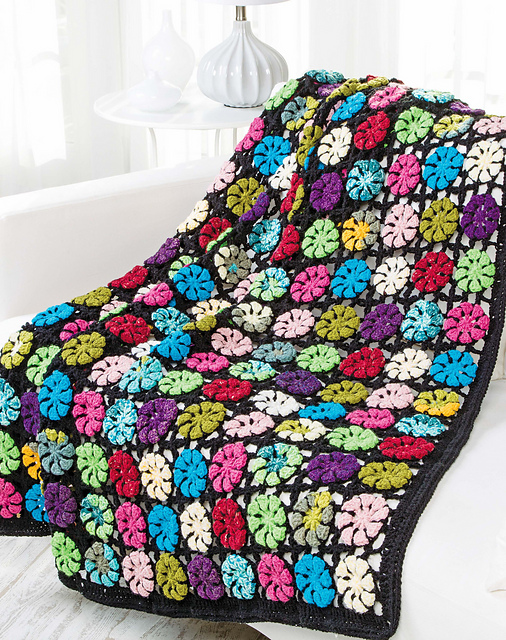
One side of Flower Trellis Afghan “Flowers” Photo courtesy of Annie’s

1_Page_042_Image_0001_medium2

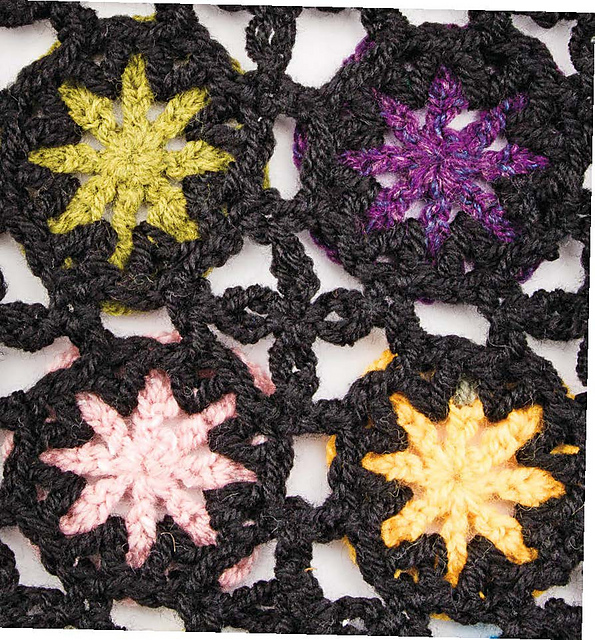
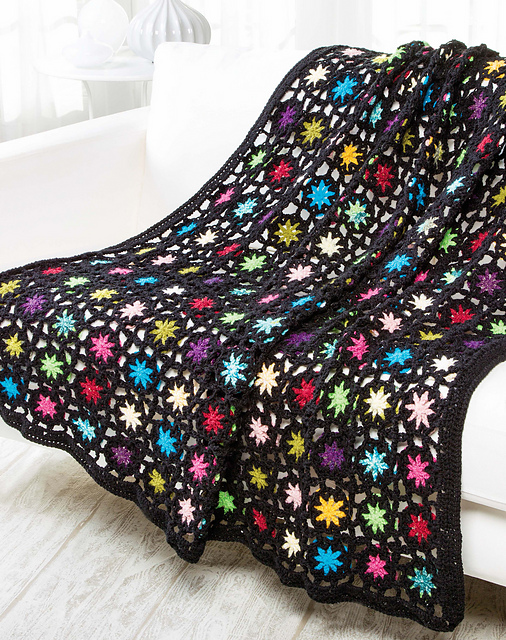
Opposite side of Flower Trellis Afghan, “Snowflake” Photo courtesy of Annie’s

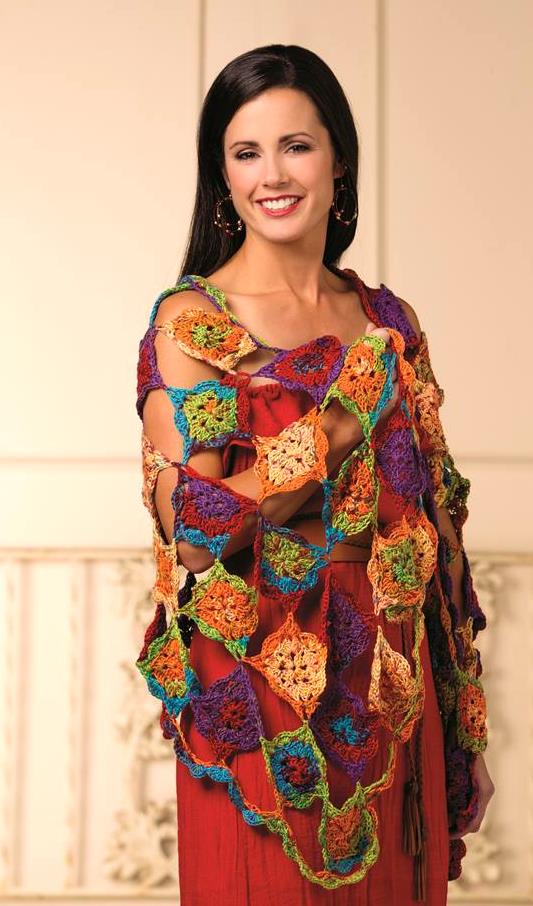
My Flower Trellis Afghan, on the cover of the current special issue of Crochet! Magazine From Scraps to Sensational, really shows how stitch placement can create a completely different effect, allowing this afghan to have two different but equally beautiful sides.

This afghan is comprised of motifs, which are only 3 round each. The first 2 rounds are the pops of color! Only a little yarn is needed for these rounds, so it really puts the scraps in your stash to work, the more interesting the color, or variegation, or hue of the yarn, the more interest to the overall effect.

1_Page_041_Image_0001_medium2

Flower Trellis Afghan Photo courtesy of Annie’s

1_Page_043_Image_0001_medium2

Flower Trellis Afghan Photo courtesy of Annie’s

The really magic occurs in the third round. The stitch placement of working in round 1 behind round 2, allows for the petals of the “flowers” to become distinguished, while creating the “snowflake” appearances on the opposite side. Or at least that is what I envision when I see them.

The other great feature about this afghan is that it is joining as you go; all is worked in the third round. So working the color of the motifs can be completely portable, and then join them all together when working the last round. This is a rewarding project, as it really helps clean up the left over bits of yarn you have been holding onto for the “special” project, and by placing your stitches in a different location you find that you have a project that has a personality, and differing effect on either side

Blossom Spins and Flowers on the Beach Thoughts

ScannedImageThis is a busy time of year. All the work that filled my days at the end of summer is now making its way onto the newsstands to be enjoyed!

Untitled

Photo courtesy of Annie’s

The special issue of Crochet! Magazine, Quick & Easy Crochet Accessories features two of my new designs (one if actually featured on the issue cover!), and I thought that I would share some of what went into creating them.

image

Blossom Spins Wrap Photo courtesy of Annie’s

The first one, the Blossom Spins Wrap, grew out of some playing I was doing with the picot stitch. The picot is usually noticed in edges and is created from a set of chains that are slip stitched back to the same base stitch. This creates a little nub, or dot, along the stitch pattern. I was attempting to see what other secrets this little decorative stitch might hold. In doing so I made the chains a little longer and now created a loop that could become the foundation for other stitches! In the case of the wrap these picots hold a shell stitch that allows for a subtle wave, making these square motifs appear more like diamonds.

The other real charm of this design, the color work, is all done by the yarn. Both of these designs I am discussing are created with Deborah Norville Serenity Garden Yarn, it is a light weight yarn that is silky and soft. It comes in a wide array of color ways and creates lovely striping, and in the result of the motifs, creates a beautiful speckling of color highlights.

image-2

Flowers on the Beach Photo courtesy of Annie’s

The other design, the Flowers on the Beach Bag, came into being from the flowers. The flowers are a design that I have played with, creating the petals large and wide in just a single row, and then basically outlining the edge of the flower by working a round of single crochet directly on top. I have found that I really enjoy these flowers, and they, like the motifs in the wrap, offer a great way for the color of the yarn to create a fun dimension. The mesh bag that the flowers are worked onto is quite simple and easily collapses, not taking up much room when being stored, but then can readily carry all the necessities for a day at the farmer’s market or a picnic at the beach.

In retrospect these designs really sing due to the color of the yarn, the structure of the designs themselves hold a good positive and negative space, but the color is what catches your eye and draws you in more. I might have to play with some more color changes and see how that can affect the outcomes of designs that I feel are missing something….you’ll never know when the right combination will come together.

Where Designs Grow- The Bharat Star Table Runner

ScannedImageThe New Year seems like it has been a bit of a whirl wind, especially since I have several designs coming out in various publications over the next several weeks. I enjoy sharing my thoughts of where these designs grew from, and the latest of these is the Bharat Star Table Runner, that is now available in the special issue of Crochet World Magazine, Blue Ribbon Crochet (available on newsstands and for download now).

871501_BlueRibbon_COVERThis table runner created with #10 cotton thread (Nazli Gelin Garden, color #700-09), was a design that grew out my approach to seeing in uses for the picot stitch. The picot stitch is a crochet classic, which is often used in an edging, sometimes within lace stitches, and is essentially working a chain-3 loop among a row or round of stitches. This creates a little, for lack of a better term, “nub” to rise above the other stitches and create a visual interest.

In playing with this classic technique, I have used the picot, instead of an embellishment as a location of additional stitch work. I have found that increasing the picot to a chain-4 loops, this becomes an excellent place to put shell or fan stitches, that creates a nice rounded arch.

image-1

photo courtesy of Annie’s

So while sitting in grass at my old high school, waiting for my kids to finish their parks & recreation tennis lessons last summer, I was playing with motifs. I was originally attempting to create large lace motif, but after working my fourth round by working a shelled arch in a picots I could not find a way to continue it further. I loved the shape that it made. I knew I was really on to something with it when the other parents waiting for their kids commented on how much they liked what I was making (once again crochet is an ice breaker).

I added the small motif squares to the mix, as a way to assist in a smooth join to the fabric, and believe that the square shape is a nice compliment to the star shape. I actually enjoy this stitch pattern enough that I have considered, several times, adding more motifs to make a wrap, or even a full table cloth.

If you do not feel comfortable using thread, this pattern can use yarn, and offer beautiful results as well.

I enjoy many of my designs, but this one is up among my favorites.

Working On “Special” with Some Nice Results

ScannedImageSo I am one of those people that will eat dessert last. If I eat it first, it means that I am skipping dinner. Even as a kid with T.V. dinners, I would save that little two bit dessert of fruit cobbler until the very end. I still do this today; I eat my most favorite part of any meal last.

So now what does this have to do with crochet? Well not a whole lot, except that if I find a “special” yarn or accessory I have a difficult time getting around to using it. I want to “save” special until I find the right fit.

This is true with a couple of things I have received over the last year, but I am forcing myself to bring them to use. After all how can I truly enjoy them if they are tucked away somewhere “special”. So I begin this process by making my own necklace.

DSCF0881

My “Special” Creation with Mini Masterpiece Pendant and Kreinik Twist Yarn

Those that see me often know I do not where all that much jewelry, just a simple necklace of a single pearl, a pair of earrings and a handmade bracelet. All things that have some sentimental value to me, and bring back memories, so receiving a Mini Masterpiece Pendant this last summer from one of its creator Shelby Allaho, immediately placed it in a “special” category.

I will admit the pendant is a little bigger then I am use to wearing, at least daily, but I think that I would put it to use on “special” occasions. So the Mini Masterpiece Pendant is actually a small wooden frame, it is light weight and has a simple, yet decorative design. It is meant to frame a piece of stitching, (or anything your imagination can conceive of), but this also became a “special” hang up for me. What is “special” enough to be placed in the frame…( I possibility might have a problem here)….

A few months ago I also received some Kreinik Twist Carry-Along Yarn color #339 Teal. So this carry along yarn is a lace weight, and has a lot of sparkle. So it got me thinking….these are two things that I might be able to combine. I played around with many possible small motifs created out of Twist, and found that the yarn is very soft, has a nice elastic quality in the stitches, and as I stated earlier, has a nice sparkle. This yarn is intended to be used with a heavier yarn, to add a little something extra to your overall fabric, but I decided to use it by itself. I was quite happy with the result.

I made a simple 2 round motif (if you want to make one too, here are my notes on the pattern:Rnd 1: Ch 10, sc in first ch, *ch 9, sc in same ch as sc; rep from *2 more times. (4 ch=9 loops)Rnd 2: Sl st in each of the next 3 ch of ch-9 loop, ch 4, 4 tr in ch-9 sp, ch 5, *5 tr in next ch-9 loop, ch 5; rep from * 2 more times, sl st to top of beg ch 4. Finish off. ) Then stitched it to the frame, I then added a single pearl bead to the center. It is airy, light, and I enjoy the shape created in both the positive and negative space.

This is a very creative concept to “frame” your stitch work and it does give you something to think about…What would you frame? I have always felt that crochet is an art; I guess I may need to get some more frames.

My Drop Stitch Journey

ScannedImageAs any long time crochet has realized “fancier” crochet stitches really do not have a single name. The term Popcorn, or Cable give you the basic idea, but a Cluster can have a few different interpretations. So it is important to pay close attention to the “Special Stitches” selections of patterns, and if working up your own idea, remember to be consistent with the process or steps of your stitch.

IMG_6122.1 -copy

The Drop Stitch with Shells

With that being stated, I wanted to share how my version of the “Drop Stitch” came about.
Several years ago, I was attempting to find a way to create a round open loop within a row of fabric. I know you can create chain and skip spaces, but I have a vision that was a little different, almost like a “loopty loop” of a roller coaster. In my attempts to find this approach to fulfill my vision I began playing with some “long loops”. With these long loops I twisted, I stitched over, I stitched through and around, in various ways and found eventually found a way to make them secure in the fabric, and eventually began to see what resembled the effects of Hairpin Lace.

Summer Rays Drop Stitch Wrap- pattern.

Summer Rays Drop Stitch Wrap

I wrote up the process and created a short scarf for Crochet! Magazine in the Summer 2012 issue to explain what I found, and how to create it. Since then I have played with the stitch in a variety of ways in my personal crochet, even creating a self-published design earlier this year, Summer Rays Drop Stitch Wrap.(Available for $5 at Craftsy & Ravelry)
The principal behind the process is not the difficult; essentially you pull through a long loop in the indicated stitch. Then you remove your hook and dependent upon the design, insert the hook in either the same indicated stitch or into the adjacent stitch and pull through a loop, and slip stitch. This slip stitch secures the loop and you then move on to the next stitch. The fun in this fabric is that you can work across the ends of the loops to create a second row, and thus have a row of long open loops, similar to the drop stitch effects in knitting.
I have used this stitch in a wide arrange of yarns and am happy with the results of most. However the only ones I have not been as happy with are yarns that have a little “springiness” to them. They have a lot of stretch and easily return to their natural state (like some sock yarns). This did not allow for a very long loop, it caused the loop to pull back, creating a more 3D effect in the fabric, which I have not found a good use for yet.
I still have not found a way to create the circle of loopty loops that are in my head, but by playing with various techniques and concepts along the way, I hope to enjoy many more discoveries.

If you want to take another journey of a Drop Stitch, check out Kim Guzman’s new book Learn Drop Stitch Crochet, She works it a little different then I do, she uses a knitting needle to keep the loops more uniform.