Festive Julie Ann Square- Moogly 2019 CAL

What a month…just last month I was working the last 2018 square for the Moogly CAL…now I am working up the second square of the Moogly 2019 CAL! Check out all the squares for 2019 here, and the 2018 square here.

I feel very privileged to be able to share with you this latest design, the Festive Julie Ann Square. Inspired by my student Julie Ann, who loves to work in the round, and makes a festive atmosphere where ever she is going.

The square uses long post loops, to create a stunning color play of the eye. Working this square for some reason always makes me think of flowers, I guess that is one of the reasons I see it as festive.

Festive Julie Ann by Linda Dean

Bring in the New Year with a bright star of festival with this square that elongates some post stitches to create a planned bleeding of the colors.
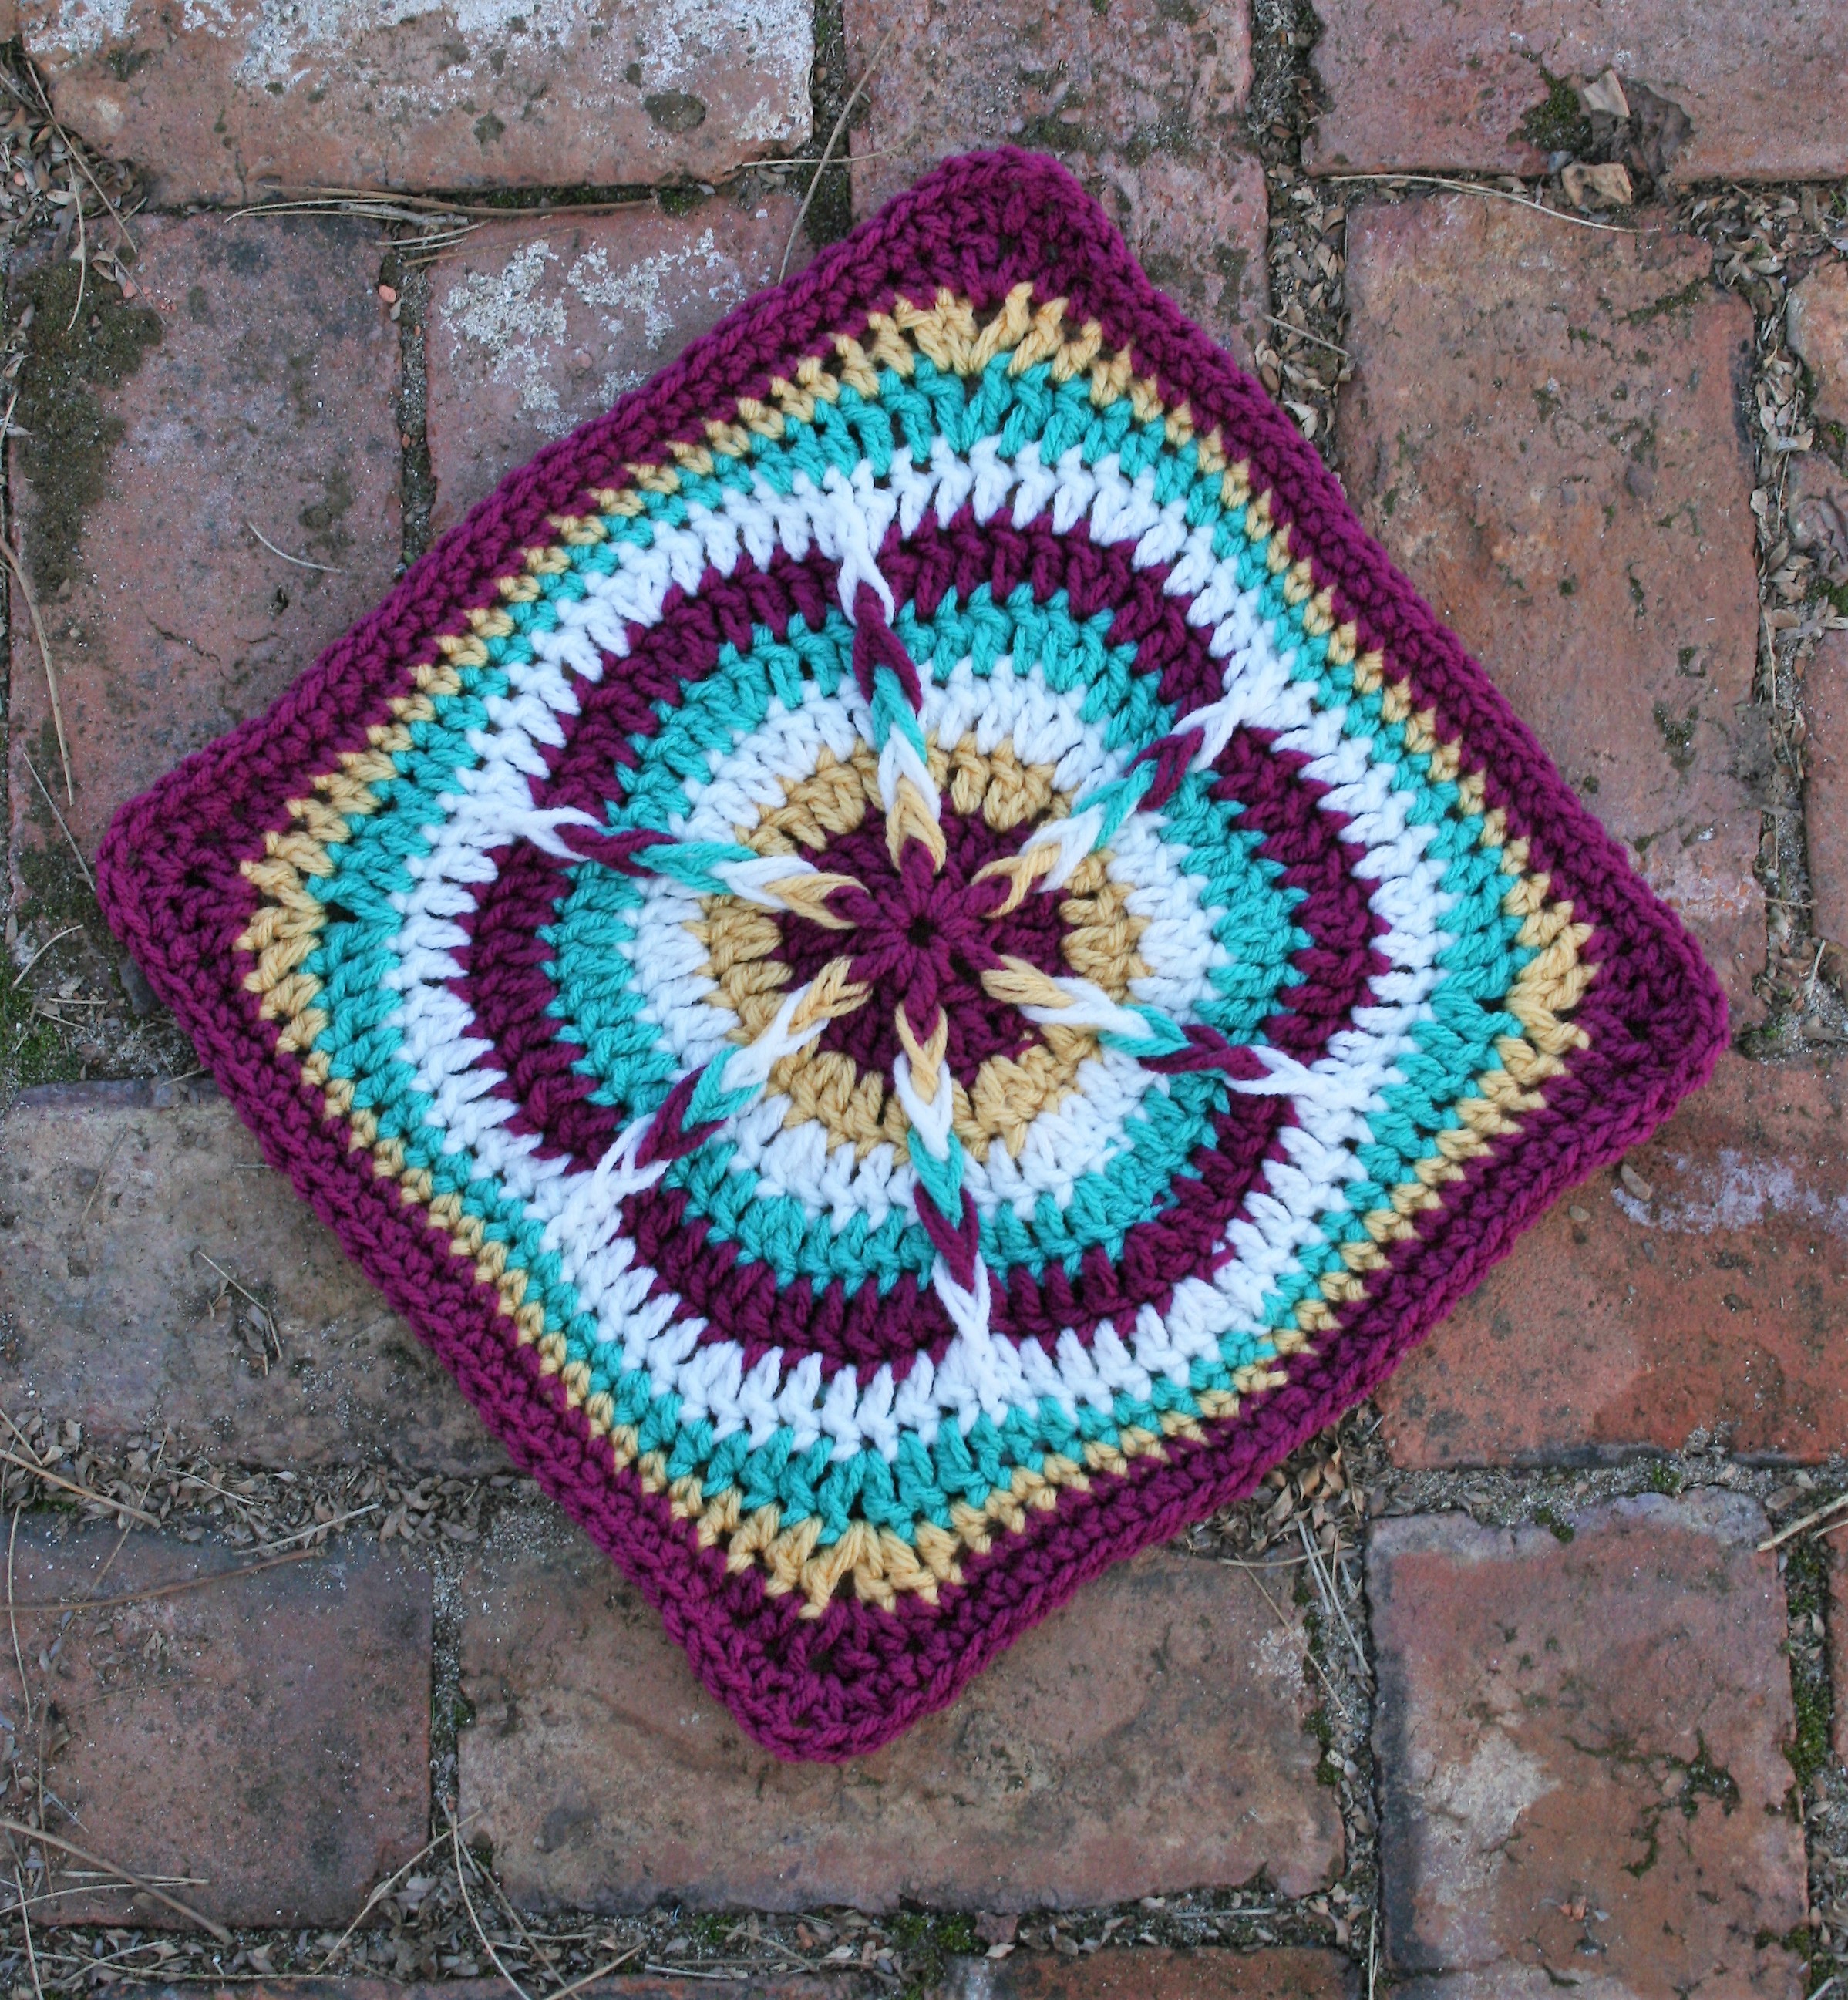
Materials:

*Red Heart With Love, #1907 Boysenberry (A), #1207 Cornsilk (B), #1101 Eggshell (C), #1562 Jadeite (D)

*Hook J/10/ 6.00mm

Gauge: 12”x 12” square (30.5 x 30.5cm) –After Rnd 3 you should measure approximately 4″ (10cm)

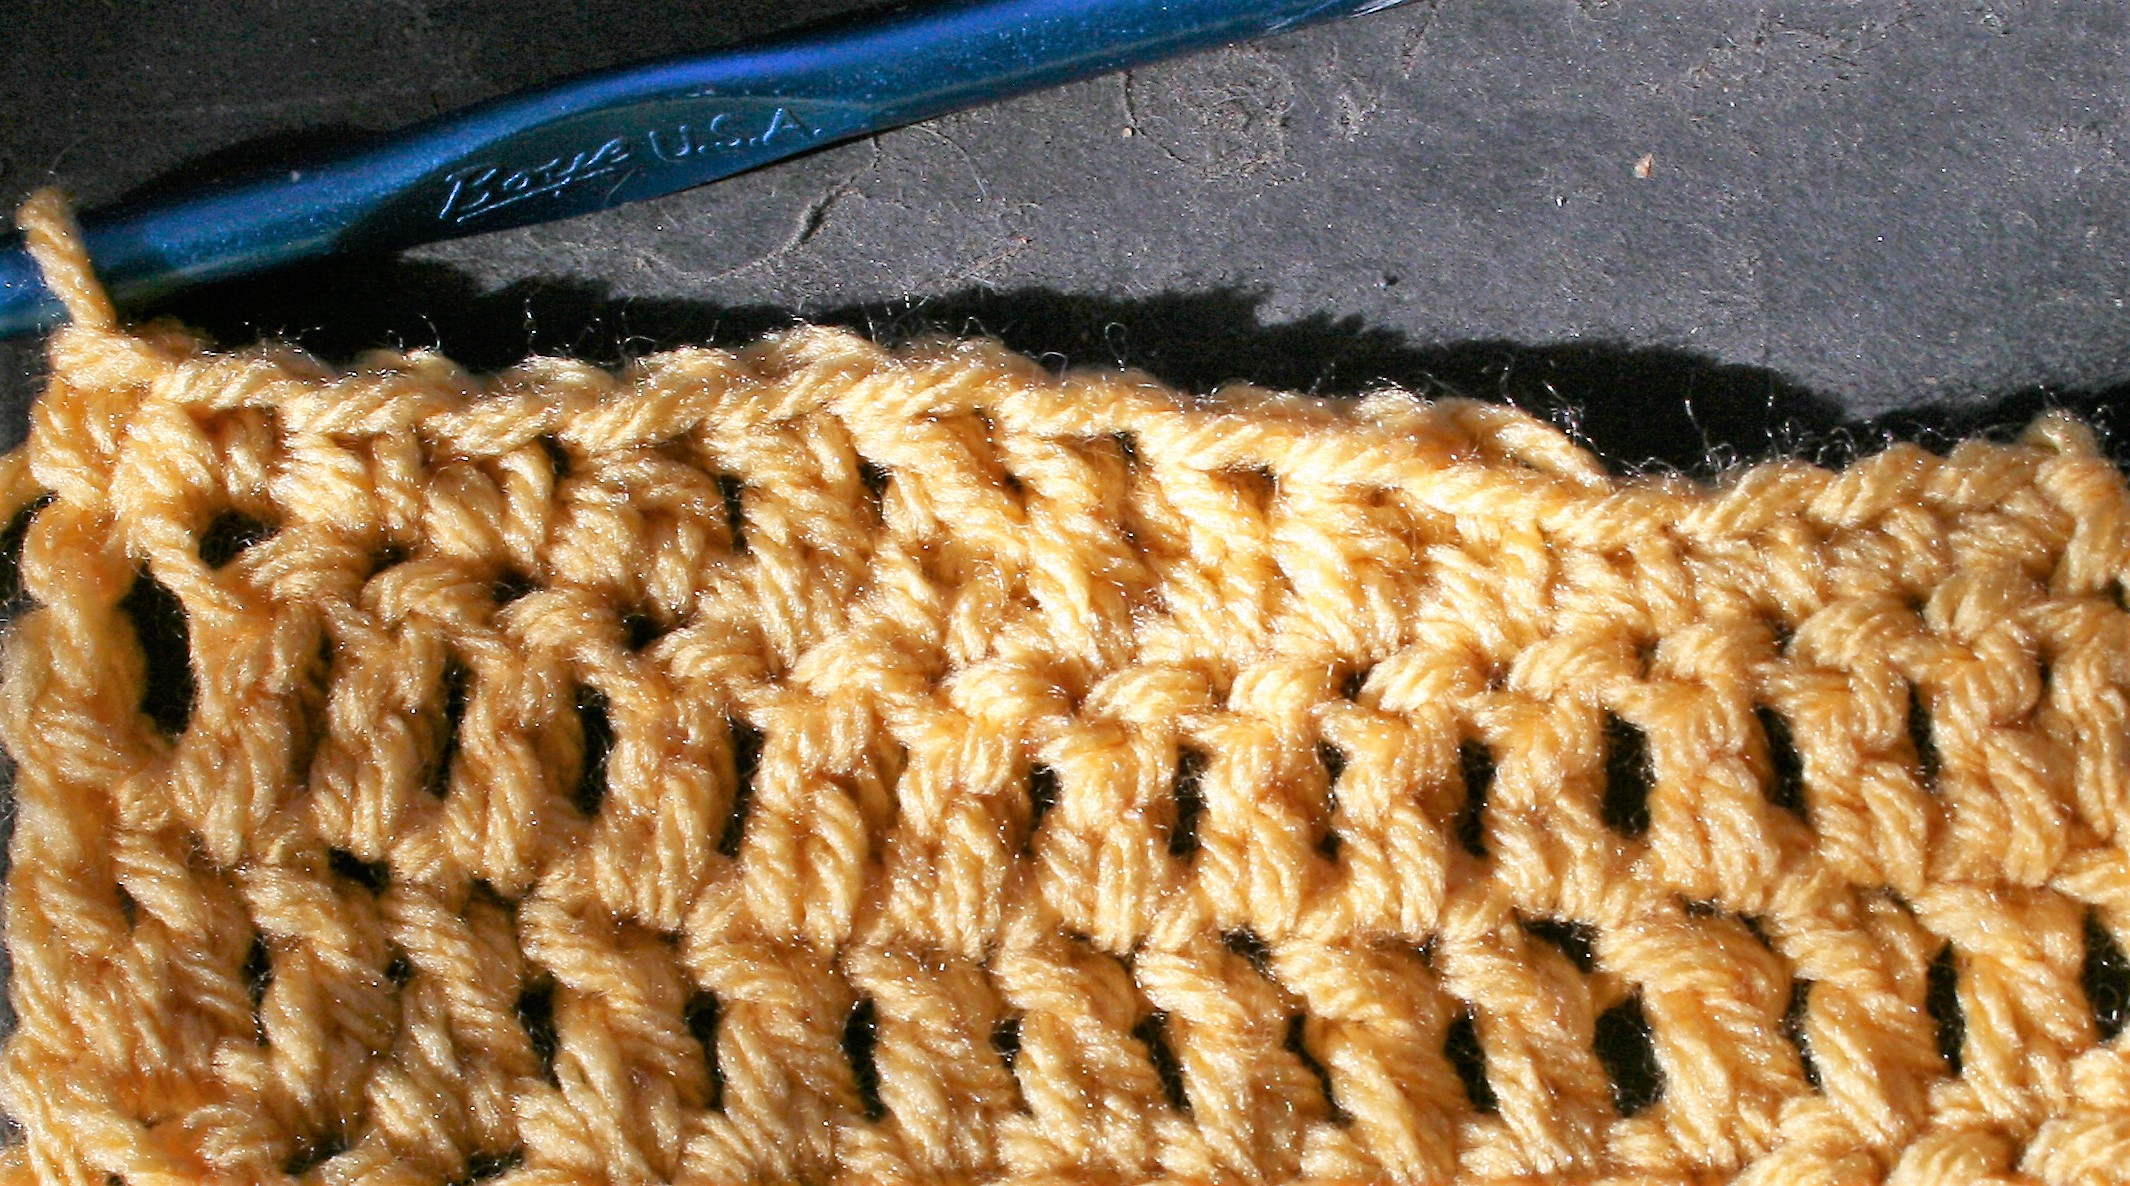
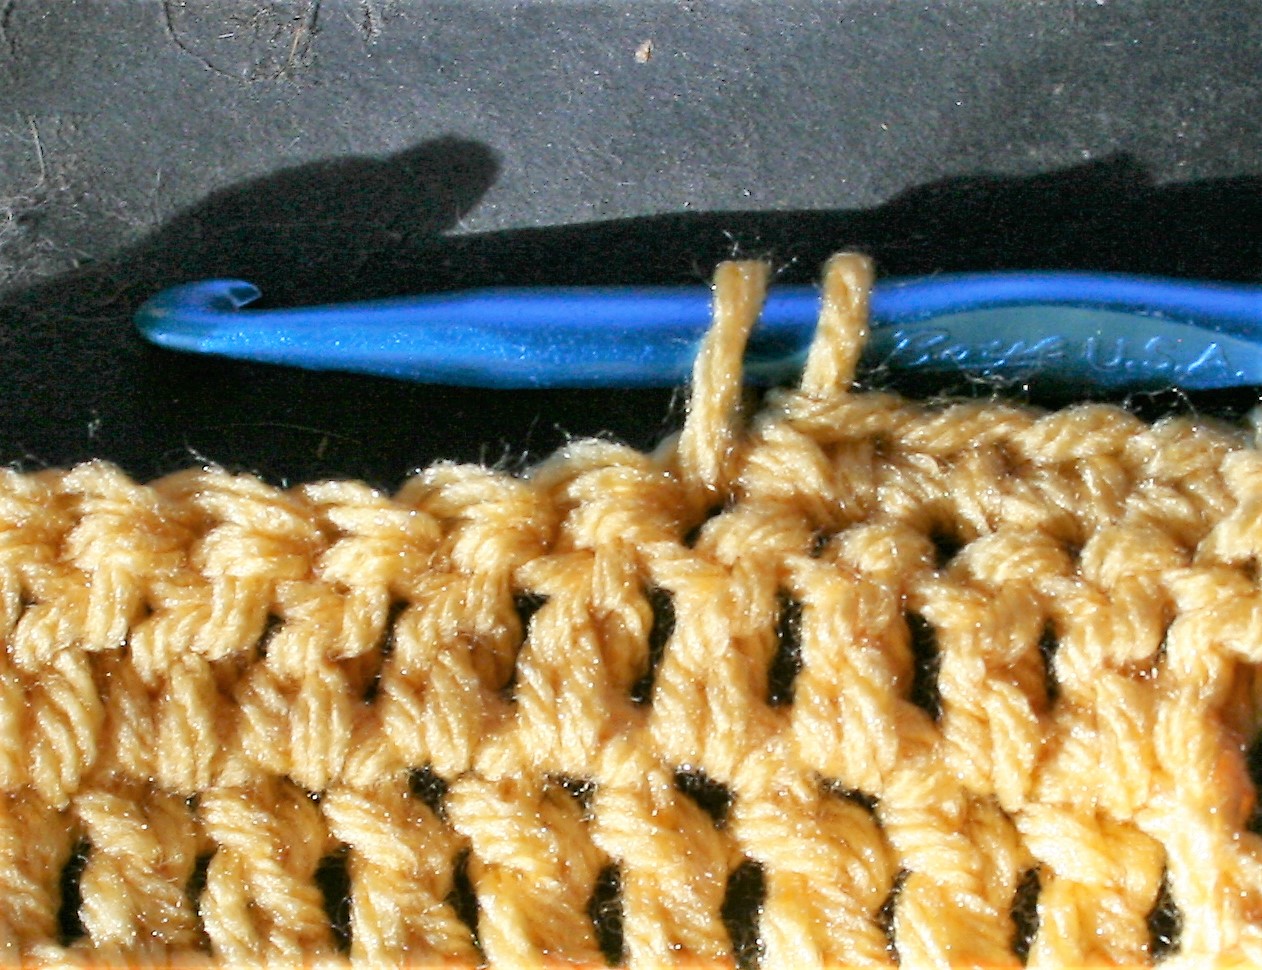
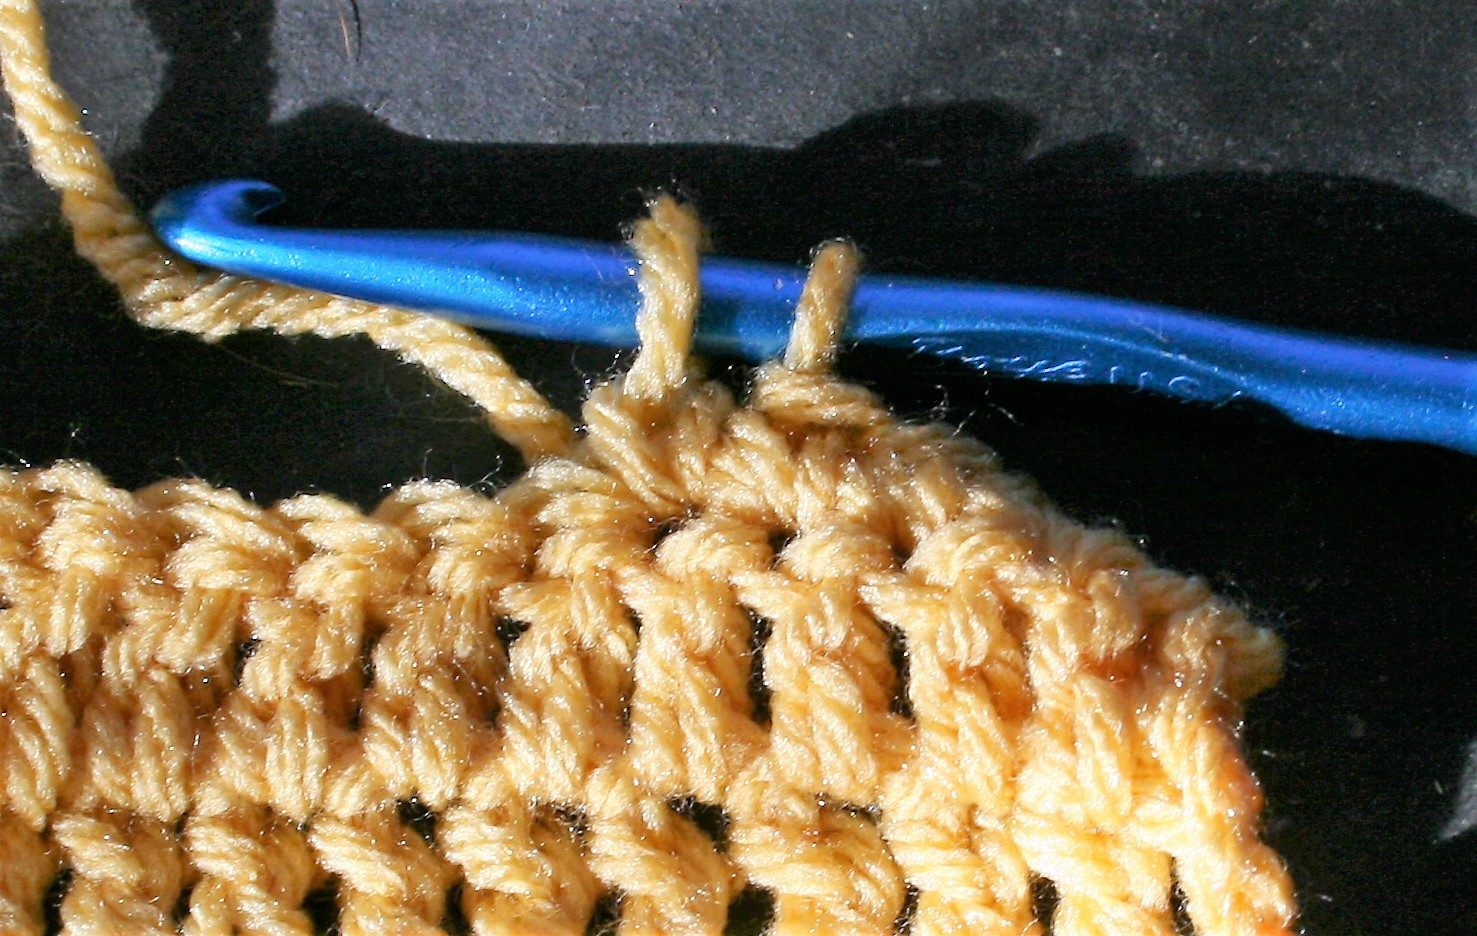
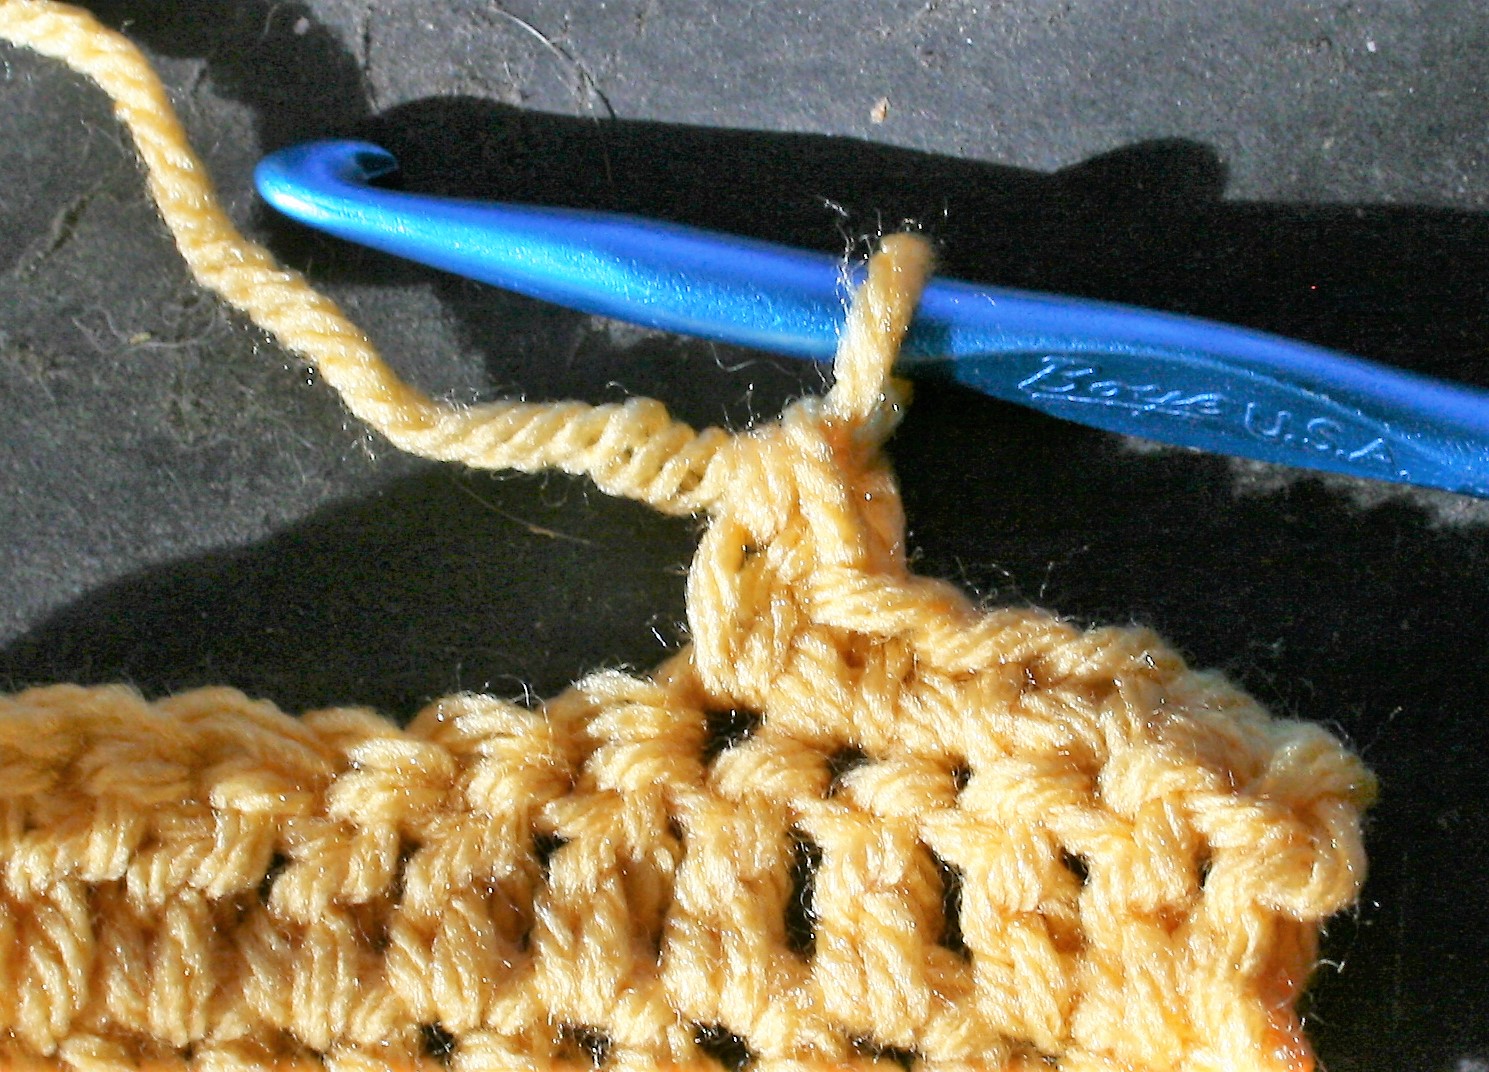
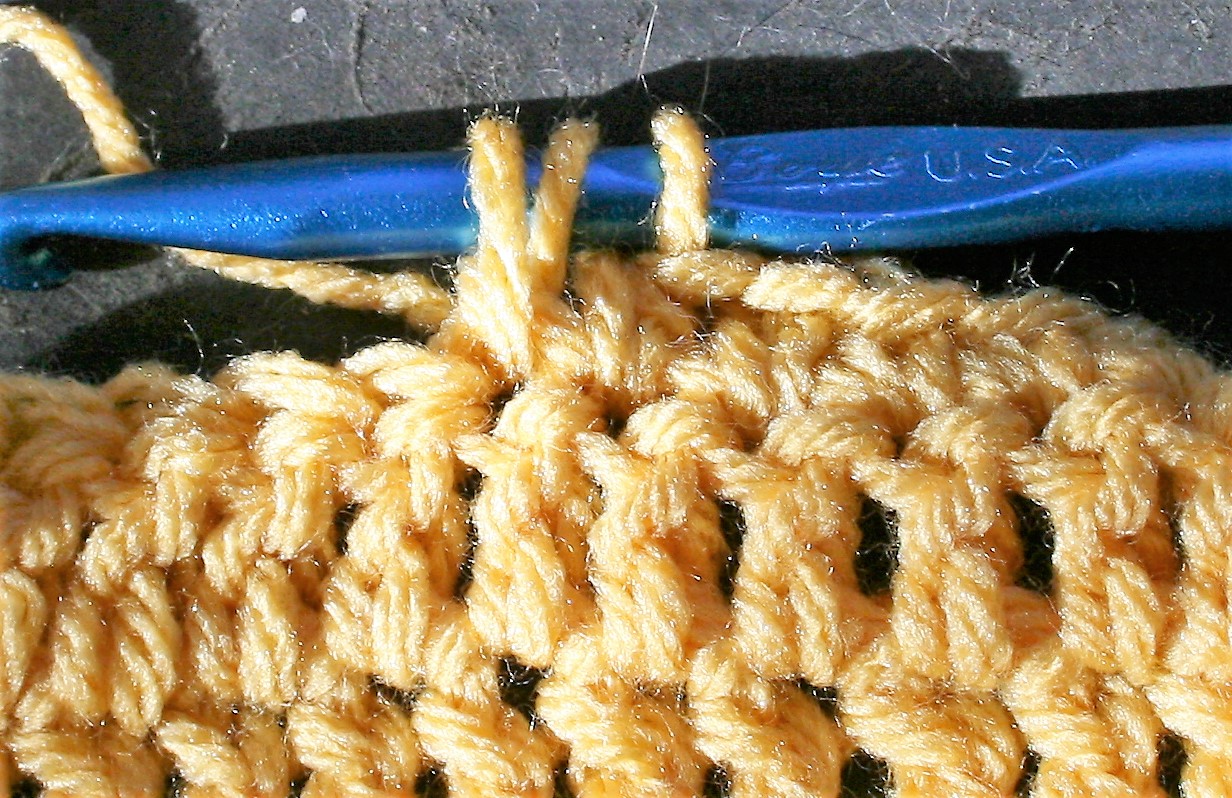
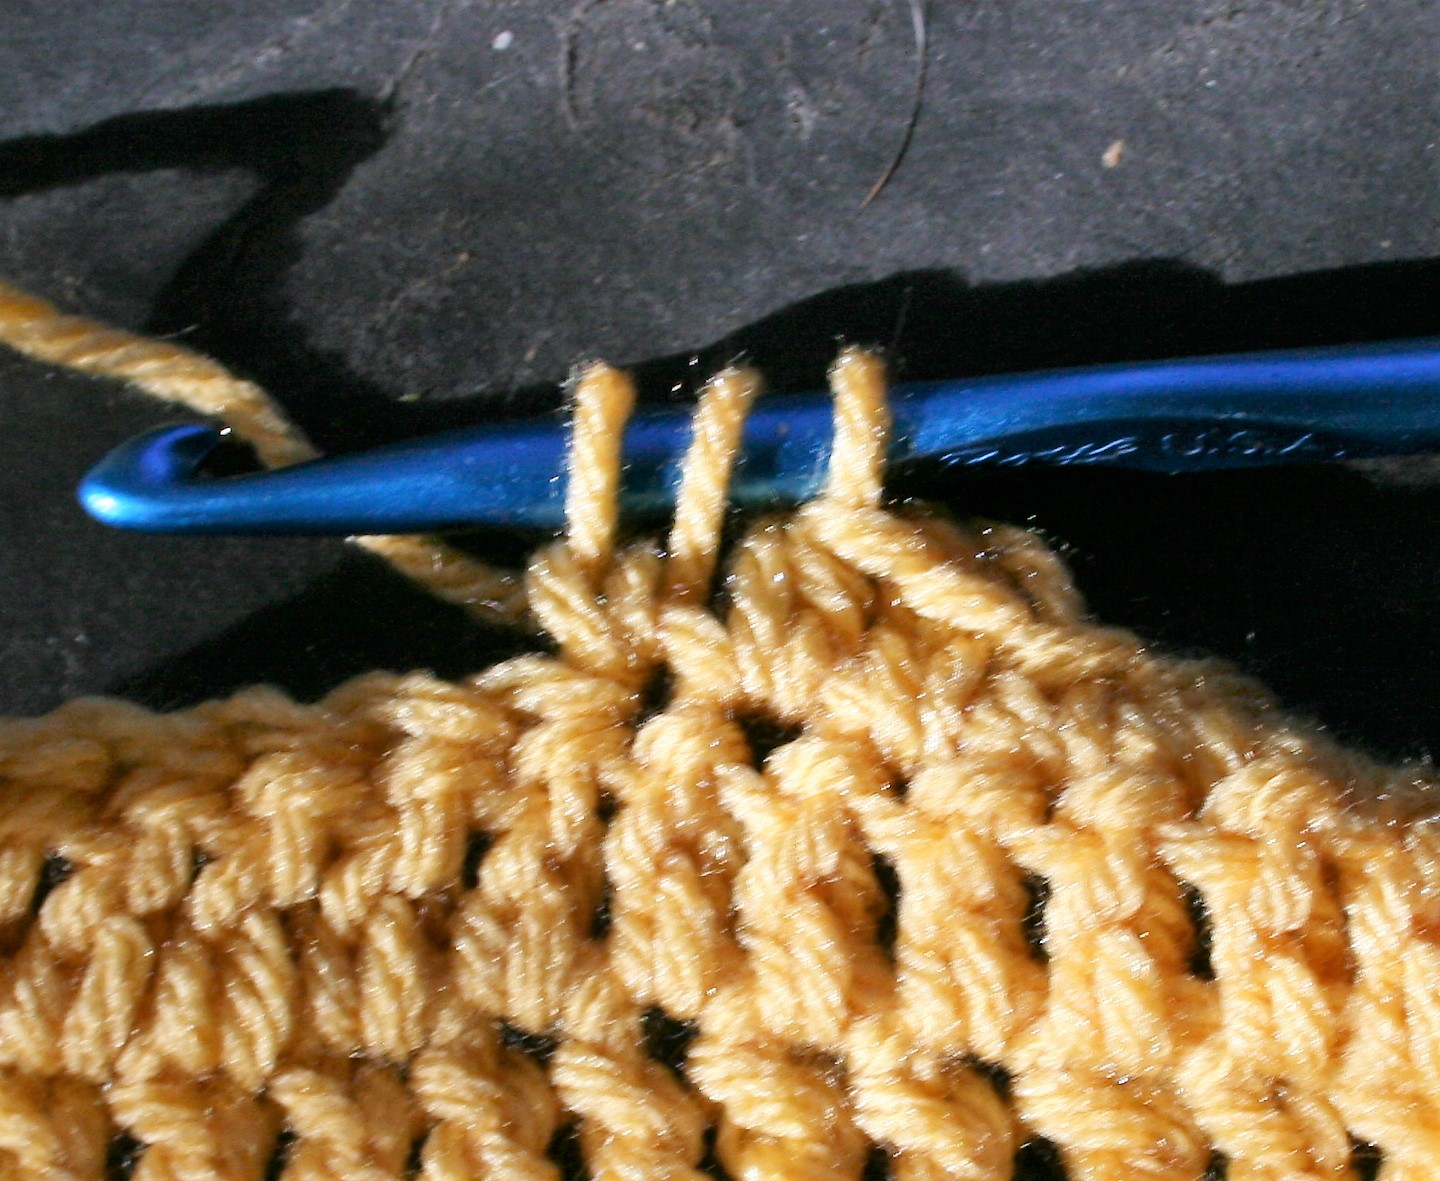
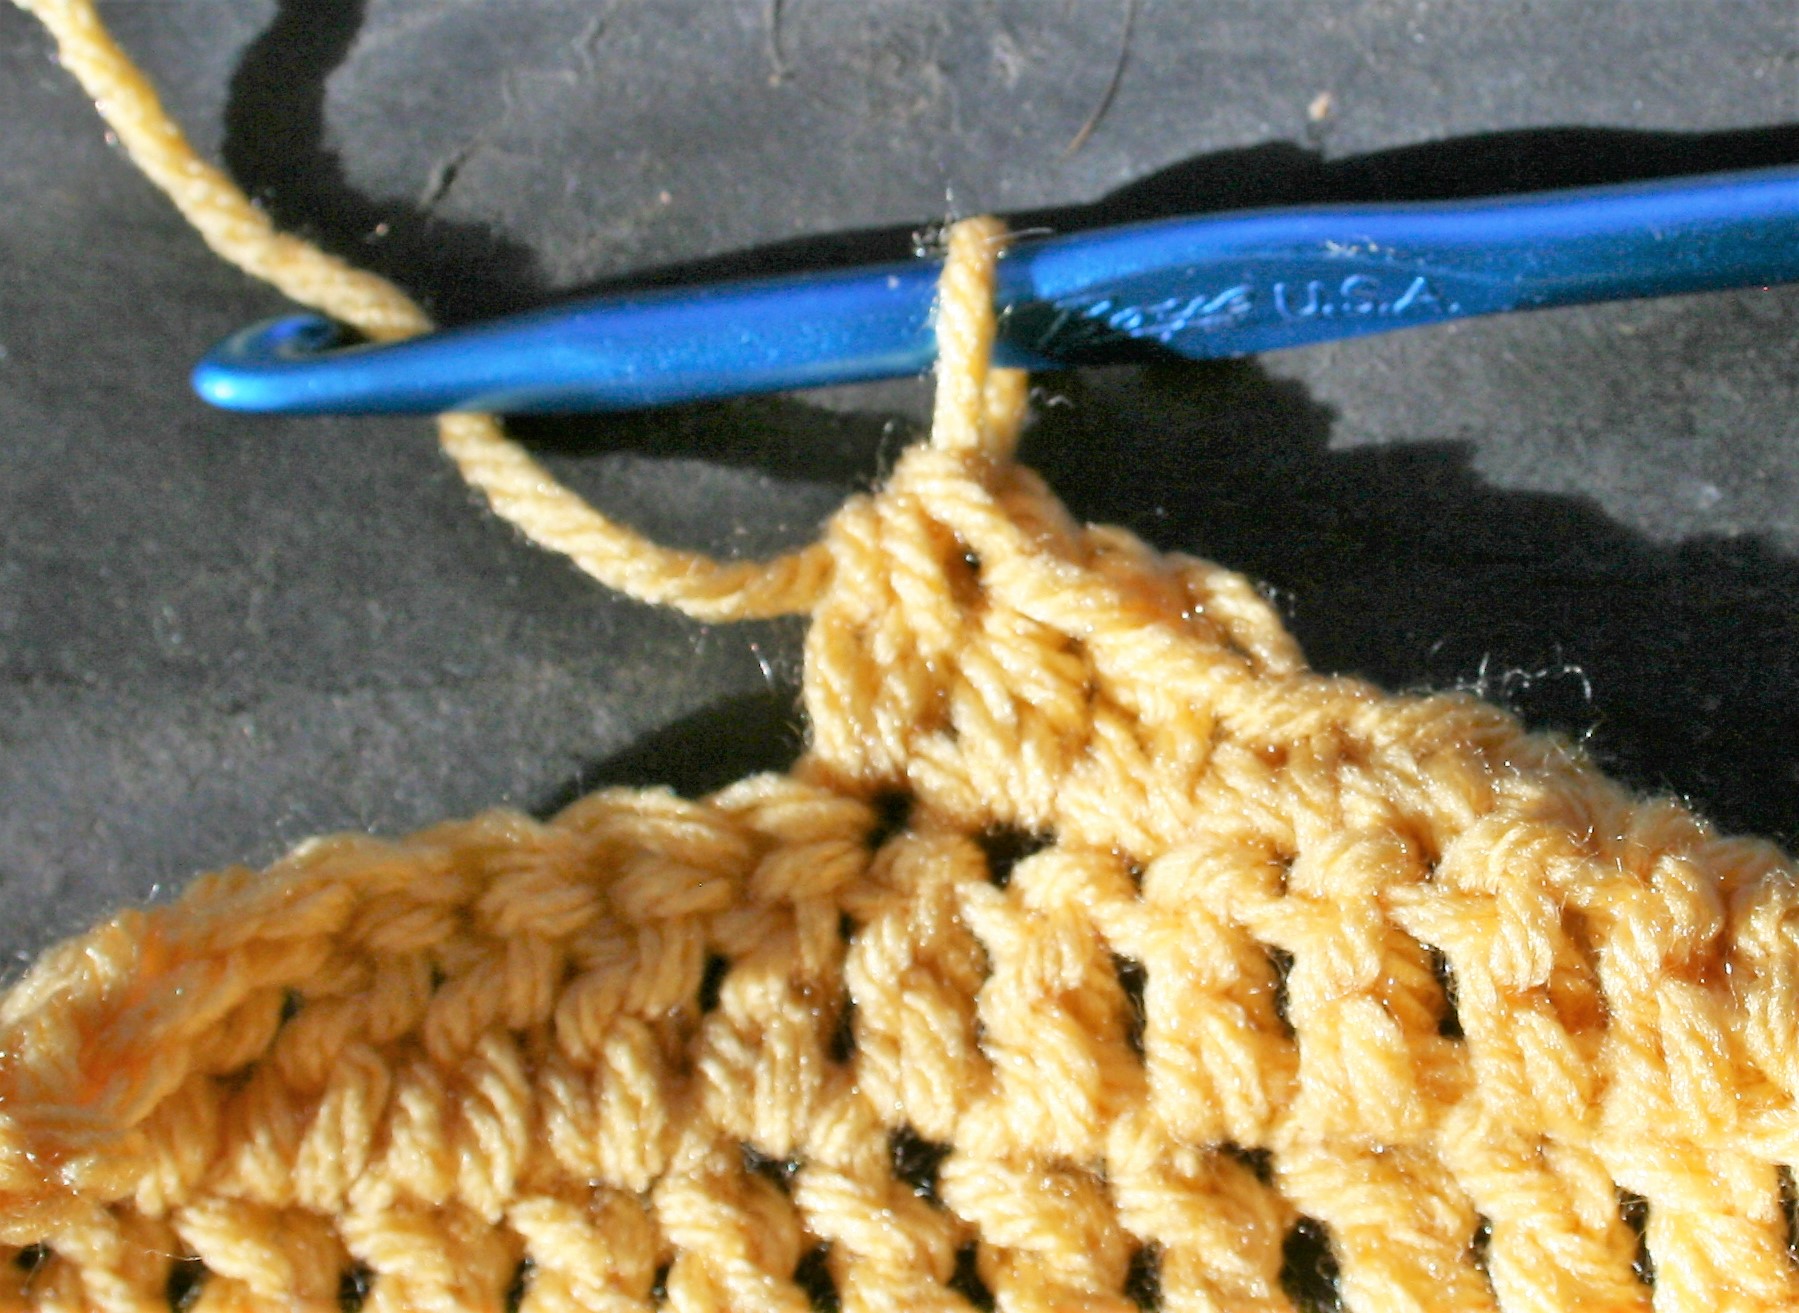
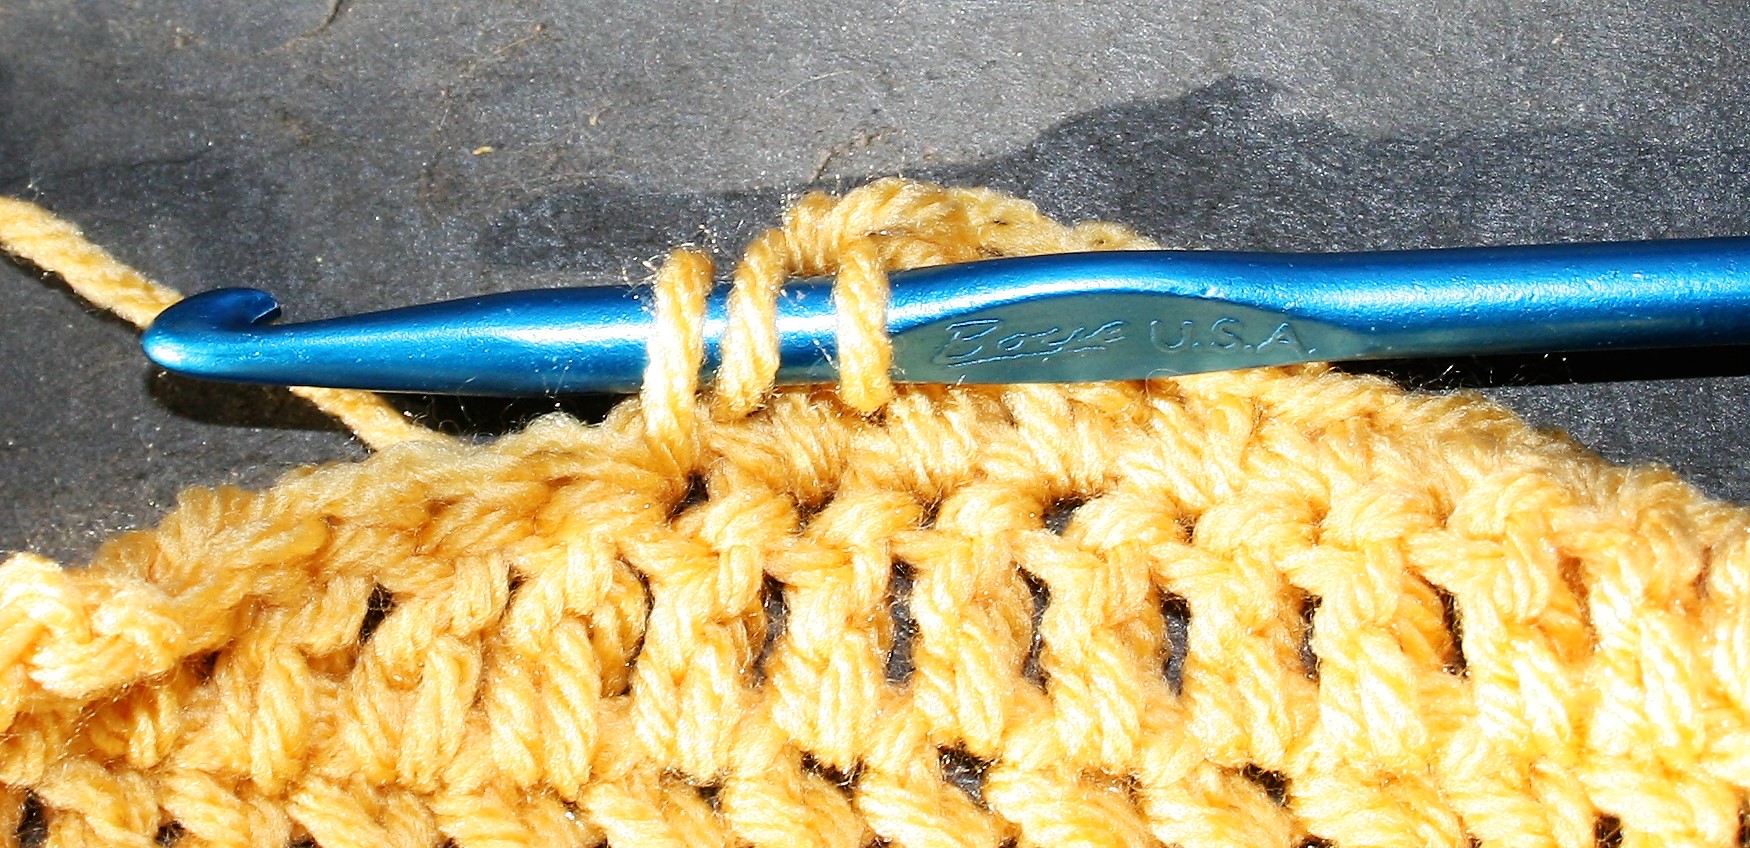
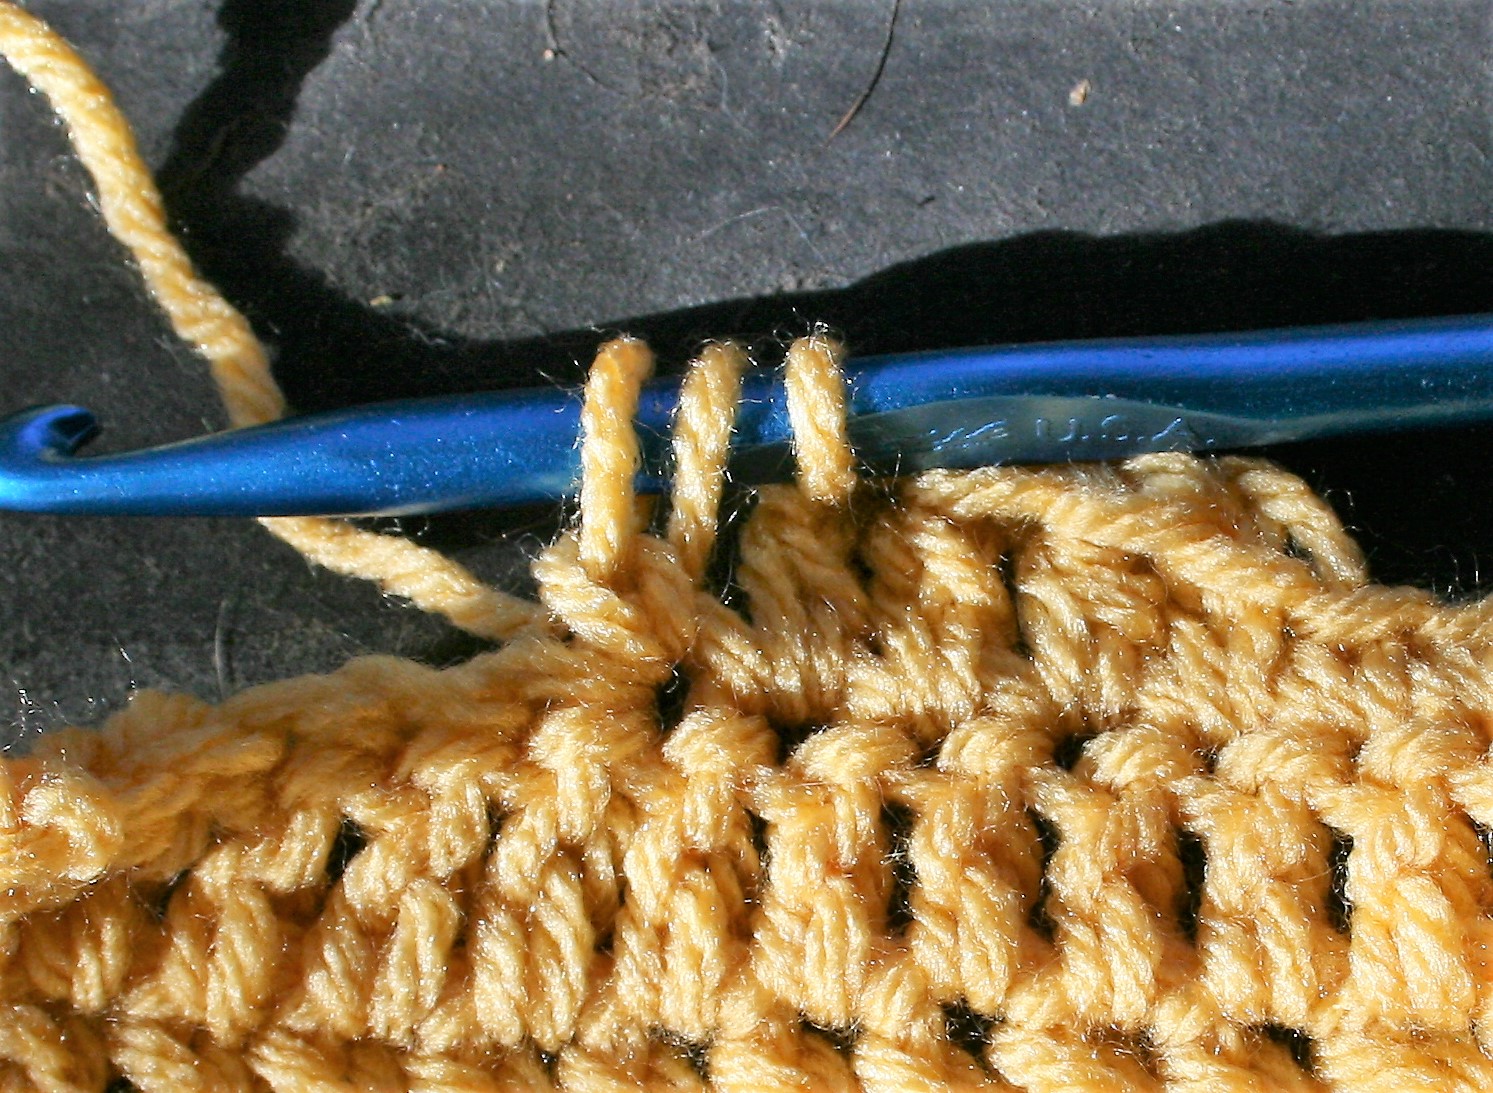
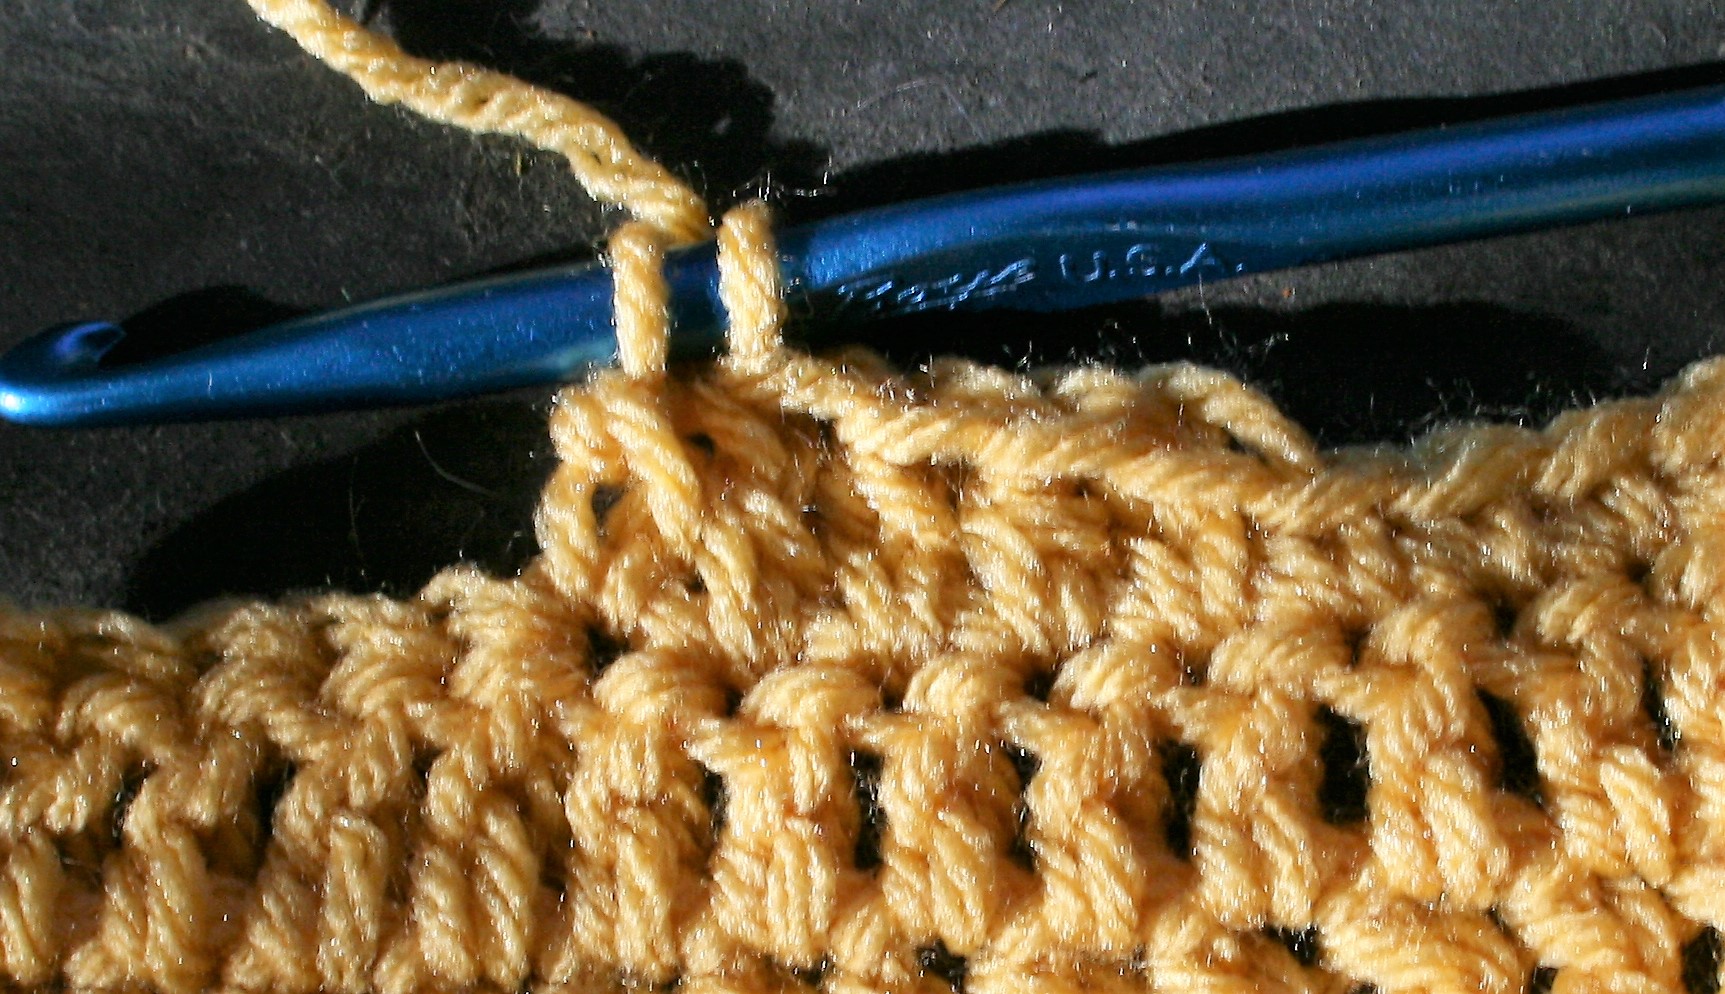
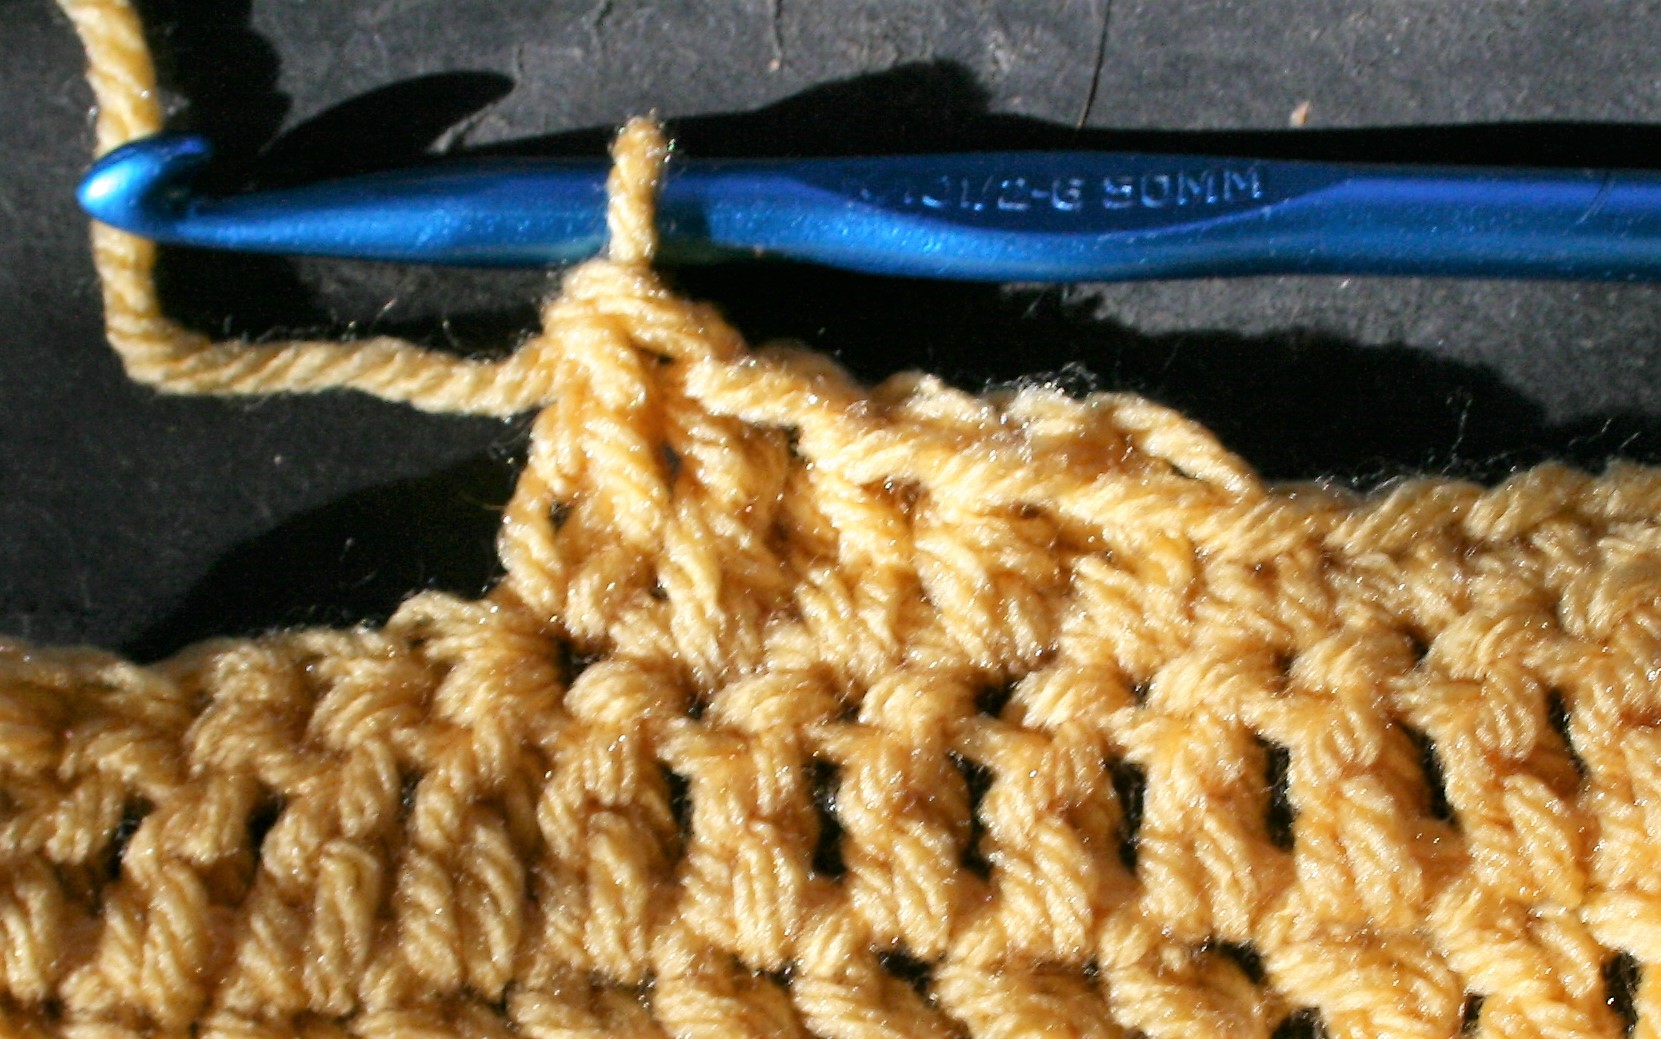
Long Loop Front Post Double Crochet (LLfpdc): Working over post stitch of previous round, YO, insert hook around post of stitch  2 rows below from back to front and right to left, YO, pull up a loop about an inch in height, (YO, pull through 2 loops) twice.

Note that you will work a double crochet and a post stitch in the same stitch.

Rnd1: With A, ch 4, 11 dc in 4th ch from hook, join to top of beg ch. -12 dc

Rnd 2: Ch 3 (counts as a dc, now and throughout), fpdc in same st, 2 dc in next st, [(dc, fpdc in next st), 2 dc in next st] rep around, join. -18 dc, 6 fpdc

Rnd 3: Change to B, ch 3, dc in next st, LLfpdc in same st as last, dc in next st, 2 dc in next st, [dc in next 2, LLfpdc in same st as last, dc in next st, 2 dc in next st] rep around, join. -30 dc, 6 LLfpdc

Rnd 4: Change to C, ch 3, dc in next 2 sts, LLfpdc in same st as last, dc in next 2 sts, 2 dc in next st, [dc in next 3, LLfpdc in same st as last, dc in next 2 sts, 2 dc in next st] rep around, join. -42 dc, 6 LLfpdc

Rnd 5: Change to D, ch 3, dc in next 3 sts, LLfpdc in same st as last, dc in next 3 sts, 2 dc in next st, [dc in next 4, LLfpdc in same st as last, dc in next 3 sts, 2 dc in next st] rep around, join. -54 dc, 6 LLfpdc

Rnd 6: Change to A, ch 3, dc in next 4 sts, LLfpdc in same st as last, dc in next 4 sts, 2 dc in next st, [dc in next 5, LLfpdc in same st as last, dc in next 4 sts, 2 dc in next st] rep around, join. -66 dc, 6 LLfpdc

Rnd 7: Change to C, ch 3, dc in next 5 sts, LLfpdc in same st as last, dc in next 5 sts, 2 dc in next st, [dc in next 6, LLfpdc in same st as last, dc in next 5 sts, 2 dc in next st] rep around, join. -78 dc, 6 LLfpdc

Rnd 8: Change to D, ch 1, sc in same st, [sc in next 4 sts, hdc in next 3 sts, dc in next 2 sts, (dc, ch 1, dc) in next st, dc in next 2 sts, hdc in next 3 sts, sc in next 6 sts] rep around, join. -40 sc, 24 hdc, 24 dc, 4 ch-1 sps

Rnd 9: Change to B, ch 1, sc in same st, [sc in next 7 sts, hdc in next 2 sts, dc in next st, (dc, ch 1, dc) in ch-1 sp, dc in next st, hdc in next 2 sts, sc in next 9 sts] rep around, join. -64 sc, 16 hdc, 16 dc, 4 ch-1 sps

Rnd10: Change to A, ch 1, sc in same st, [sc in next 9 sts, hdc in next 2 sts, (dc, ch 1, dc) in ch-1 sp, hdc in next 2 sts, sc in next 11 sts] rep around, join. -80 sc, 16 hdc, 8 dc, 4 ch-1 sps

Rnd 11: Ch 1, sc in same st, [sc in next 10 sts, hdc in next 2 sts, (dc, ch 1, dc) in ch-1 sp, hdc in next 2 sts, sc in next 12 sts] rep around, join. Fasten off. Block. Weave in ends. -88 sc, 16 hdc, 8 dc, 4 ch-1 sps

Cathy’s Classic Handbag- Make It For Me!

Thank you to ELK Studio for putting together this Make it For Me event! what a nice way to kick off the new year, after months of crocheting gifts for everyone else it is time to rejuvenate and focus a bit more inward and create something for you! (Check out the entire list of month long projects here)

I am thrilled to be able to join this event with my Cathy’s Classic Handbag. It is made with less than one skein, so you can reach into your stash. I even provided two options for handles…I really like the wooden round handles, but reality…I enjoy crocheting and getting to the craft store or even ordering on line means I am not finishing it the same day I start, so I provided a crochet handle option too. (If you want to learn how to attach the wooden handles, I have some instructions to help you here).

This handbag was inspired by one of my students. Cathy always has a smile and carries herself with a rural, country chic charm. She brightens the room no matter what her day may have contained, and to get all dressed up I could see her with this classic style.

Cathy’s Classic Handbag by: Linda Dean

A classic handbag that is fast to work up and has a lot of charm. A bit of stretch and a bell shape add to this great purse. With optional handle options you can utilize a simple round wooden handle or crochet your own. 

Skill Level: Advanced Beginner

Finished Size Approximately: 7”x 16” (18 x 40.5 cm)

Gauge: 12 sts /16 rows=4”

Materials List:

  • K/10 ½/6.50mm size crochet hook
  • Red Heart With Love medium weight 100% acrylic (370yds/338m/7oz/198g) Sample color: 1907 Boysenberry or #1971 Tigerlily
  • Tapestry needle
  • Everything Mary Round Wood Handle (optional)

Abbreviations:

blsc: back loop single crochet (need help identifying the back loop, check this out)

ch(s): chain(s)

rem: remaining

rep: repeat

sc: single crochet

sp(s): space(s)

st(s): stitch(es)

yo: yarn over

Pattern Notes

The body of the bag is worked from one side across the bottom to the other side.

The body of the bag is worked with short rows.

The handles of the bag are attached to the row ends of the bag.

There are 2 options provided for handles.

Row 1: Ch 45, sc in 2nd ch from hook, sc in each ch across, turn. -44 sc

Row 2: Ch 1, sc in next 5 sts, blsc in next 34 sts, leaving rem sts unworked, turn.  -39 sc

Row 3: Ch 1, blsc in next 34 sts, leaving rem sts unworked, turn. -34 sc

Row 4: Ch 1, blsc in next 34 sts, sc in next 5 sts of the row 2 below, turn. -39 sc

Row 5: Ch 1, sc in next 5 sts, blsc in next 34 sts, sc in next 5 sts of the row 2 below, turn. -44 sc

Row 6-61: Rep Rows 2-5 fourteen times.

Wooded Handle Attaching (Option 1)

Working along the row ends, sc around the wooden handle, working 32 sc across edge. Fasten off. (For tips on how to work around the handle, check out this tutorial)

Repeat on opposite side.

Crochet Handle Attaching (Option 2)

Ch 1, working along the row ends, 4 sc in first row end, working in a spiral (meaning that you are working in the round but are not joining the round, you continue working in the next stitch) to create a cord, blsc in the first sc worked in the end row, blsc in each sc until the cord measures about 14” (35.5cm), sl st to opposite end row from the beginning of the cord, sl st next 3 sts of cord to same st, sc in each row end across to beginning of the cord, fasten off.

Seaming

Folding handles together, whip stitch the open ends of the purse leaving between 1-2” open from the handles.

Weave in ends.

Scrap Use Free Pattern

I just completed the Craftvent CAL from Jimmy Beans Wool (if you missed it, but want to work up the pattern, find details here). When I was done, I had several little yarn ball left overs, so I had to find something to do with them.

Yes, I am one of those crocheters, the type that does not like to waste any yarn. This means that I have options for scrap projects. With these left over bits, from the “Sugar Plum” colors of the project already go really well together, so visually anything will look pretty good.

I started out thinking I would make a little draw string bag, but as I got into the project I realized that I had enough yarn to actually make a hat, and a hat is going to get a bit more wear in my household.

I have shared this scrap pattern below, and the notation of how you can turn this into a drawstring bag.

Please note that I do not have any length of the yarn used noted, as really it is just scraps. You could put any colors together anyway you want.

I used an H/8/5.00mm hook and light weight yarns (for a listing of the yarns in the projects, they are the same as the yarns in the Craftvent Quest Shawl, listed here). To help you hat fit perfectly, I share information here.

Scrap Hat

Rnd 1: Ch 4, 11 dc in 4th ch from hook, sl st to join to beg ch.

Rnd 2: Ch 3, dc in same st, 2 dc in each st around, sl st to join.

Rnd 3: Ch 3, dc in same st, dc in next st, [2 dc in next st, dc in next st] rep around, sl st to join.

Rnd 4: Ch 3, dc in same st, dc in each of the next 2 sts, [2 dc in next st, dc in next 2 sts] rep around, sl st to join.

Rnd 5: Ch 3, dc in same st, dc in each of the next 3 sts, [2 dc in next st, dc in next 3 sts] rep around, sl st to join.

Rnd 6: Change color, ch 1, 2 sc in back loops of same st, sc in back loops of next 4 sts, [2 sc in back loops of next st, sc in back loops of next 4 sts] rep around, sl st to join.

Rnd 7: Change color, ch 1, 2 sc in back loops of same st, sc in back loops of next 5 sts, [2 sc in back loops of next st, sc in back loops of next 5 sts] rep around, sl st to join.

Rnd 8: Change color, ch 3, dc in back loop of same st, dc in back loop of next 6 sts, [2 dc in back loop of next dc, dc in back loop of next 6 sts] rep around, sl st to join.

Rnd 9: Change color, ch 3, dc in each st around, sl st to join.

Rnd 10: Change color, ch 1, sc in back loop of each st around, sl st to join.

Rnd 11: Change color, ch 3, dc in back loop of each st around, sl st to join.

Rnd 12: Change color, ch 3, dc in each st around, sl st to join.

Rnd 13: Ch 3, dc in each st around, sl st to join.

Rnd 14: Ch 3, dc in each st around, sl st to join.

Rnd 15: Change color, ch 1, sc in back loop of each st around, sl st to join.

Rnd 16: Change color, ch 1, sc in back loop of each st around, sl st to join.

Rnd 17: Change color, ch 3, dc in back loop of each st around, sl st to join.

Rnd 18: Change color, ch 3, dc in each st around, sl st to join.

Rnd 19: Change color, ch 1, sc in back loop of each st around, sl st to join.

Rnd 20: Change color, ch 3, dc in back loop of each st around, sl st to join.

Rnd 21: Change color, ch 3, dc in each st around, sl st to join.

Rnd 22: Change color, ch 1, sc in back loop of each st around, sl st to join.

Rnd 23: Change color, ch 1 sc in back loop of each st around, sl st to join. Fasten off. Weave in ends.

Simple Bag

Work as for Hat in Rnds 1-19.

Rnd 20: Change color, ch 4, sk next dc, dc in next st, ch 1, sk 1, [dc in next st, ch 1, sk 1] around, sl st to join.

Rnd 21: Change color, ch 3, dc in each st and ch-sp around, sl st to join.

Rnd 22: Change color, ch 1, sc in back loop of each st around, sl st to join.

Rnd 23: Change color, ch 1 sc in back loop of each st around, sl st to join. Fasten off. Weave in ends.

Drawstring

Create a chain about 50” long, turn and sl st in each ch across, fasten off.

Weave drawstring through the ch-sps of Rnd 20, then weave ends around to opposite side, ensuring that the tie is wrapped around the bag twice. Tie ends of drawstring together, and pull pull closed.


Adding Some Height with Extended Stitches

When I am teaching I find that if my students make a mistake, it is because they are attempting something more advanced than they had learned. One such “more advanced stitch” is working Extended Stitches.

Extended stitches are a great way to make more gentle curves, or even help make gauge, and they are pretty easy to create. The technique of extending can be used with any crochet stitch, and only adds one additional step.

To create the stitch you start whichever stitch you are work, just as you always do. Meaning if you are creating a single crochet, insert you hook in the indicated stitch, yarn over and pull through; if you are creating double crochet, yarn over then insert in you hook in the indicated stitch, yarn over and pull through. The extension happens right after the “yarn over and pull through”, this is the point in a stitch that I refer to as “anchoring” as it secures the stitch being created to fabric being created.

After “anchoring the stitch” you yarn over and pull through a loop, essentially creating a chain. Then you complete the stitch as usual. This little added chain gives a little extra height to the stitch, however it does not make it as tall as the next typical stitch in crochet. This helps create a gentler curve in a gradual stitch taper.

There is only a slight difference in the appearance of these extended stitches, and that is a little extra “v” at the base of the stitch post.

Steps for working typical crochet stitches, note: all photo examples are worked to the left of the typical version of the stitch for comparison:

Extended Single Crochet (esc):

Insert hook into indicated stitch, yarn over pull through a loop to anchor, chain one, yarn over and pull through 2 loops.

Extended Half Double Crochet (ehdc):

Yarn over, insert hook into indicated stitch, yarn over pull through a loop to anchor, chain one, yarn over and pull through 3 loops.

Extended Double Crochet (edc):

Yarn over, insert hook into indicated stitch, yarn over and pull through a loop to anchor, chain one, yarn over pull through 2 loops, yarn over pull through 2 loops.

Holiday Stashdown- Moebuis Cowl, Free Pattern

Wow! How is it already December? Thank you for joining me as part of the Holiday Stash Down. Check out all 15 designs, that have been released each Monday since September in an effort to help everyone get ready for the holidays.

Today I am sharing the Vas’s Hug Moebius Cowl, you could really call if an infinity scarf too, but either way I think you will enjoy it. It is worked with 2 skeins of Paintbox Yarns Simply DK, I used 2 contrasting yarns for a nice visual.

It is worked up as a long rectangle, with color changes on the same side so you can do yarn carries. Then it is seamed and edged. The Row repeat is simple, so you can finish up this project quickly and have it ready in time for you holiday gift giving.

Enjoy!

Vas’s Hug Moebius Cowl

Materials: 

*Hook size I/9/5.5mm

*Paint Box Yarns Simply DK, light weight, 100% acrylic yarn (3.5oz/100g/302yrd/276m), 1 skein each of color  #142 Tea Rose(A) & 105 Slate Gray(B)

Gauge: 4 (2dc, ch 2, sc) stitches/ 6 rows=4″ (10cm)

Finished Size: 10″ x 72″ (25 x 183 cm)

Pattern Notes:To weave in fewer ends, simply carry the yarn changes up the edge of the cowl. When working the edging you will crochet of these “yarn carries”. (Check out an example here)

If you need more visuals for working this stitch pattern, you can find it listed as the “Titter Tat” stitch here, on my blog.

Row 1: With B, ch 42, sc in 2nd ch from hook, [ch 4, sk 3 ch, sc in next ch] 10 times, turn. -10 ch -4 sps

Row 2: (2dc, ch 3, sc) in each ch-4 sp across, turn.

Row 3: (2 dc, ch 3, sc) in each ch-3 sp across, change to color A, turn.

Row 4: (2 dc, ch 3, sc) in each ch-3 sp across, turn.

Row 5: (2 dc, ch 3, sc) in each ch-3 sp across, change to color B, turn

Row 6: (2 dc, ch 3, sc) in each ch-3 sp across, turn

Rows 7-106: Rep Rows 3-6 twenty five times

Row 107: Rep Row 3

Row 108: Rep Row 4

Row 109: (Joining Row) Lay fabric out flat, turn Row 108 around and fold fabric so that Row 108 and Row 1 are together (the twist adds the Moebius), (2dc, ch 1, sl st to around skipped ch-3 of beg ch adjacent to row, ch 1, sc) in each ch-3 sp across. Fasten off.

Edging

Rnd 1: With Color B join to any stitch on any edge, ch 1, evenly sc around (because of the twist placed to create the Moebius, this one edge will continue all the way around both sides of the cowl), sl st to join, change color A, turn.

Rnd 2: Ch 1, sc in each st around, sl st to join. Fasten off, weave in ends, block.