Moorish Tiles Square- Moogly CAL 2020

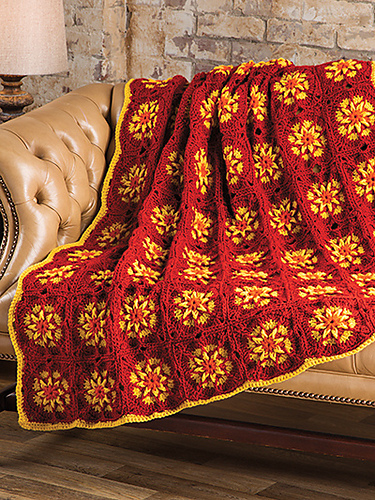
I love starting off the year with the Moogly CAL! It is a great year long project that makes new squares every two weeks. By the end of the year, you have an afghan. It is always a fun project with many inspirational squares.

I am fortunate enough to share my square with you. To check out all the others make sure and follow along here.

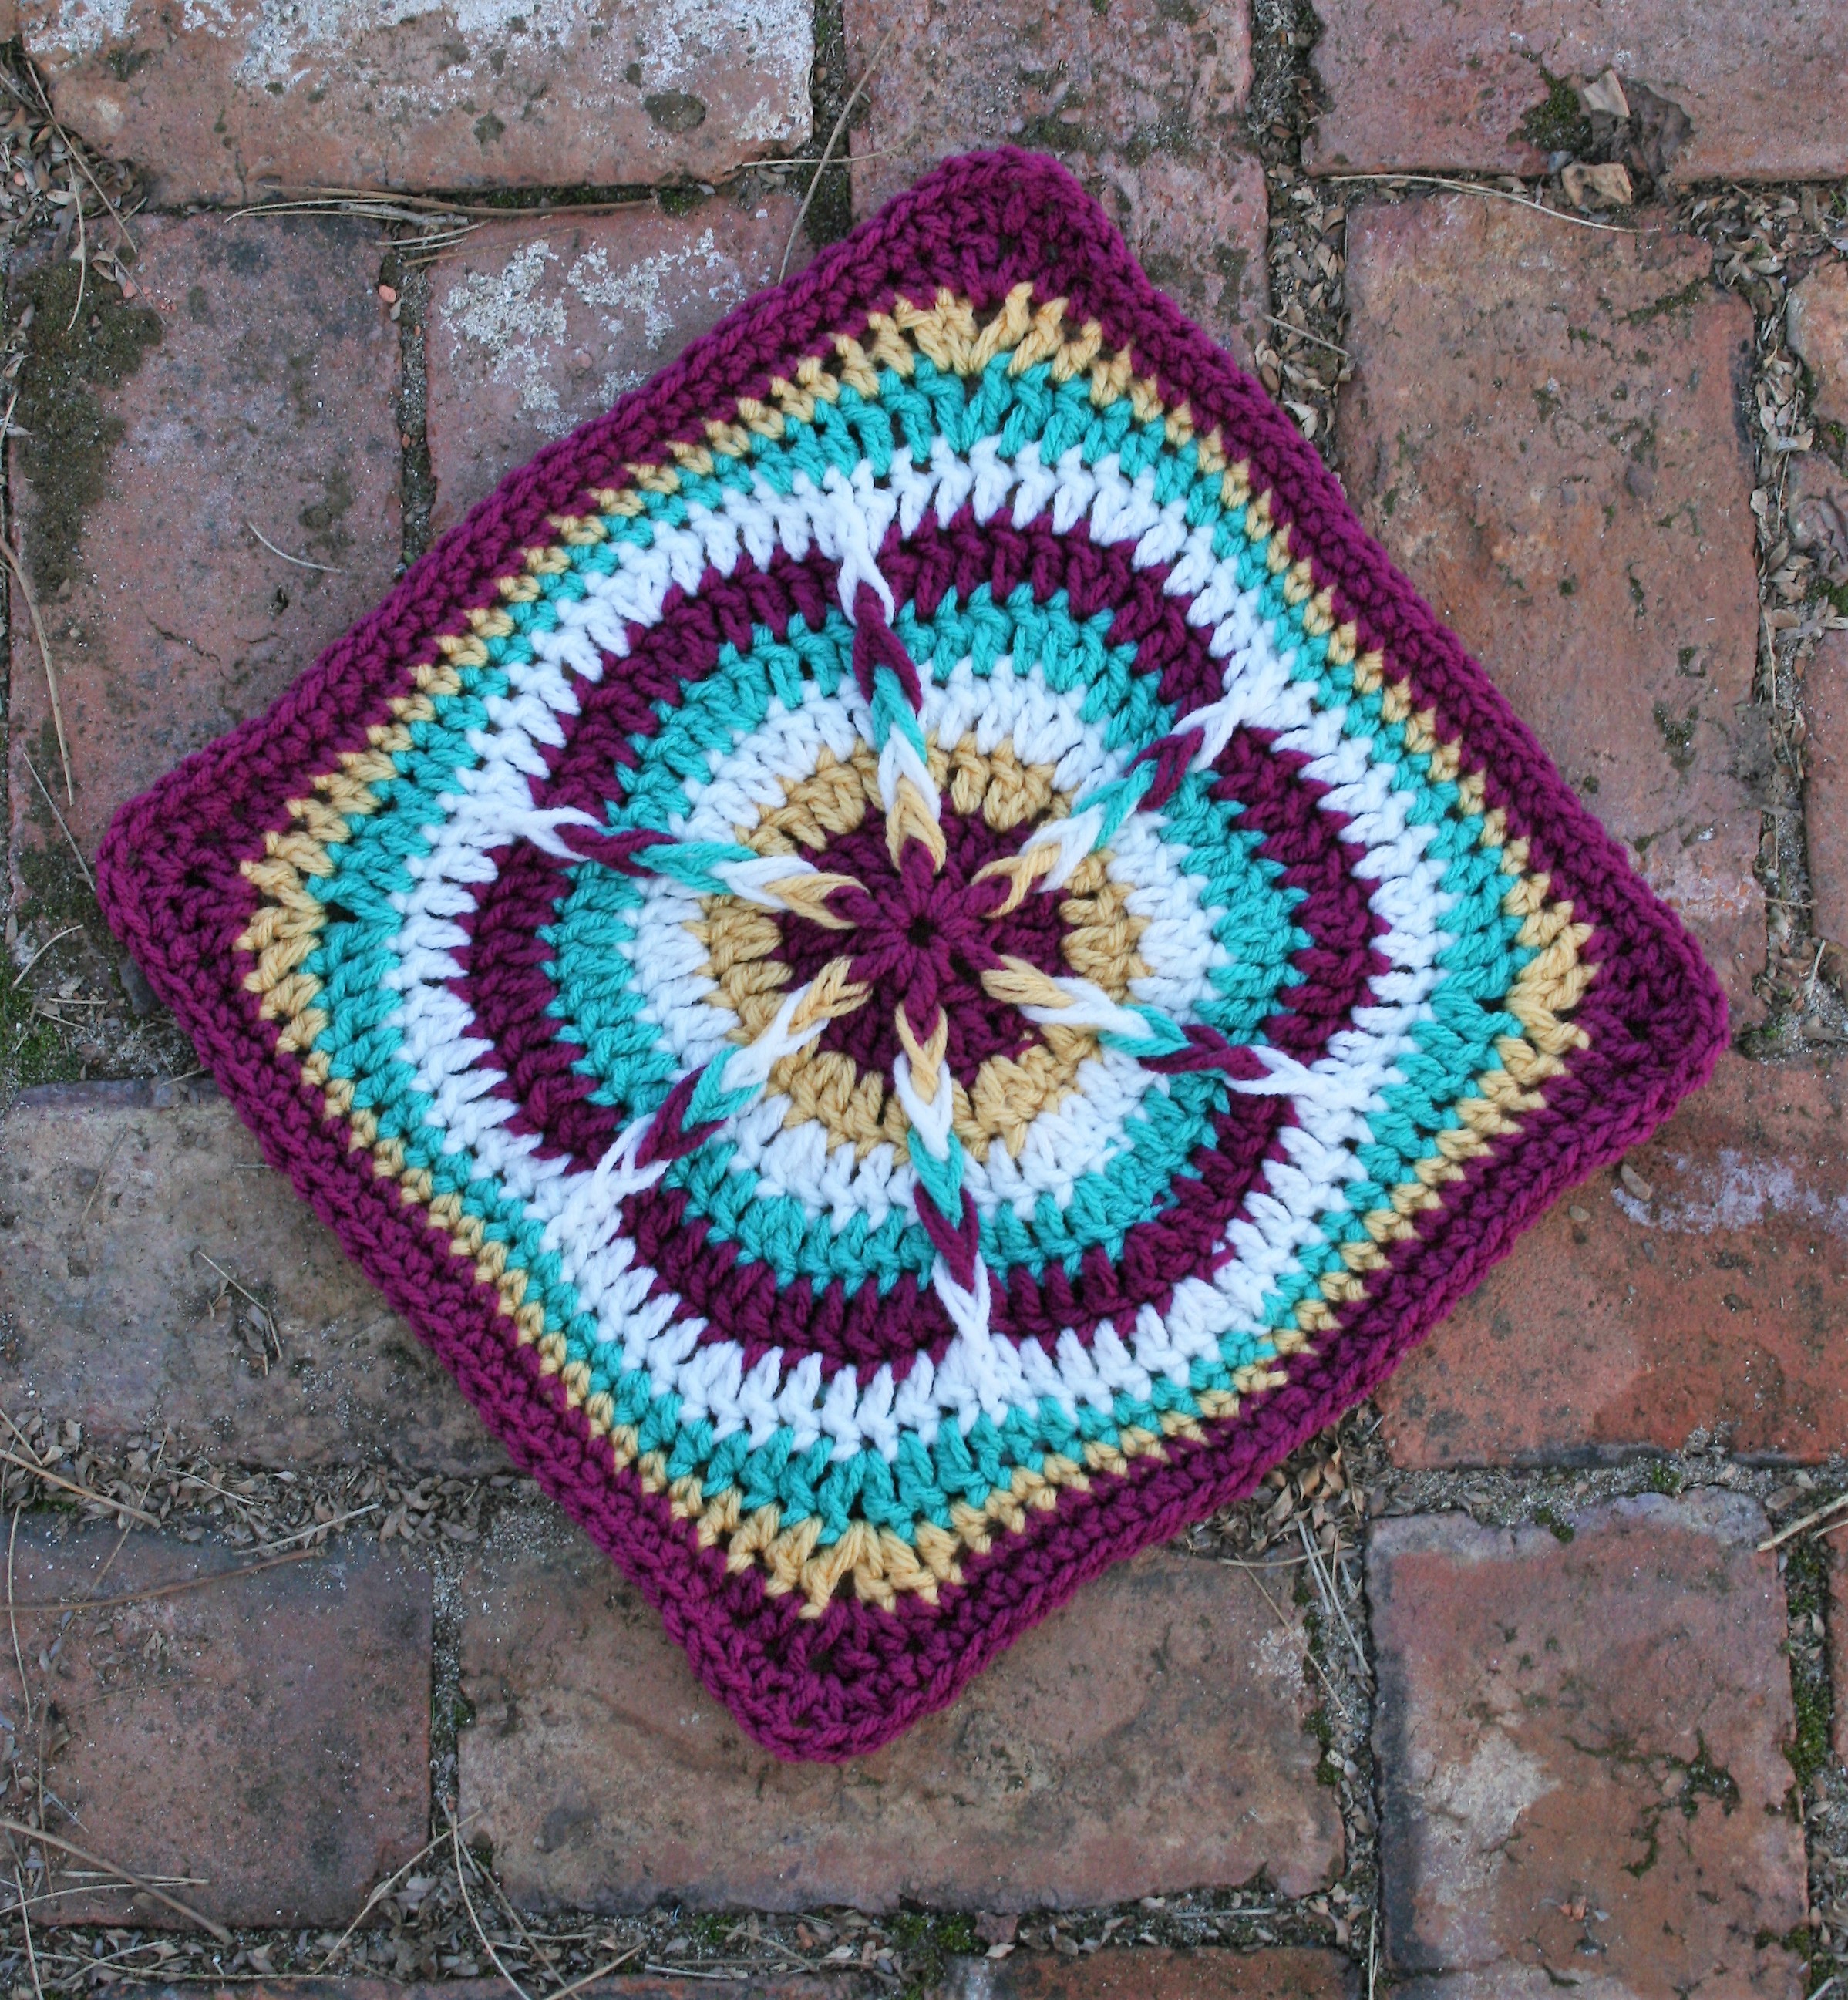
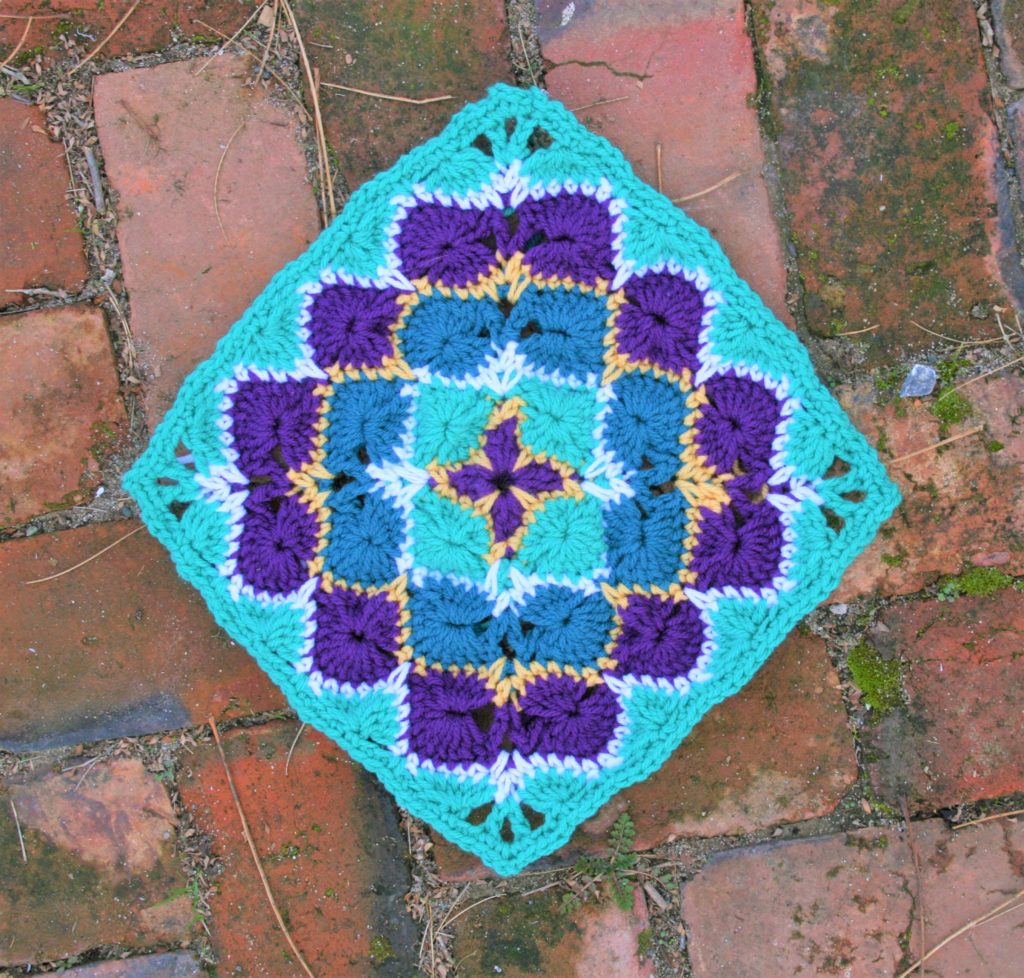
This square uses a stitch often called a Catherine Wheel. Essentially it is a row of decrease, and a row of large shell worked in the center of the decrease. This makes a circle in the fabric. Learn more about this technique with my free charity square, 1 for Me, 1 For You- Rolling Along.

I have been playing with this stitch a bit lately. Taking a liking to working a contrasting color row between the “circles”, I have also found that by working slip stitches where this classic stitch works single crochets, creates a bit of a tighter fabric. This is beneficial, as sometimes this stitch technique can become a bit open and “gappy” at the edges of the circles.

The name really came from how the design struck me. It has reminded me of the mosaics I have seen in art books, and inspires me to want to travel.

Moorish Tiles Square

Materials

*Red Heart With Love, #1542 Aubergine (A), #1207 Cornsilk (B), #1562 Jadeite (C), #1001 White (D), #1623, Mallard (E)

*Hook J/10/ 6.00mm

Gauge

12”x 12” square (30.5 x 30.5cm)

Special Stitches

Double Crochet 6 Together (dc6tog): Working over the next 6 sts, [yo, insert hook into next st, yo, pull up a loop, yo, pull through 2 loops] six times, yo, pull through all 7 loops on hook.

Double Crochet 7 Together (dc7tog): Working over the next 7 sts, [yo, insert hook into next st, yo, pull up a loop, yo, pull through 2 loops] seven times, yo, pull through all 8 loops on hook.

Double Crochet 9 Together (dc9tog): Working over the next 9 sts, [yo, insert hook into next st, yo, pull up a loop, yo, pull through 2 loops] nine times, yo, pull through all 10 loops on hook.

Notes/Tips

Single crochet stitches are worked over slip stitches, this may be up to 3 rows, creating a break in color.

When working the last round, work the single crochet stitches into the chain stitches and not the space (with the exception of the corners), so as not to create open gaps.

Learn how to work a Standing Single Crochet here.

The Pattern

Rnd1: With A, ch 4, sl st to first ch to create ring, (ch 5 counts as dc + ch 2, [2 dc, sl st, 2 dc, ch 2] three times, 2 dc, sl st, dc, sl st to 3rd ch of beg ch) in the ring. Fasten off. -16 dc, 4 sl st, 4 ch-2 sps

First Round with Single Crochet over Slip Stitches

Rnd 2: With B, join with a standing sc in any ch-2 sp see notes to work a Standing Single Crochet, ch 2, sc in same sp, [sc in next 2 dc, sc over sl st  in ring, sc in next 2 dc, (sc, ch 2, sc) in ch-2 sp] three times, sc in next 2 dc, sc over sl st in ring, sc in next 2 dc, join. Fasten off. -28 sc, 4 ch-2 sps

Rnd 3: With C, join with a sl st in any ch-2 sp, ch 2, sl st in same sp, [ch 3, dc7tog, ch 3, (sl st, ch 2, sl st) in ch-2 sp] three times, ch 3, dc7tog, ch 3, join in ch-2 sp. -4 dc7tog, 8 sl sts, 4 ch-2 sps

Rnd 4: ch 2, sl st in same sp, [9 dc in center dc7tog, (sl st, ch 2, sl st) in ch-2 sp] three times, 9 dc in center dc7tog, join. Fasten off. -36 dc, 8 sl st, 4 ch-2 sps

Second Round with Single Crochet over Slip Stitches

Rnd 5: With D, join with a standing sc in any ch-2 sp, ch 2, sc in same sp, sc over sl st into sp 3 rows below, [sc in each st to next sl st, sc over sl st into sp 3 rows below, (sc, ch 2, sc) in ch-2 sp, sc over sl st into sp 3 rows below] three times, sc in each st to next sl st, sc over sl st into sp 3 rows below, join. Fasten off. – 52 sc, 4 ch-2 sps

Rnd 6: With E, join to any ch-2 sp, ch 5 counts as dc + ch 2, dc in same sp, [ch 3, dc6tog, ch 3, sl st in next st, ch 3, dc6tog, ch 3, (dc, ch 2, dc) in ch-2 sp] three times, ch 3, dc6tog, ch 3, join to 3rd ch.  – 8 dc6tog, 4 sl st, 4 (dc, ch 2, dc)

Rnd 7: Sl st in ch-2 sp, ch 2, sl st in same sp, [9 dc in dc6tog, sl st in next sl st, 9 dc in dc6tog, (sl st, ch 2, sl st) in next ch-2 sp] three times, 9 dc in dcs6tog, sl st in next sl st, 9 dc in dc6tog, join. Fasten off. -72 dc, 12 sl st, 4 ch-2 sps

Third Round with Single Crochet over Slip Stitches

Rnd 8: With B, join with a standing sc in any ch-2 sp, ch 2, sc in same sp, [sc over sl st into sp 3 rows below, sc in each st to next sl st, sc over sl st into st 3 rows below, sc in each st to next sl st, sc over sl st into sp 3 rows below, (sc, ch 2, sc) in ch-2 sp] three times, sc over sl st into sp 3 rows below, sc in each st to next sl st, sc over sl st into st 3 rows below, sc in each st to next sl st, sc over sl st into sp 3 rows below, join. Fasten off. -92 sc, 4 ch-2 sps

Rnd 9: With A, join in any ch-2 sp, ch 5 counts as dc + ch 2, dc in same sp, [ch 3, dc6tog, ch 3, sl st in next st, ch 3, dc9tog, ch 3, sl st in next st, ch 3, dc6tog, ch 3, (dc, ch 2, dc) in ch-2 sp ] three times, ch 3, dc6tog, ch 3, sl st in next st, ch 3, dc9tog, ch 3, sl st in next st, ch 3, dc6tog, ch 3, join to 3rd ch. – 4 dc9tog, 8 dc6tog, 8 sl sts, 4 (dc, ch 2, dc)

Rnd10: Sl st in ch-2 sp, ch 2, sl st in same st, [9 dc in dc6tog, sl st in next sl st, 9 dc in dc9tog, sl st in next sl st, 9 dc in dc6tog, (sl st, ch 2, sl st) in ch-2 sp] three times, 9 dc in dc6tog, sl st in next sl st, 9 dc in dc9tog, sl st in next sl st, 9 dc in dc6tog, join. Fasten off. – 108 dc, 16 sl sts, 4 ch-2 sps

Fourth Round with Single Crochet over Slip Stitches

Rnd 11: With D, join with a standing sc in any ch-2 sp, ch 2, sc in same sp, {sc over sl st into sp 3 rows below, [sc in each st to next sl st, sc over sl st into st 3 rows below] twice, sc in each st to next sl st, sc over sl st into sp 3 rows below, (sc, ch 2, sc) in ch-2 sp} three times, sc over sl st into sp 3 rows below [ sc in each st to next sl st, sc over sl st into st 3 rows below] twice, sc in each st to next sl st, sc over sl st into sp 3 rows below, join. Fasten off. -132 sc, 4 ch-2 sps

Row 12: With C, join to any ch-2 sp, ch 5 counts as dc + ch 2, dc in same sp, {ch 3, dc6tog, ch 3, sl st in next st, ch 3, dc9tog, ch 3, sl st in next st, ch 3, dc9tog, ch 3, sl st in next st, ch 3, dc6tog, ch 3, (dc, ch 2, dc) in ch-2 sp) three times, ch 3, dc6tog, ch 3, sl st in next st, ch 3, dc9tog, ch 3, sl st in next st, ch 3, dc9tog, ch 3, sl st in next st, ch 3, dc6tog, ch 3, join to 3rd ch. -8 dc9tog, 8 dc6tog, 12 sl sts, 4 (dc, ch 2, dc)

Last Round, Work in Chains, and Single Crochet over Slip Stitches

Row 13: See notes. Ch 1, sc in same st, [(sc, ch 2, sc) in ch-2 sp, sc in each st and ch across to next ch-2 sp] three times, (sc, ch 2, sc) in next ch-2 sp, sc in each st and ch across to last st, join. Fasten off. Weave in ends. Block. -140 sc, 4 ch-2 sps

Festive Julie Ann Square- Moogly 2019 CAL

What a month…just last month I was working the last 2018 square for the Moogly CAL…now I am working up the second square of the Moogly 2019 CAL! Check out all the squares for 2019 here, and the 2018 square here.

I feel very privileged to be able to share with you this latest design, the Festive Julie Ann Square. Inspired by my student Julie Ann, who loves to work in the round, and makes a festive atmosphere where ever she is going.

The square uses long post loops, to create a stunning color play of the eye. Working this square for some reason always makes me think of flowers, I guess that is one of the reasons I see it as festive.

Festive Julie Ann by Linda Dean

Bring in the New Year with a bright star of festival with this square that elongates some post stitches to create a planned bleeding of the colors.

Materials:

*Red Heart With Love, #1907 Boysenberry (A), #1207 Cornsilk (B), #1101 Eggshell (C), #1562 Jadeite (D)

*Hook J/10/ 6.00mm

Gauge: 12”x 12” square (30.5 x 30.5cm) –After Rnd 3 you should measure approximately 4″ (10cm)

Long Loop Front Post Double Crochet (LLfpdc): Working over post stitch of previous round, YO, insert hook around post of stitch  2 rows below from back to front and right to left, YO, pull up a loop about an inch in height, (YO, pull through 2 loops) twice.

Note that you will work a double crochet and a post stitch in the same stitch.

Rnd1: With A, ch 4, 11 dc in 4th ch from hook, join to top of beg ch. -12 dc

Rnd 2: Ch 3 (counts as a dc, now and throughout), fpdc in same st, 2 dc in next st, [(dc, fpdc in next st), 2 dc in next st] rep around, join. -18 dc, 6 fpdc

Rnd 3: Change to B, ch 3, dc in next st, LLfpdc in same st as last, dc in next st, 2 dc in next st, [dc in next 2, LLfpdc in same st as last, dc in next st, 2 dc in next st] rep around, join. -30 dc, 6 LLfpdc

Rnd 4: Change to C, ch 3, dc in next 2 sts, LLfpdc in same st as last, dc in next 2 sts, 2 dc in next st, [dc in next 3, LLfpdc in same st as last, dc in next 2 sts, 2 dc in next st] rep around, join. -42 dc, 6 LLfpdc

Rnd 5: Change to D, ch 3, dc in next 3 sts, LLfpdc in same st as last, dc in next 3 sts, 2 dc in next st, [dc in next 4, LLfpdc in same st as last, dc in next 3 sts, 2 dc in next st] rep around, join. -54 dc, 6 LLfpdc

Rnd 6: Change to A, ch 3, dc in next 4 sts, LLfpdc in same st as last, dc in next 4 sts, 2 dc in next st, [dc in next 5, LLfpdc in same st as last, dc in next 4 sts, 2 dc in next st] rep around, join. -66 dc, 6 LLfpdc

Rnd 7: Change to C, ch 3, dc in next 5 sts, LLfpdc in same st as last, dc in next 5 sts, 2 dc in next st, [dc in next 6, LLfpdc in same st as last, dc in next 5 sts, 2 dc in next st] rep around, join. -78 dc, 6 LLfpdc

Rnd 8: Change to D, ch 1, sc in same st, [sc in next 4 sts, hdc in next 3 sts, dc in next 2 sts, (dc, ch 1, dc) in next st, dc in next 2 sts, hdc in next 3 sts, sc in next 6 sts] rep around, join. -40 sc, 24 hdc, 24 dc, 4 ch-1 sps

Rnd 9: Change to B, ch 1, sc in same st, [sc in next 7 sts, hdc in next 2 sts, dc in next st, (dc, ch 1, dc) in ch-1 sp, dc in next st, hdc in next 2 sts, sc in next 9 sts] rep around, join. -64 sc, 16 hdc, 16 dc, 4 ch-1 sps

Rnd10: Change to A, ch 1, sc in same st, [sc in next 9 sts, hdc in next 2 sts, (dc, ch 1, dc) in ch-1 sp, hdc in next 2 sts, sc in next 11 sts] rep around, join. -80 sc, 16 hdc, 8 dc, 4 ch-1 sps

Rnd 11: Ch 1, sc in same st, [sc in next 10 sts, hdc in next 2 sts, (dc, ch 1, dc) in ch-1 sp, hdc in next 2 sts, sc in next 12 sts] rep around, join. Fasten off. Block. Weave in ends. -88 sc, 16 hdc, 8 dc, 4 ch-1 sps

Ann’s Angles Square

I am so honored to be invited to participate in this years Moogly CAL 2018 Afghan Block! This is the last square for 2018, find all the rest here, and complete your own throw using one of each square.

This year I have been playing with miter squares, and thought I would share the skill with you. A miter square is worked from two outside edges, with a decrease at the corner, until no stitches are left on either edge, creating a square.

However with this design, I then added to two edges to create an effect that is similar to a look of a square atop a square, or some say even an arrow.

The name is derived from one of my students, Ann. She is my world traveler that shares stories of all of the exotic lands she has visited. She is also a former high school mathematics instructor, and always keeps us on point with the the patterns and the various ways that the stitch counts can be effected.

Ann’s Angles Square

Materials:

*Red Heart With Love: #1562 Jadeite (A), #1101 Eggshell (B), #1207 Cornsilk (C), #1971 Tigerlily (D)

*Hook J/10/ 6.00mm

Gauge

Square= 12″ x 12″ (30.5 x 30.5 cm)

Row 1: With A, ch 42, sc in 2nd ch from hook, sc in next 18 sts, sc3tog over the next 3 chs, sc in the last 19 chs, turn.

Row 2: Ch 1, flsc in same st, flsc in next 17 sts, sc3tog over next 3 sts, flsc in last 18 sts, turn.

Row 3: Ch 1, flsc in same st, flsc in next 16 sts, sc3tog over next 3 sts, flsc in last 17 sts, turn.

Row 4: Ch 1, flsc in same st, flsc in next 15 sts, sc3tog over next 3 sts, flsc in last 16 sts, turn.

Row 5: Ch 1, flsc in same st, flsc in next 14 sts, sc3tog over next 3 sts, flsc in last 15 sts, change to color B, turn.

Row 6: Ch 1, flsc in same st, flsc in next 13 sts, sc3tog over next 3 sts, flsc in last 14 sts, turn.

Row 7: Ch 1, flsc in same st, flsc in next 12 sts, sc3tog over next 3 sts, flsc in last 13 sts, turn.

Row 8: Ch 1, flsc in same st, flsc in next 11 sts, sc3tog over next 3 sts, flsc in last 12 sts, turn.

Row 9: Ch 1, flsc in same st, flsc in next 10 sts, sc3tog over next 3 sts, flsc in last 11 sts, turn.

Row 10: Ch 1, flsc in same st, flsc in next 9 sts, sc3tog over next 3 sts, flsc in last 10 sts, change to color C, turn.

Row 11: Ch 1, flsc in same st, flsc in next 8 sts, sc3tog over next 3 sts, flsc in last 9 sts, turn.

Row 12: Ch 1, flsc in same st, flsc in next 7 sts, sc3tog over next 3 sts, flsc in last 8 sts, turn.

Row 13: Ch 1, flsc in same st, flsc in next 6 sts, sc3tog over next 3 sts, flsc in last 7 sts, turn.

Row 14: Ch 1, flsc in same st, flsc in next 5 sts, sc3tog over next 3 sts, flsc in last 6 sts, turn.

Row 15: Ch 1, flsc in same st, flsc in next 4 sts, sc3tog over next 3 sts, flsc in last 5 sts, change to color D, turn.

Row 16: Ch 1, flsc in same st, flsc in next 3 sts, sc3tog over next 3 sts, flsc in last 4 sts, turn.

Row 17: Ch 1, flsc in same st, flsc in next 2 sts, sc3tog over next 3 sts, flsc in last 3 sts, turn.

Row 18: Ch 1, flsc in same st, flsc in next 1 st, sc3tog over next 3 sts, flsc in last 2 sts, turn.

Row 19: Ch 1, flsc in same st, sc3tog over next 3 sts, flsc in last st, turn.

Row 20: Ch 1, sc3tog over next 3 sts, fasten off.

Working over the ends of rows.

Row 21: With color D, join to either of edge of Row 1, ch 1, evenly work 19 sc sts across edge, 3 sc in last stitch of row 20, working down the other edge or rows, evenly work 19 sc sts across edge, turn.

Row 22: Ch 1, flsc in same st, flsc in next 19 sts, 3 sc in next st, flsc in next 20 sts, turn.

Row 23: Ch 1, flsc in same st, flsc in next 20 sts, 3 sc in next st, flsc in next 21 sts, turn.

Row 24: Ch 1, flsc in same st, flsc in next 21 sts, 3 sc in next st, flsc in next 22 sts, change to color C, turn.

Row 25: Ch 1, flsc in same st, flsc in next 22 sts, 3 sc in next st, flsc in next 23 sts, turn.

Row 26: Ch 1, flsc in same st, flsc in next 23 sts, 3 sc in next st, flsc in next 24 sts, turn.

Row 27: Ch 1, flsc in same st, flsc in next 24 sts, 3 sc in next st, flsc in next 25 sts, turn.

Row 28: Ch 1, flsc in same st, flsc in next 25 sts, 3 sc in next st, flsc in next 26 sts, change to color B, turn.

Row 29: Ch 1, flsc in same st, flsc in next 26 sts, 3 sc in next st, flsc in next 27 sts, turn.

Row 30: Ch 1, flsc in same st, flsc in next 27 sts, 3 sc in next st, flsc in next 28 sts, turn.

Row 31: Ch 1, flsc in same st, flsc in next 28 sts, 3 sc in next st, flsc in next 29 sts, turn.

Row 32: Ch 1, flsc in same st, flsc in next 29 sts, 3 sc in next st, flsc in next 30 sts, change to color A, turn.

Row 33: Ch 1, flsc in same st, flsc in next 30 sts, 3 sc in next st, flsc in next 31 sts, turn.

Row 34: Ch 1, flsc in same st, flsc in next 31 sts, 3 sc in next st, flsc in next 32 sts, turn.

Row 35: Ch 1, flsc in same st, flsc in next 32 sts, 3 sc in next st, flsc in next 33 sts, turn.

Row 36: Ch 1, flsc in same st, flsc in next 33 sts, 3 sc in next st, flsc in next 33 sts, 3 sc in next st, working on edge of Rows 21-36 evenly sc across to the unused loops of the beg ch of row 1, sc in the next 20 unused loops, 3 sc in next st, sc in the next 20 unused loops, continue evenly sc across the ends of Rows 21-36, 2 sc in last st, sl st to join. Fasten off, weave in ends, block.


Deborah’s Diamond Square

Thank you for joining me for my Moogly CAL Square! As a time of year of giving thanks, I am very thankful to be invited to participate in the project, and I hope you enjoy my contribution as the last square for the year.

If you are unfamiliar with The Moogly Yearly Afghan CAL, you can learn more about this project, learning a new 12″ square every 2 weeks, here at Mooglyblog.com.

I tend to like a little different angle in my squares, hence to rotation to create a diamond in the center. This square changes colors every round, but you can create it in many different color configurations. As for the name of this square, Deborah is a long time student, and supporter of my crochet career. She makes a point of sharing her love of baking with all the other students at the weekly crochet classes I teach at my local yarn store, and is always encouraging to everyone. So the name is another sign of thanks.

Deborah’s Diamond Square   by: Linda Dean

Small Shells create a center diamond that is framed in color, having a modern feel with classic charm.

Finished Size: 12”x 12”

Materials List:

  • J/10/6.00mm size crochet hook
  • Lion Brand Vanna’s Choice medium weight 100% Acrylic yarn (3.5oz/100g/170yds): 1 skein each color: (A) #123 Beige, (B) #134 Terracotta, (C) #133 Brick, (D) #172 Kelly Green
  • Tapestry needle

Abbreviations:

ch: chain

dc: double crochet

hdc: half double crochet

sk: skip

sp(s): space(s)

st(s): stitch(es)

YO: yarn over

Rnd 1: With color A, ch 4, sl st to first ch forming a ring, ch 2 (counts as hdc), 2 dc in ring, hdc in ring, [hdc, 2 dc, hdc] in ring three times, sl st to join, fasten off. -8 hdc, 8 dc

Rnd 2: With color B join to last st of Round 1, ch 3 (counts as dc) 5 dc in same st as join, sk 1 st, sc in next dc, sk 1 st, [6 dc in next hdc, sk 1 st, sc in next dc] three times, sl st to join, fasten off. – 4 sc, 24 dc

Rnd 3: With color C, join to any sc, ch 3 (counts as dc), 10 dc in the same st, sk 2 dc, sc in next 2 dc sts, sk next 2 dc, [11 dc in next sc, sk 2 dc, sc in next 2 dc, sk next 2 dc] three times, sl st to join, fasten off. -8 sc, 44 dc

Rnd 4: With color D, join to last st of Round 3, ch 3 (counts as dc), 5 dc in same st as ch, 6 dc in next sc, sk 4 sts, sc in next st, ch 1, sk 1 st, sc in next st, [6 dc in next 2 sc, sk 4 sts, sc in next st, ch 1, sk 1 st, sc in next st] three times, sl st to second to the last st join, fasten off. -8sc, 48 dc

Rnd 5: With color A join in any ch-1 sp, ch 1, sc in same sp, sc in next 6 sts, [hdc in next st, ch 1, hdc in next st, sc in next 13 sts] three times, hdc in next st, ch 1, hdc in next st, sc in remaining 6 sts, sl st to join, fasten off. – 52 sc, 8 hdc

Rnd 6: With color B, join in any ch-1 sp, ch 3 (counts as hdc and ch 1), hdc in same sp, sc in each st across to ch-1 sp, [(hdc, ch 1, hdc) in next ch-1 sp, sc in each st across] three times, sl st to join, fasten off. –60 sc, 8 hdc

Rnd 7: With color C, join in any ch-1 sp, ch 3 (counts as hdc and ch 1), hdc in same sp, sc in each st across to ch-1 sp, [(hdc, ch 1, hdc) in next ch-1 sp, sc in each st across] three times, sl st to join, fasten off. –68 sc, 8 hdc

Rnd 8: With color D, join in any ch-1 sp, ch 3 (counts as hdc and ch 1), hdc in same sp, sc in each st across to ch-1 sp, [(hdc, ch 1, hdc) in next ch-1 sp, sc in each st across] three times, sl st to join, fasten off. –76 sc, 8 hdc

Rnd 9: With color A, join to any ch-1 sp, (sc, ch 1, sc) in same sp, sk hdc, [sk 1 st, 3 dc in next st, sk 1 st, sc in next st] five times, *(sc, ch 1, sc) in ch-1 sp, sk hdc, [sk 1 st, 3 dc in next st, sk 1 st, sc in next st] five times; rep from * around, sl st to join, fasten off. – 28 sc, 60 dc

Rnd 10: With color B, join to any ch-1 sp, ch 3 (counts as hdc and ch 1), hdc in same sp, sk sc and 1 dc, sc in next dc, 3 dc in next sc, [sk 1 dc, sc in next dc, 3 dc in next sc] across to ch-1 sp, *(hdc, ch 1, hdc) in ch-1 sp, sk sc and 1 dc, sc in next dc, 3 dc in next sc, [ sk 1 dc, sc in next dc, 3 dc in next sc] across to ch-1 sp; rep from * around, sl st to join, fasten off. -8 hdc, 28 sc, 60 dc

Rnd 11: With color C, join to any ch-1 sp, ch 4 (counts as dc and ch 1), dc in same sp, hdc in next hdc, [3 dc in next sc, sk 1 dc, sc in next dc] across, hdc in hdc *(dc, ch 1, dc) in ch-1 sp, hdc in next hdc, [3 dc in next sc, sk 1 dc, sc in next dc] across, hdc in hdc; rep from * around, sl st to join, fasten off. -8 hdc, 20 sc, 68 dc

Rnd 12: With color D, join to any ch-1 sp,  ch 4 (counts as dc and ch 1) dc in same sp, hdc in next dc, hdc in next hdc, [sk 1 dc, sc in next dc, 3 dc in next sc] across, hdc in next hdc, hdc in next dc, *(dc, ch 1, dc) in ch-1 sp, hdc in next dc, hdc in next hdc, [sk 1 dc, sc in next dc, 3 dc in next sc] across, hdc in next hdc, hdc in next dc; rep from * around, sl st to join, fasten off. – 16 hdc, 20 sc, 68 dc

Rnd 13: With Color A, join to any ch-1 sp, ch 3 (counts as hdc and ch 1), hdc in same sp, sc in each st across, *(hdc, ch 1, hdc) in ch-1 sp, sc in each st across; rep from * around, sl st to join, fasten off. – 8 hdc, 104 sc

Rnd 14: With Color B, join ot any ch-1 sp, ch 3 (counts as hdc and ch 1) sc in each st across, *(hdc, ch 1, hdc) in ch-1 sp, sc in each st across; rep from * around, sl st to join, fasten off. -8 hdc, 112 sc

Weave in ends, block if desired.

Astral Flowers Throw with Humble Beginnings

ScannedImageI fell in love with the Astral Flowers Square the moment it came from my hook, and still enjoy It as a throw in the October 2016 issue of Crochet World MagazineAs with much of my design style I happened upon this by playing and a little bit of a challenge, however the story of its beginning is not a happy one.

M01232_15_medium

Astral Flowers Throw Photo courtesy of Annie’s

A friend and fellow designer lost her daughter last year, and as a way of letting her know that she was the hearts and minds of vast community a fellow friend organized a formation of a friendship afghan. She asked for six inch squares in various colors that had significance to members of the suffering family. She selected a certain type of yarn, so that everything would work together nicely, and agreed to sew all the squares together. When all was said and done enough squares were created by various crochet designers, and others in the industry, that in the end there were at least 3 afghans created, the Astral Flower Square is among them.

I originally sat down with the three colors and just began putting them together without thinking of the stitches themselves, but the difficult time my friend was going through. I created a total of 6 squares, no sense in having partially used skeins when more squares could be created. In this methodical challenge of working squares I worked one with post stitches, this grew into this square.

133005_small2I will admit that I was a bit taken aback by the way the color can be so deceptive and making the square appear to have more going on than it really does. At one moment I can see a star in another I can see a flower, there seems to be depth and volume in the work, yet it really is just a couple of rounds. The only magic that happens is that the post stitches create an illusion of the color being worked in other ways.

The other thing that I find striking with this square is that the sides are not actually straight. The corners are slightly higher then than the center of each side, creating a little “key hole” type effect. I really like how this shape works at bringing a little something extra to the throw overall, and seaming the squares in the back loops only of the stitches creates a simple framed edge. The one drawback to the square, used in the fashion that I have, is that it really does need to be hand sewn together, no join as you go…but maybe if I play with a different edging…no, I think I like it the way it is.