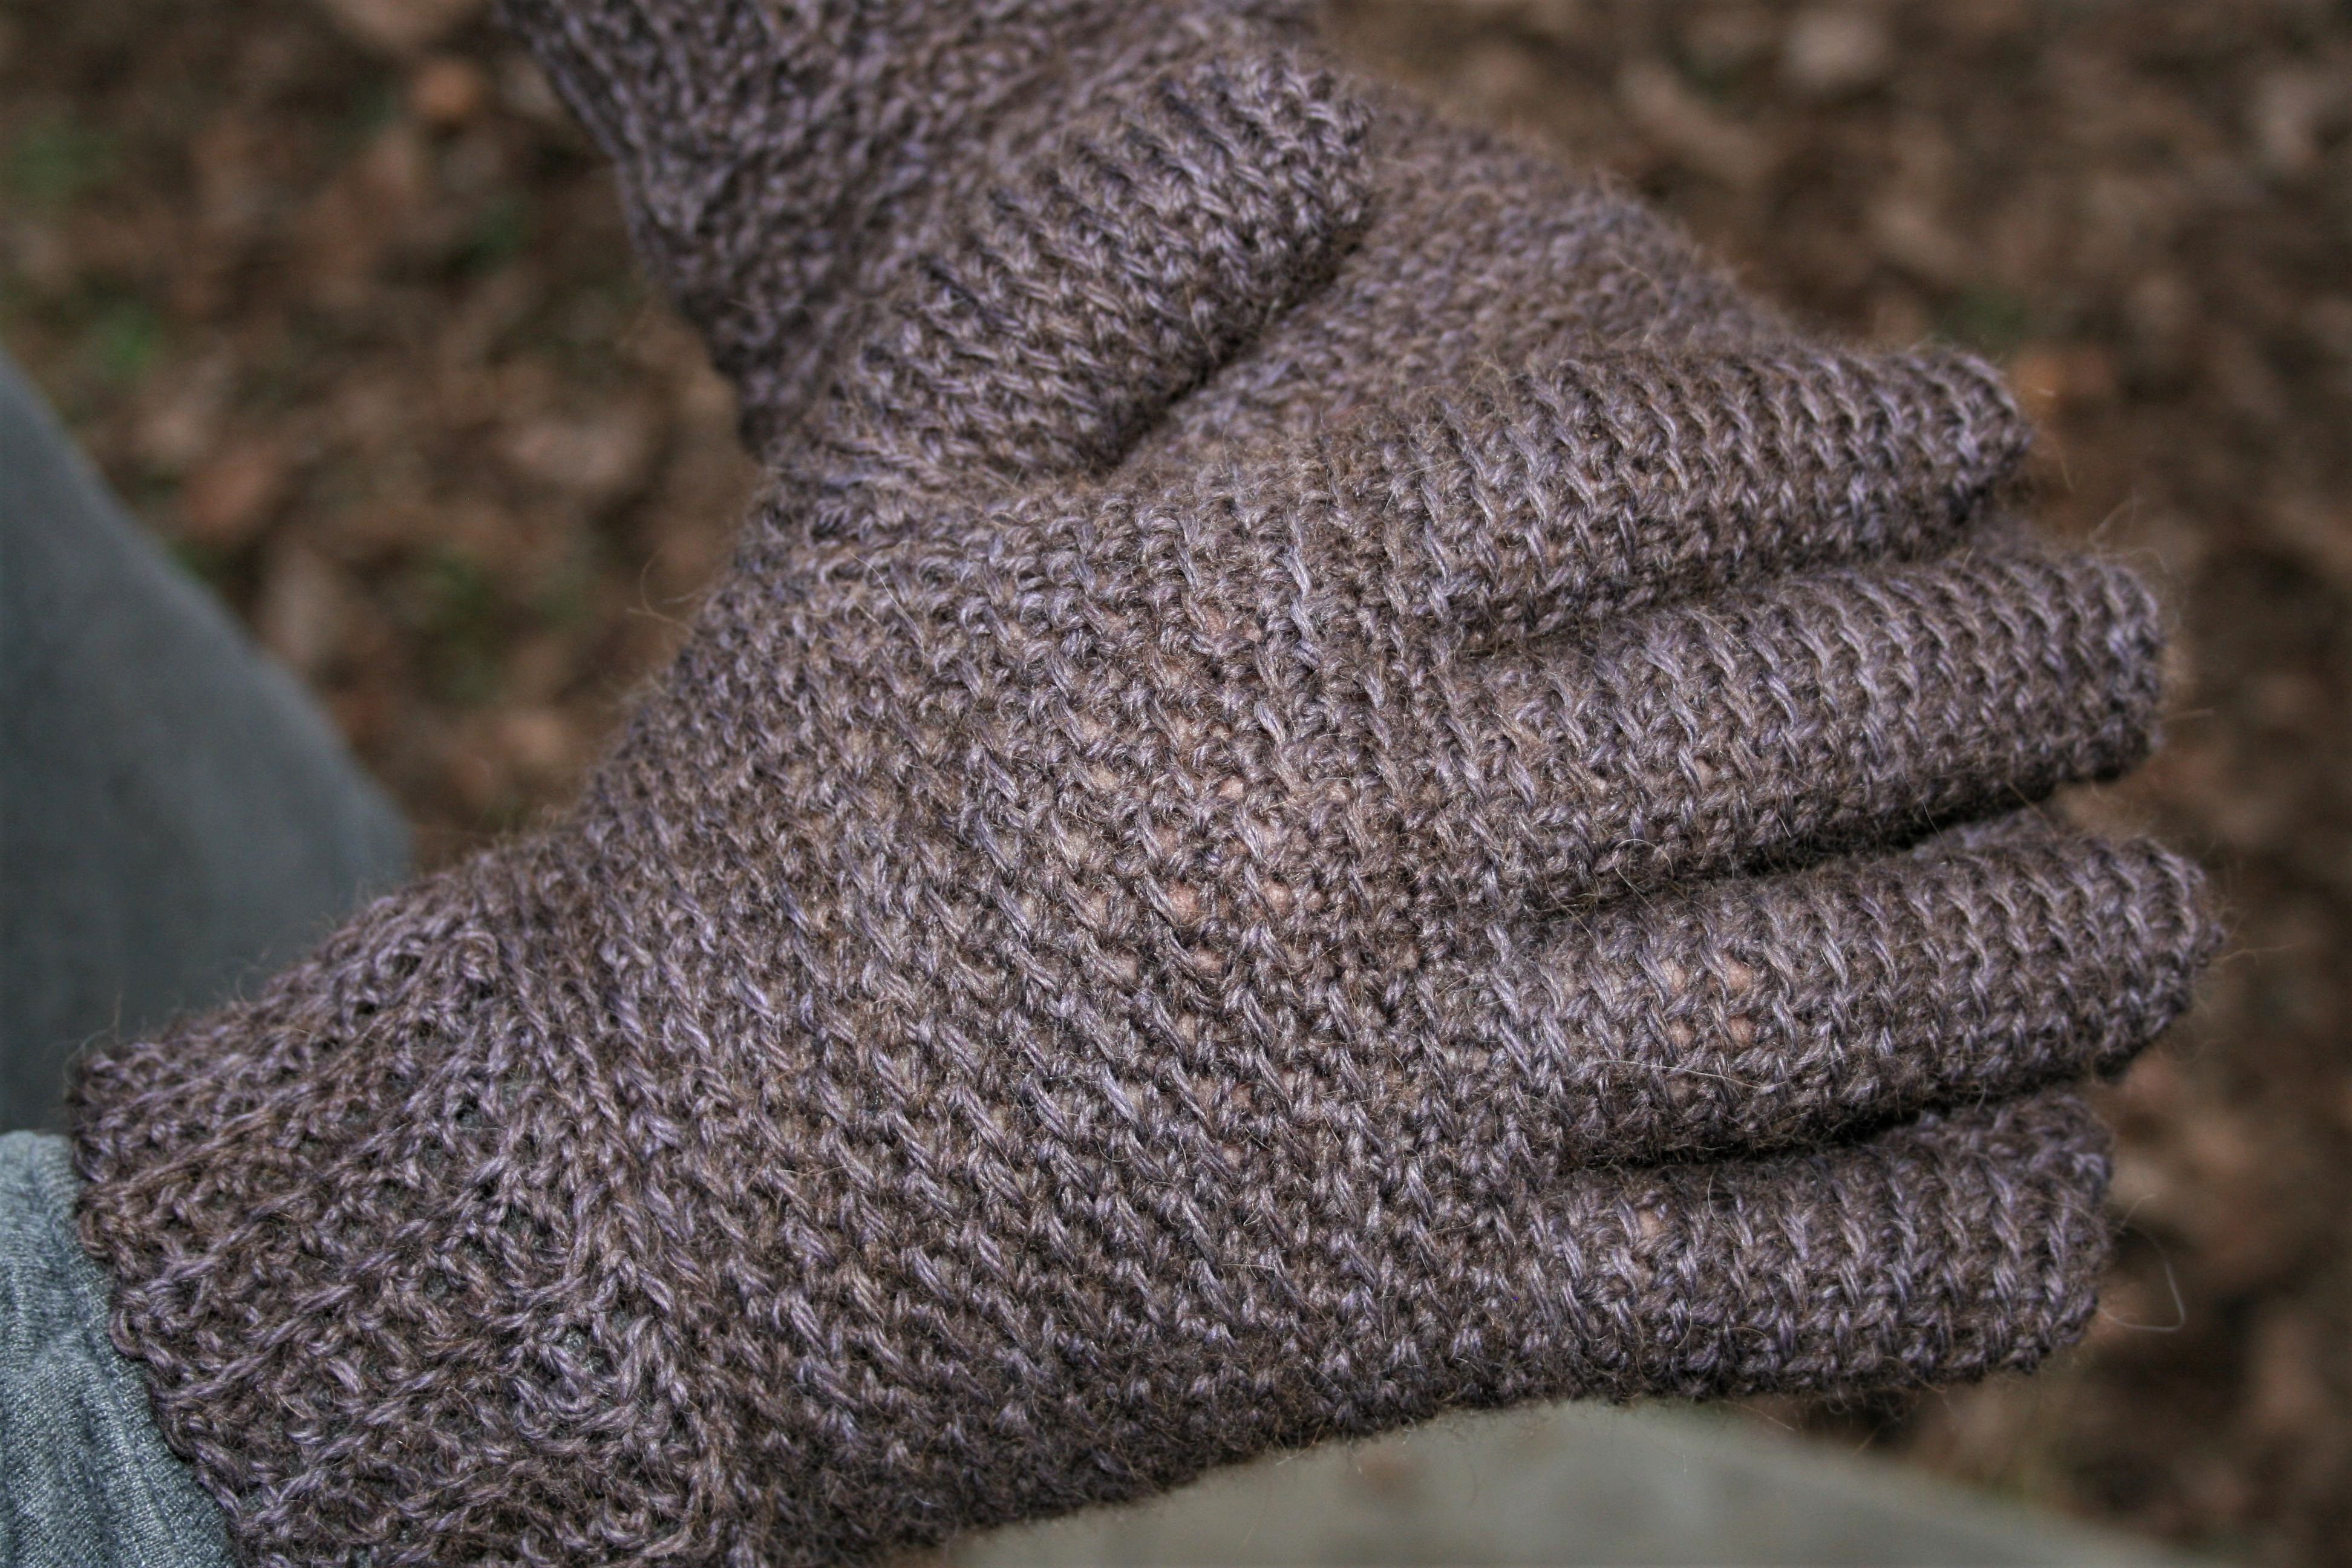
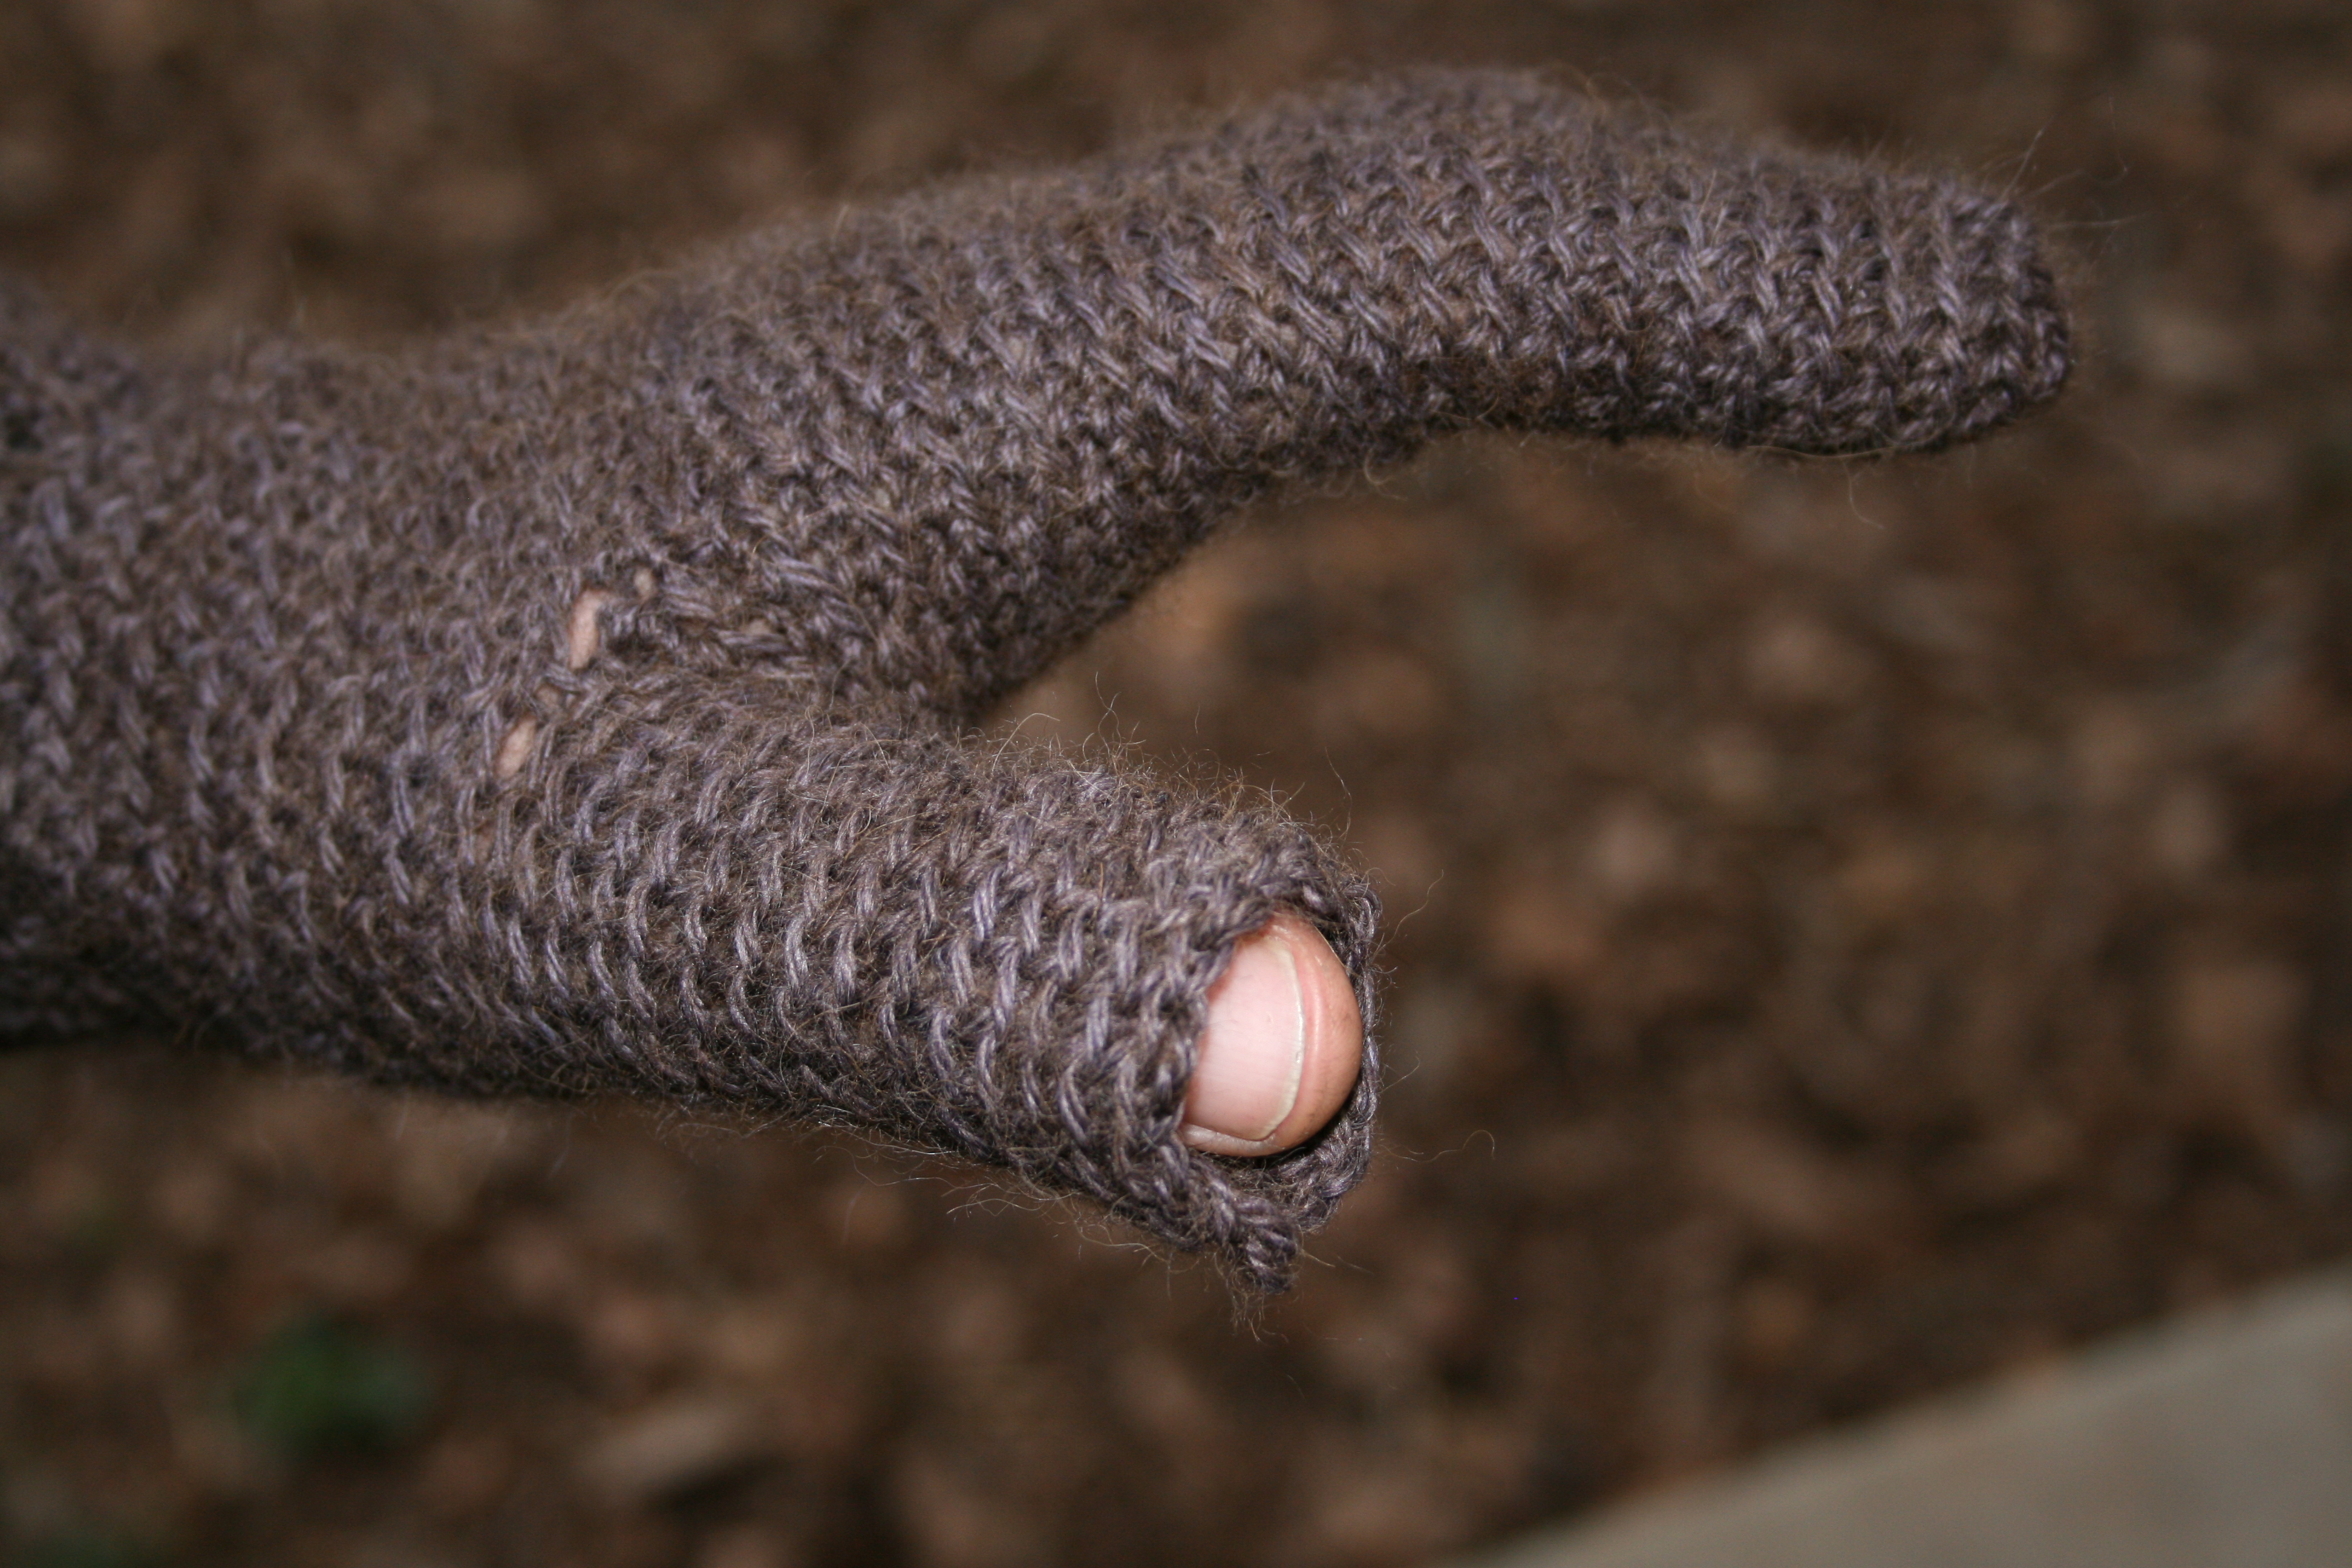
 As part of the Christmas in July Crochet Along, I am happy to share Slight Trail Men’s Gloves as a free pattern for you!
 Check out more Christmas in July patterns as well as giveaways here.
Slight Trail Men’s Gloves by: Linda Dean
Fingered gloves are a must during the cold months, and are easier then they look! This simple stitch pattern offers a unique texture that gives the gloves just enough stretch.
Skill Level: Intermediate
Finished Size: men’s size gloves-10” circumference
Materials List:
- Size I/9/5.5mm hook or hook size needed to obtain gauge
- 1 skein of Lisa Souza Baby Alpaca Sport, sport weight, 100% Baby Alpaca Yarn (330yds/3.4 oz) (www.lisaknit.com)
- Stitch Marker
- Tapestry needle
Gauge: 8 st /10 rows =2”
Pattern Note/Special Stitches
Glove are worked in a continuous spiral, there is no joining. Use stitch marker to indicate end of round.
Pattern worked in round has single crochet stitches stacked upon single crochet stitches in the back loop, and single crochet in the back loop stitches stacked upon single crochet stitches.
Magic Loop: Create a loop with yarn, inset hook, yarn over and pull through a loop, work indicated stitches in loop, pull the “tail” end of the loop to tighten.
Abbreviations:
ch: chain
rem: remaining
rep: repeat
sc: single crochet
sl st: slip stitch
sk: skip
sp: space
st(s): stitch(es)
Gloves (Make 2)
Cuff
Row 1 : Ch 10, working in back bump only, sc in 2nd ch from hook, sc in each back bump across, ch 1, turn. (9 sc)
Rows 2-39: Sc in each back loop across, ch 1, turn.
Hand
Rnd 1: Turn cuff so that ends of fabric (Rows 1 and 39) are touching forming a tube, crocheting in the ends of the rows, sc in the end of each round. 39 sc
Rnd 2: *Sc in next 3 sts, sc in back loop of next 3 sts; rep from * 6 times, sc in next 3 sts.
Rnd 3: *Sc in back loop of next 3 sts, sc in next 3 sts; rep from * 6 times, sc in back loop of next 3 sts.
Rnds 4-16: Rep Rnds 2 & 3, ending with a repeat of Rnd 2.
Rnd 17: Ch 9, sk next 6 sts, *sc in back loop of next 3 sts, sc in next 3 sts; rep from * around. 33 sc and 1 ch-9 sp
Rnd 18: 9 sc in ch-10 sp, *sc in next 3 sts, sc in back loop of next 3 sts; rep from * around. 42 sc
Rnd 19: *Sc in back loop of next 3 sts, sc in next 3 sts; rep from * around.
Rnd 20: *Sc in next 3 sts, sc in back loop of next 3 sts; rep from * around.
Rnds 21-28: Rep Rnds 19 & 20
Index Finger
Rnd 1: Sc in back loop of next 6 sts, turn glove over, working in 7th stitch from end, sc in back loop, sc in back loop of next 6 sts. 13 sc
Rnd 2: Sc in back loop of each st around.
Rnd 3-16: Rep Rnd 2. Finish off, using yarn needle weave end through each stitch in last round and pull tight, sewing end closed.
The rest of the fingers, with the exception of the thumb, start by working into Rnd 28 of the hand. Start with the glove positioned so that the index finger is to the right. (For left handed crocheters the index finger should be to the left).
Middle Finger
Rnd 1: Join yarn with sc in same st as last st for index finger on same side, sc in back loop of next 7 sts, sk next 19 sts, sc in back loop of next 5 sts, sc in next st (that was used in previous finger). 13 sc
Rnd 2: Sc in back loop of each st around.
Rnd 3-18: Rep Rnd 2. Finish off, using yarn needle weave end through each stitch in last round and pull tight, sewing end closed.
Ring Finger
Rnd 1: Join yarn with sc in same st as last st for middle finger on same side, sc in back loop of next 7 sts, sk next 8 sts, sc in next st, sc in back loop of next 4 sts, sc in next st (that was used in previous finger). 13 sc
Rnd 2: Sc in back loop of each st around.
Rnd 3-16: Rep Rnd 2. Finish off, using yarn needle weave end through each stitch in last round and pull tight, sewing end closed.
Pinkie Finger
Rnd 1: Join yarn with sc in same st as last st for middle finger on same side, (sc in back loop of next 7 sts, sc in next st (that was used in previous finger). 10 sc
Rnd 2: Sc in back loop of each st around.
Rnd 3-12: Rep Rnd 2. Finish off, using yarn needle weave end through each stitch in last round and pull tight, sewing end closed.
Thumb:
Rnd 1: Working in sk sts of Rnd 17 of Hand, sc in back loop of each st, evenly work 9 sc in bottom side of ch-9. (15 sts)
Rnd 2: *Sc in back loop of each st around.
Rnd 3-14: Rep Rond 2. Finish off, using yarn needle weave end through each stitch in last round and pull tight, sewing end closed. (note optional for texting thumbs, simply weave in end, not closing top of thumb)

 Crochet and time have interesting effects for me. I have spoken before about how crochet traps memories and such (you can read that here), but designing can also be a bit of a time travel. I can be commissioned to create a design for a yarn company or magazine and after it is finished I have to wait months to see how everything finally comes out.
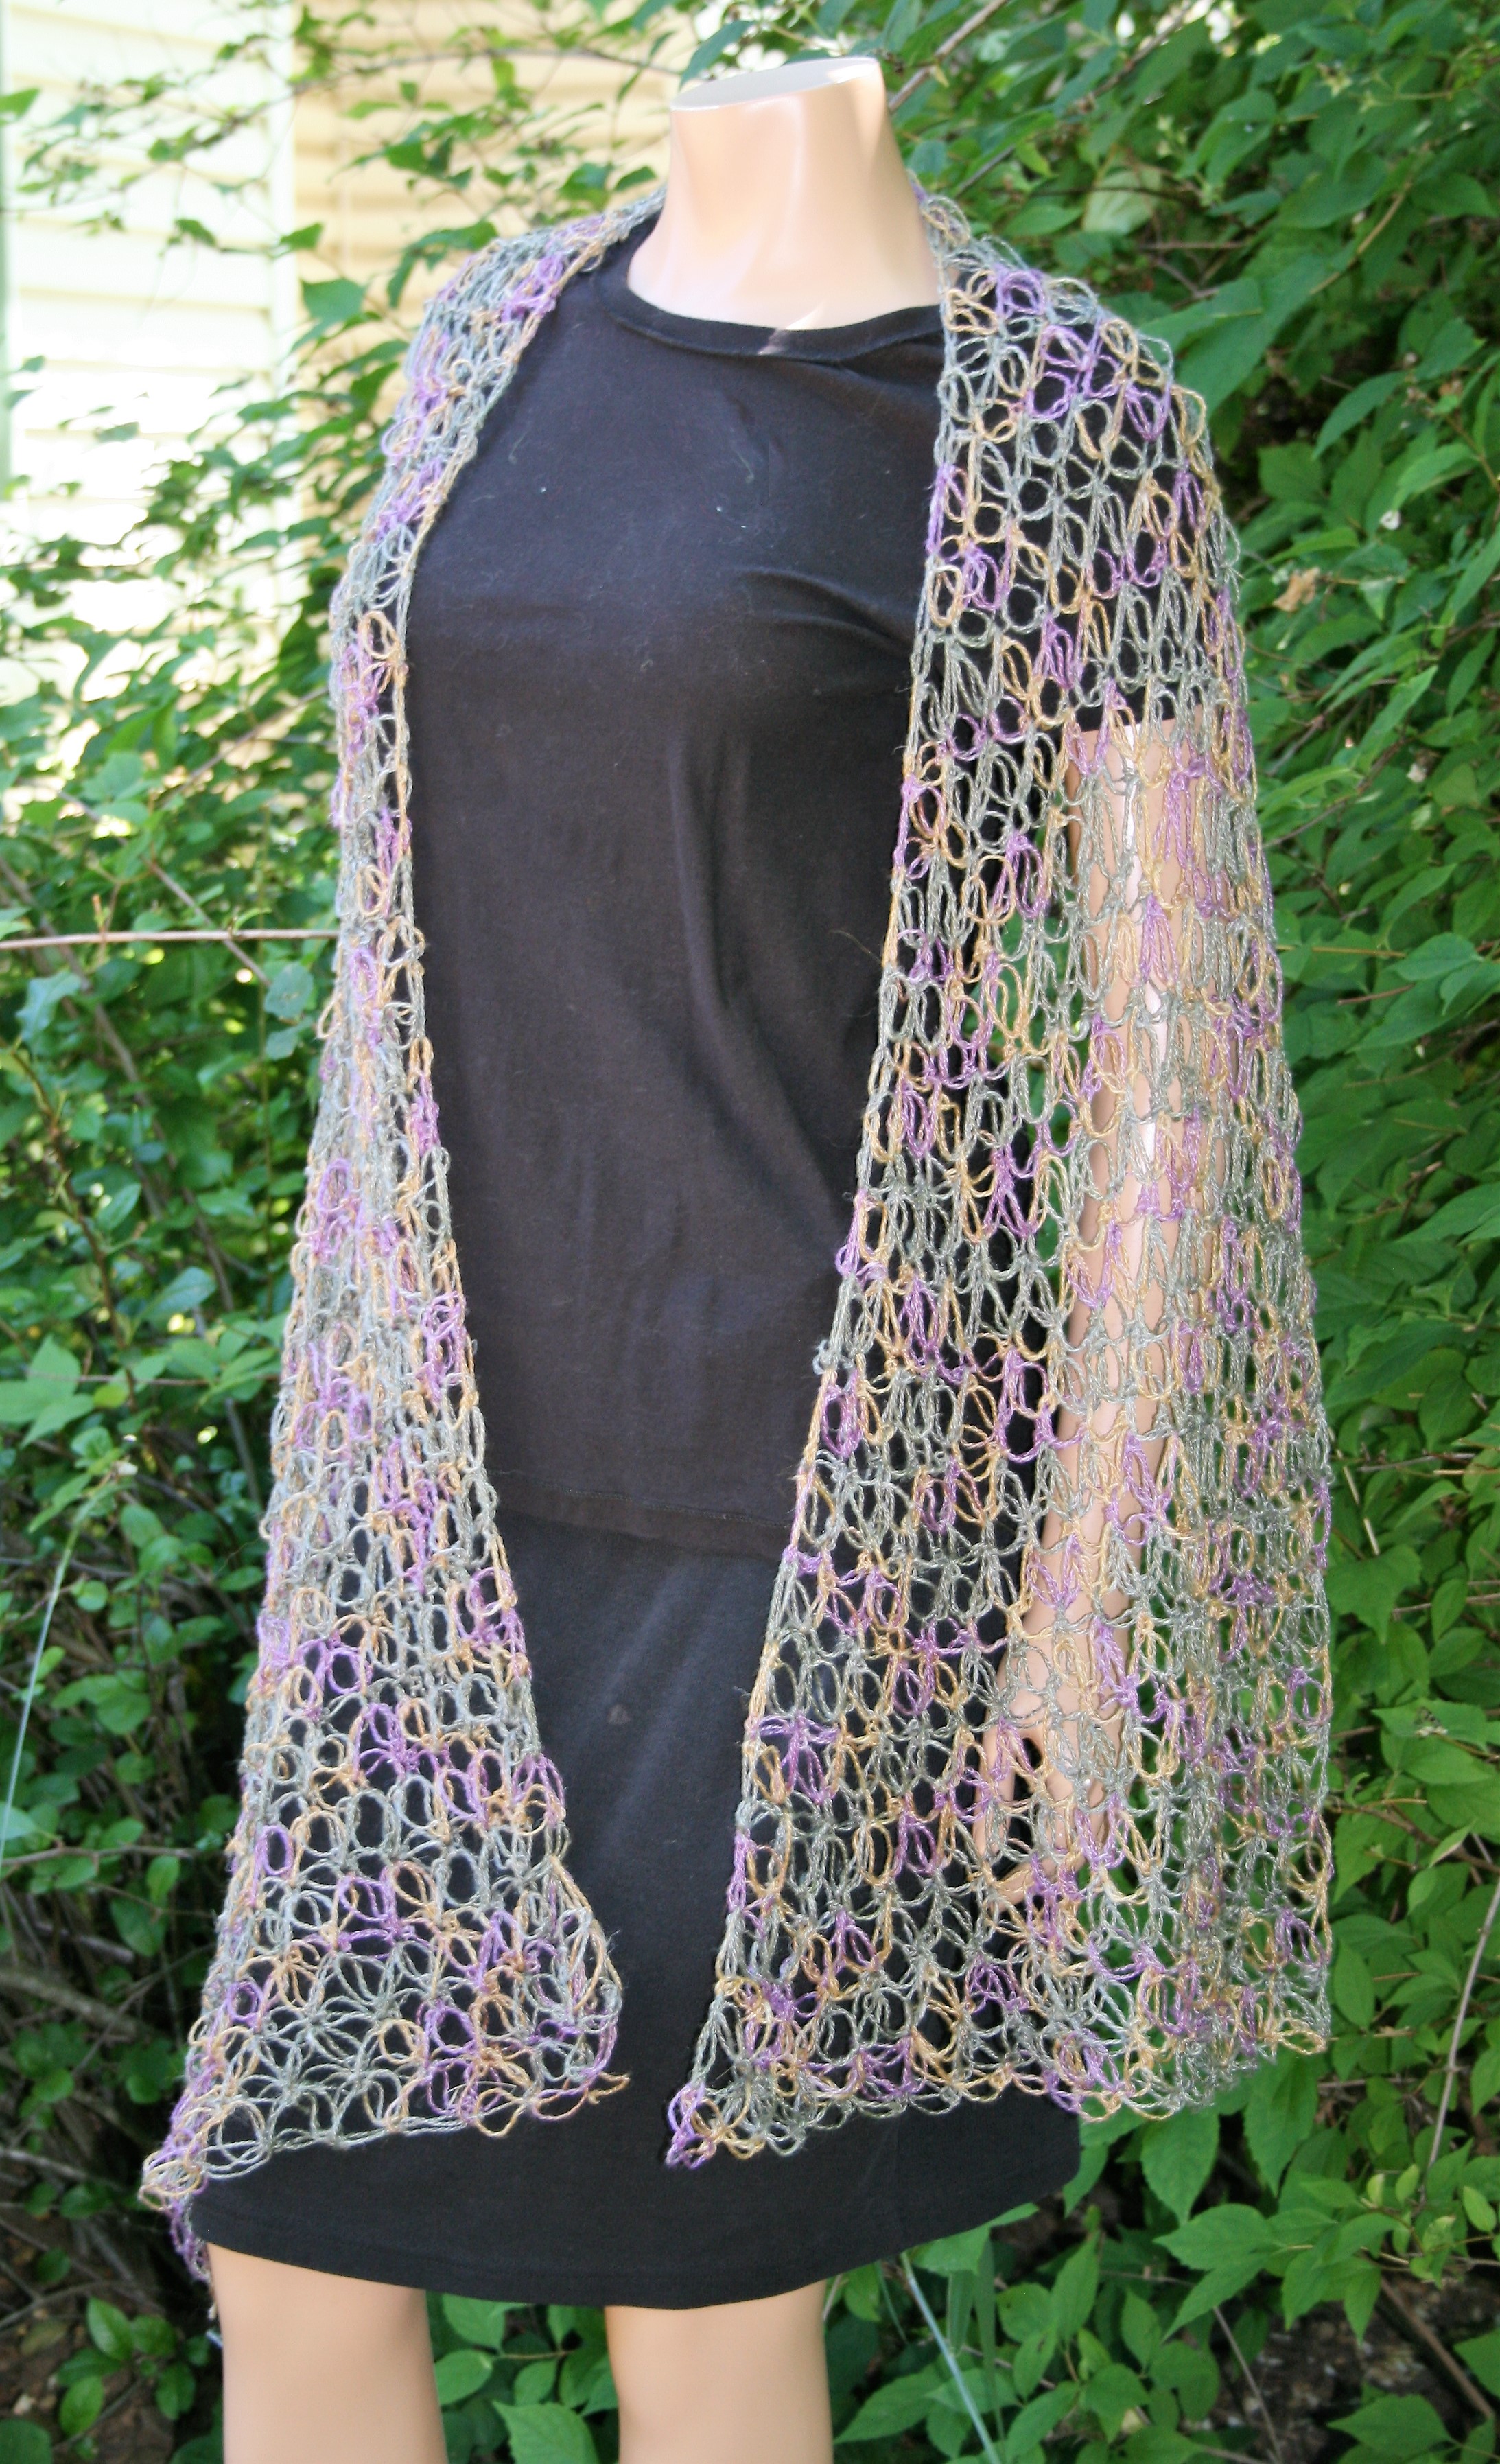
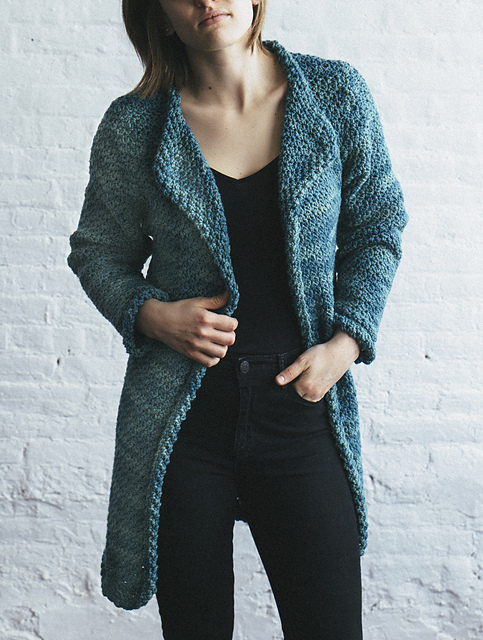 After waiting what seems like forever, I am finally able to share the Camac! This is a long cardigan or coat, depending on your leaning, that really lends itself to style and comfort. It is mid-thigh length and worked in as seamless as possible, needing only seam the shoulders and sleeves, the body is worked as one piece.
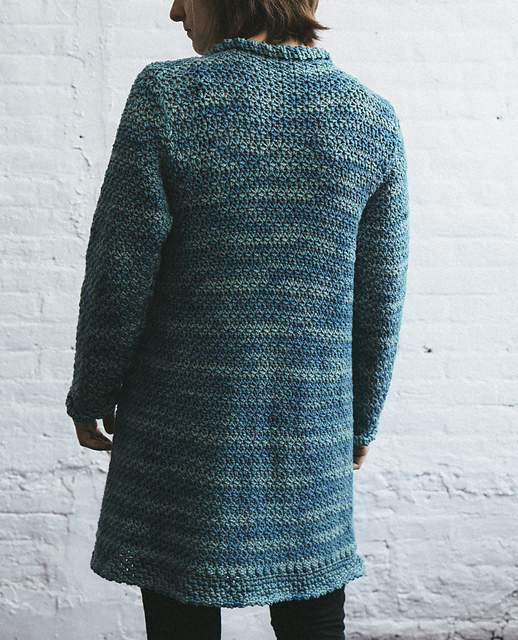 There is a simple turned edge boarding this entire coat that is actually the same stitch pattern as the rest of the fabric but uses a much larger hook to create a contrast in the fabric. The change in the hook size causes a tension between the two fabrics and this causes the edge to curl. I think it adds a simple yet endearing quality to this design.