Ideas Come Out of the Closet

ScannedImageI have recently had a little taste of spring at home, with warm temperature and blooming flowers, and for some reason this had made me feel like cleaning. In some instances I might wonder if I am feeling well, as this is a “never high on my priority listing” kind of thing, but this time I needed it as therapy.

DSCF1132

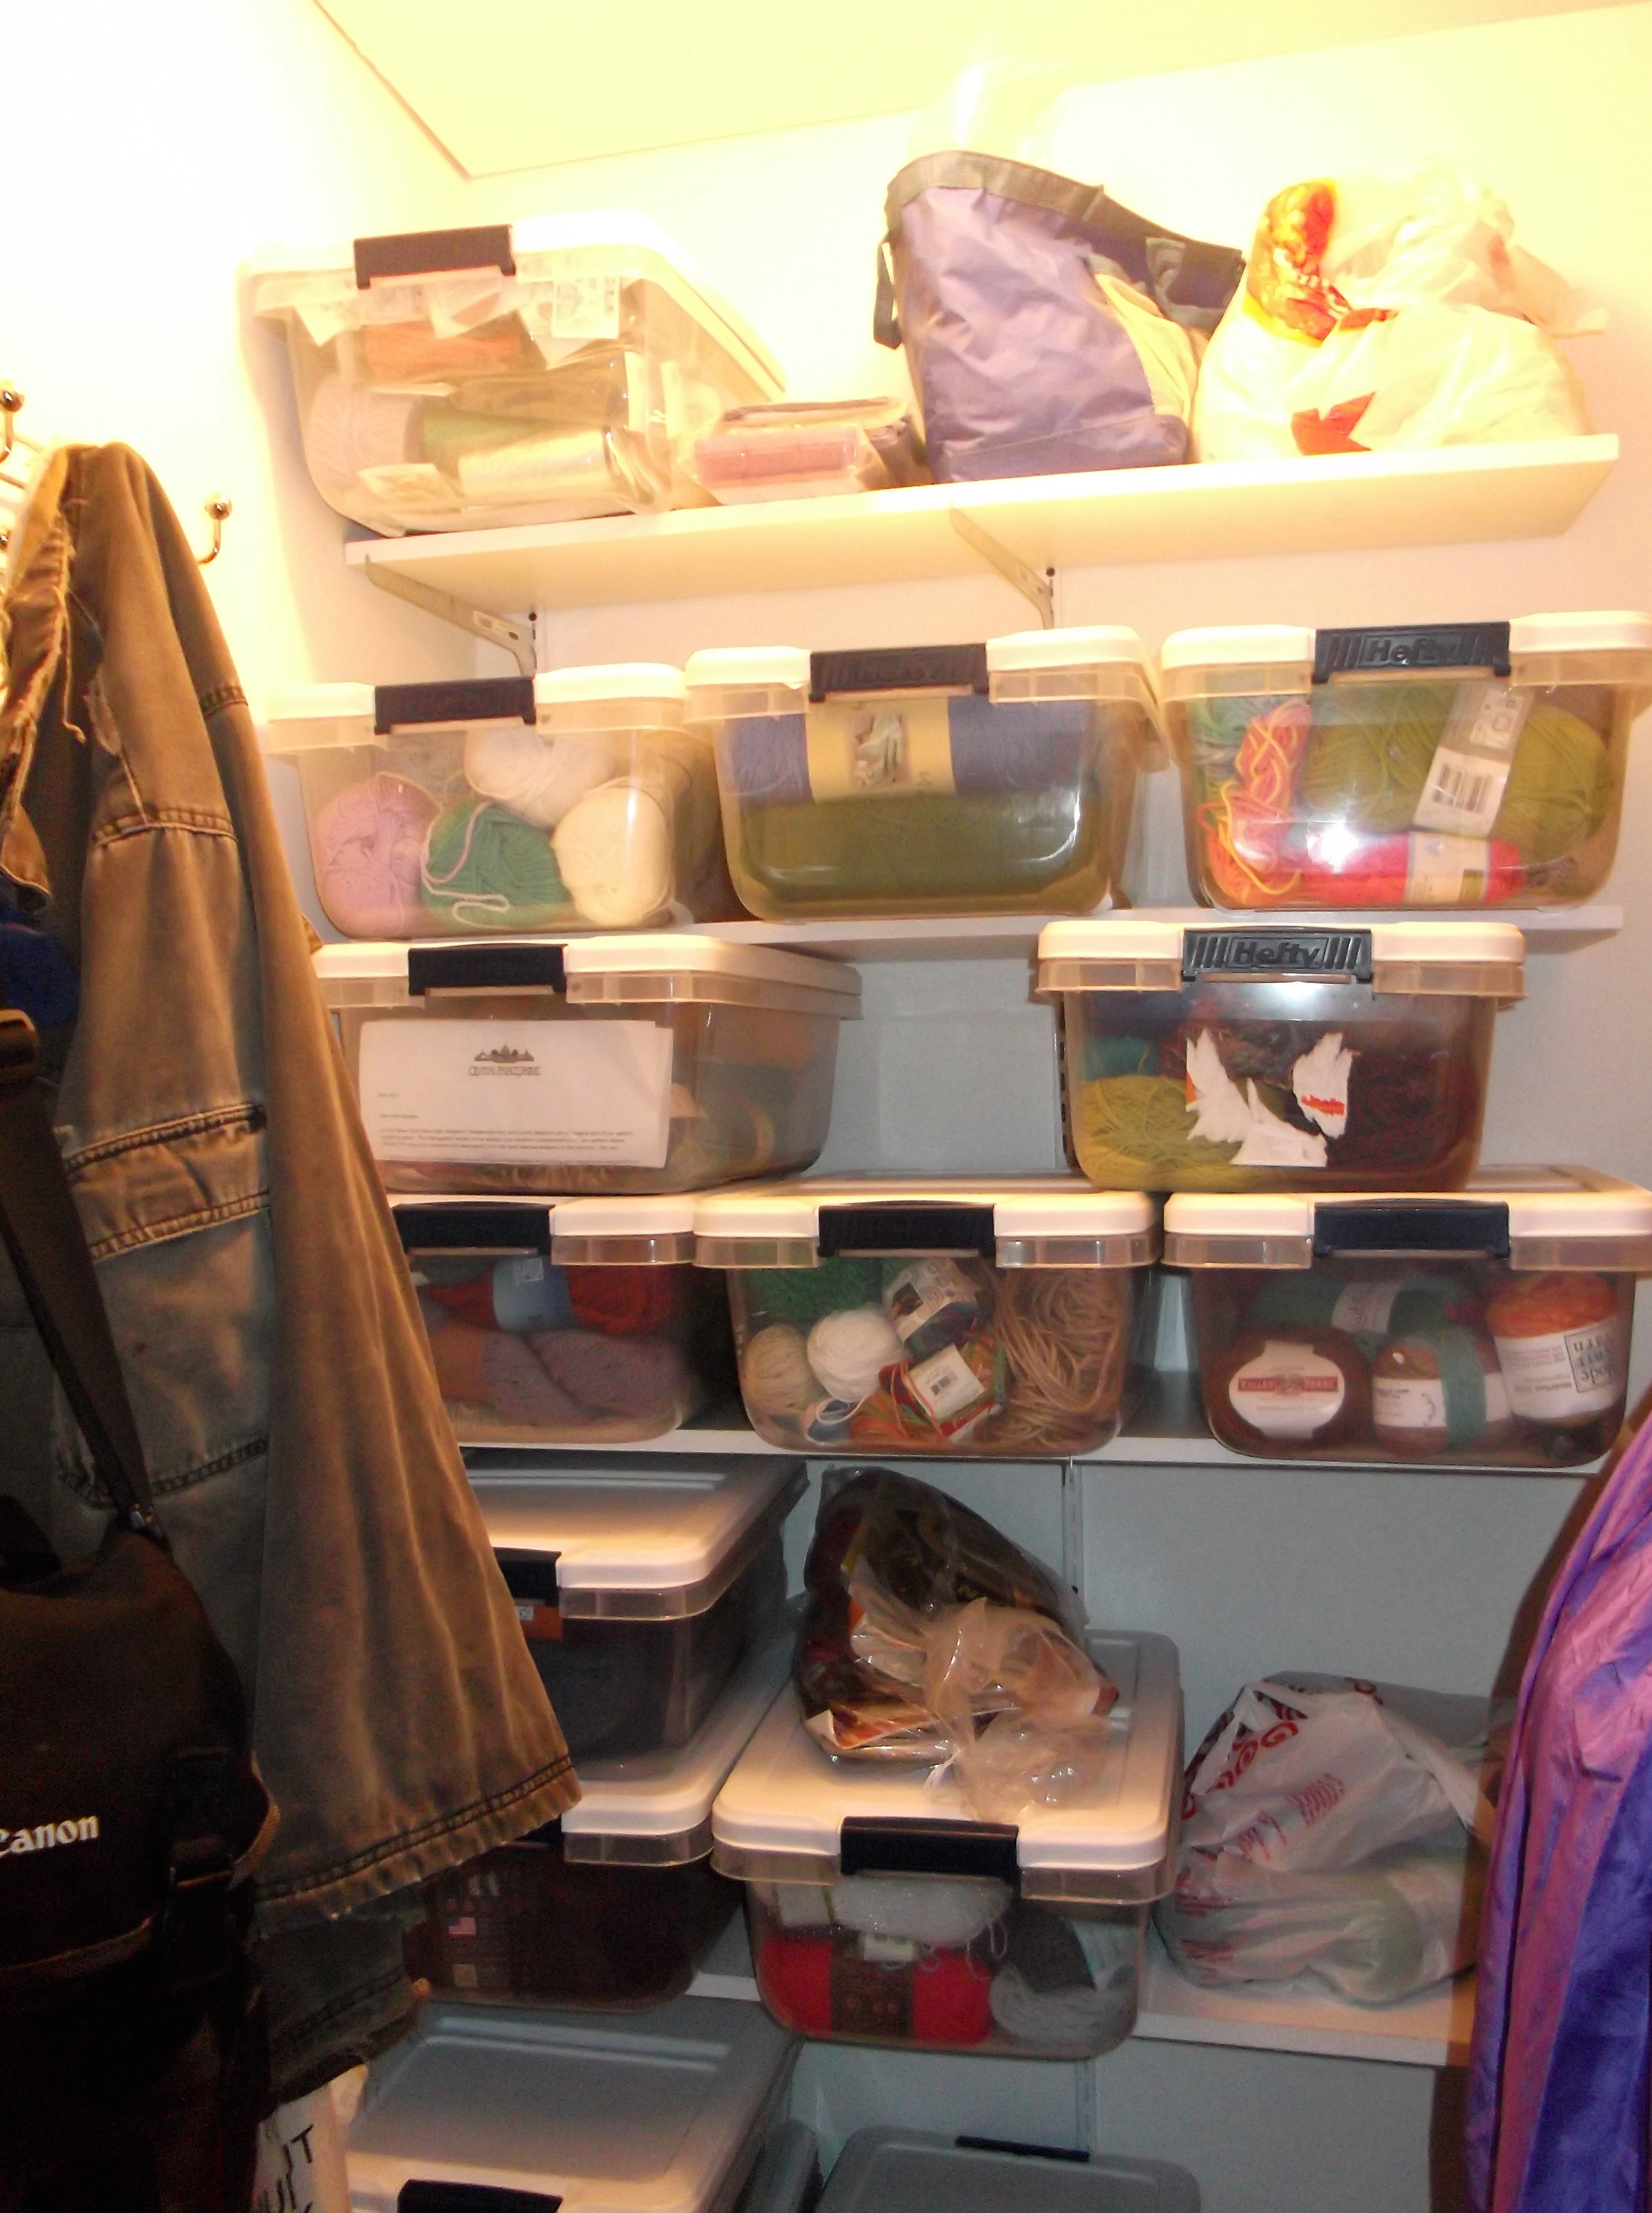
Totes are making the difference in my closet! I didn’t think to take a before photo, so please just take my word for it.

I really was not planning on writing about this, but considering the shocked awes of approval that my work has created at home, I figured it might be worth a share.

My main place of tackle was actually my work area and closet, (with the closet, being the larger accomplishment). My work space is actually a corner of my living room, and most of my working “stash of yarn” lives in my hall closet. I long found that if I give myself too much room, I accumulate much that is not needed (this is why I actually carry a small purse, a large one means that I carry many more things and most of them are probably belong to the kids). Working in this smaller area requires me to sort and clean things out a little more often to make room for new ideas.

So in the closet, the largest change is the actual addition of bins. I found some reasonably priced storage containers at my local big box store, and have found that they have nearly doubled my storage space. Prior to these, I stacked yarn on my shelves so they were readily easy to see. I have always sorted them by manufacturer, and then my weight, but by placing yarn in totes I am able to stack them better while still sorting the same.

By taking this time a cleaning things up, I was also able to get some new ideas, it can be amazing how just touching a yarn that an idea can jump into your mind about what it wants to be. In a sense it is almost like visiting an old friend, bringing back memories and jump starting the creative soul to connect. Now if only I can find the time to bring it all to life!


Love & Leche Give Away!

ScannedImageI have tended to notice in recent years, just how much my hands dry out over the course of a day. Granted it may not actually be anything new, but having your hands in yarn all day and dry skin can become a little obvious.

To begin with those fuzzy yarns, like mohair and the like, tend to find areas to snag upon. There is something a little telling about moving your hand and having your yarn follow you when you were not expecting it to. DSCF1109

At a recent trade show I had an opportunity to check out a lovely lotion bar, Love & Leche (formerly as Milk & Honey). Now I will admit, lotion in a bar is not something that I grew up with. I am completely use to lotion in a tube, lotion in a pump, bars that was for soap. However the combination of placing lotion in a bar provides something unique. With traditional lotions I am always attempting to find one that does not feel greasy, that absorbed quickly, and actually felt like it was doing something. This is a tall order, but as a bar this lotion seems to do everything.

The lotion comes in a nice little tin, and comes in a wide selection of scents that offer aromas from soothing to refreshing. The primary ingredient is beeswax, followed with coconut oil, almond oil and essential oils. These elements of nature come together to make a very nice, soothing, product that I recommend for soft feeling skin.

I am fortunate enough to have the opportunity for one lucky individual to try it for themselves. I have a Limited Edition Citrus-Rose Valentine’s Lotion Bar, with a generous size of 2.5oz, a heart emblem, in a tin. To enter all you have to do is leave a comment on this blog post about some of your favorite things to use on your skin by midnight PST on February 9, 2016. One comment will be chosen at random the following day.

Check out Love & Leche for yourself, they are offering the Limited Edition Valentine’s Bar until the end of February, so you might find something for that special someone.


Make it for Me! Free Pattern

ScannedImageI am so excited that I have been invited to join a vast array of talented designers to participate in the Elk Studios “Make it for Me” event. For the entire month of January, Elk Studios has been featuring a new design, from various designers, to encourage crocheters to make a little something for themselves. The rush of the holiday season creates hooks and yarn flying, but not usually in a project for the stitcher.

Today I am happy to share my Corkscrew Scarf. This is a fun project that can work up quickly in a wide variety of yarns, and is easily adjusted in length or width to make a scarf that fits just the way you want it.

The Corkscrew scarf was originally created as a project that “new to crochet” students could practice some stitches, while learning how to read patterns, in the crochet classes that I teach at my local yarn store, Lofty Lou’s. You can find me there most Tuesday mornings from 10-1:00, so if you happen to find yourself in the California Foothills, east of Sacramento, look us up and stop by.

corkscrew

Corkscrew Scarf by Linda Dean

You will find the pattern below, if you prefer a printable version, you can download it here,  Beginner Project-Corkscrew Scarf. If you enjoy this pattern and want to explore more of my designs, check out more of my free and for sale patterns here. I hope you enjoy the Corkscrew Scarf, and take a little time to enjoy a time of Make it for Me.

Corkscrew Scarf

by: Linda Dean

Twist and Turn! This fun scarf works up quickly and is a whimsical addition to any wardrobe.

Skill level:  Beginner

Finished measurements: 2.5”x 72”

Gauge: is not critical for this project

Material List:

  • Size I/9/5.5mm hook
  • Approximately 200yrd of medium weight yarn, sample used: (multi color)Plymouth Yarn Encore Colorspun medium weight 75% acrylic, 25% wool yarn (3.5oz/100g/200yrd/183m), 1 skein color# 7512 or (solid) Berroco Ultra Alpaca medium weight 50% Super Fine Alpaca, 50% Peruvian Wool yarn (3.5 oz/100g/215yrd/189m) 1 skein color #62178
  • Tapestry Needle


Abbreviations:

ch: chain

dc: double crochet

rep: repeat

sc: single crochet

sk: skip

sl st: slip stitch

st(es): stitches

Row 1: Ch 182, dc in 4th ch from hook, 2dc in each ch across, turn.

Row 2: Ch 4 (counts as dc and ch 1), dc in next s, *ch 1, dc in next st; rep from * across, turn.

Row 3: Ch 3 (counts as dc), dc in same st, *ch 1, dc in ch-1 sp; rep from * across to last st, dc in last st, turn.

Row 4: Ch 1, sc in same st, *ch 1, sc in ch-1 sp; rep from * across to last 2 sts, ch 1, sc in last st, finish off.

Finishing    Weave in ends; twist scarf as desired.

© 2015 Linda Dean Crochet    #2015000T1   lindadeancrochet.com   Copying prohibited, intended for private use only


Simple Changes and What They Can Create

ScannedImageI always enjoy how a simple change can make quite an affect.

M22162_Refractions_300

Refractions Tunisian Wrap Photo courtesy of Annie’s

I find this to be true with one of my latest designs to be released, Refractions Tunisian Wrap, found in the Spring 2016 issue of Crochet! Magazine. This wrap only has 2 stitches and works short rows. That is it. Yet the effect it has is stunning. A definite eye catcher.

The difference in the stitch types really allows the yarn to shine. This is because of the way the yarn gets taken up in each stitch. So, even though I used the same yarn, the looks in the different triangles is very different, almost causing the yarn to work a double a duty in a way, by having a different “pooling” pattern.

Color pooling is when colors in a variegated yarn stack up upon one another in certain ways, and this wrap creates two very different appearances in this. One triangle has long color stripes, the other almost square blocks of color.

129037The other obvious difference in the triangles it that one seems solid, while the other is lacy. So not only do you have a differing color effect, you have a differing textural effect, without changing anything but the stitch!

One of the secretly great things about the way the triangles come together is that it just easily wraps around the neck, and hugs the shoulders. There is no slipping or falling off, it stays in place.

Okay, in case you may not have realized it, I enjoyed working this pattern. I hope you do too.


Fronts & Backs, the Confusion, the Difference

ScannedImageSometimes it can be the simplest things that trip us up; this is even true in crochet. Sometimes, it is just because we are overthinking things. This can be true when utilizing the front and back loops of a stitch. In crochet the standard fall back for all stitches is to work through both loops that are created at the top of a stitch, so if a pattern does not specify anything you are assumed to work through both loops, however there are times you do get a noted distinction….front loops and back loops.

DSCF1093

Working in the front loop, notice how the hook comes from the bottom of the loop upward.

It almost sounds too easy. Working in the front loops across….working in the back loops across….But I will admit, my brain sometimes holds onto the prior position of the loop, instead of where it really is right now. I think we have all had these moments. Our brain is a little groggy, a little overloaded, and a little set in its ways, so it just almost quits processing the information. By this I mean, when you work a stitch, the loop on the top closest to you is the front loop, and the on top furthest away is the back loop; when you turn your work, these same principles still apply, but now the names you just recognized for the loops to row before has switches. 

The position of the loops applies to the row you are currently working into, not the position of the loops on the stitch just being created.

DSCF1095

Working in the back loop, notice how the hook comes down from the top through this loop.

This does become an important distinction, as it gives the fabric a different look and structure. Working in the back loops of a row give a more textured feel to the fabric as well as creating a little more stretch. While working in the front loops adds a simple decorative element and a little extra height to the fabric overall. The reason for these differences is actually the nature of crochet stitches. If you really look at a row of stitches, you will find that they actually are a little tapered, with the right side facing you the back of a stitch will be a little taller than the front. It is this slant that creates the ribbing effects of some stitches, and the decorative effect of others.

DSCF1089

The standard method of beginning a stitch, if not otherwise stated, working under both loops.

Just keep in mind, that we all have those days, so if your fabric doesn’t look how you have expected, revisit if you are placing your stitch in the right location; it can make all the difference.