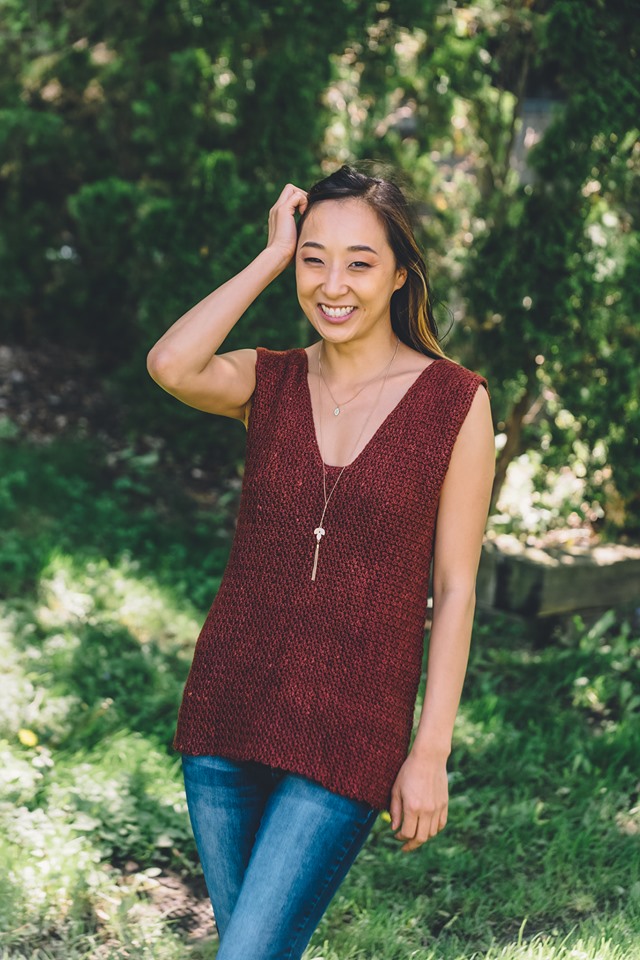
The Easygoing Tank, found in the August issue, is worked as one piece, side to side. It has a simple stitch pattern and is shaped on one edge of the fabric. By using a few join-as-you-go techniques that are explained in the pattern, you can even avoid seaming the tank at all, and finish the entire top with just your hook!
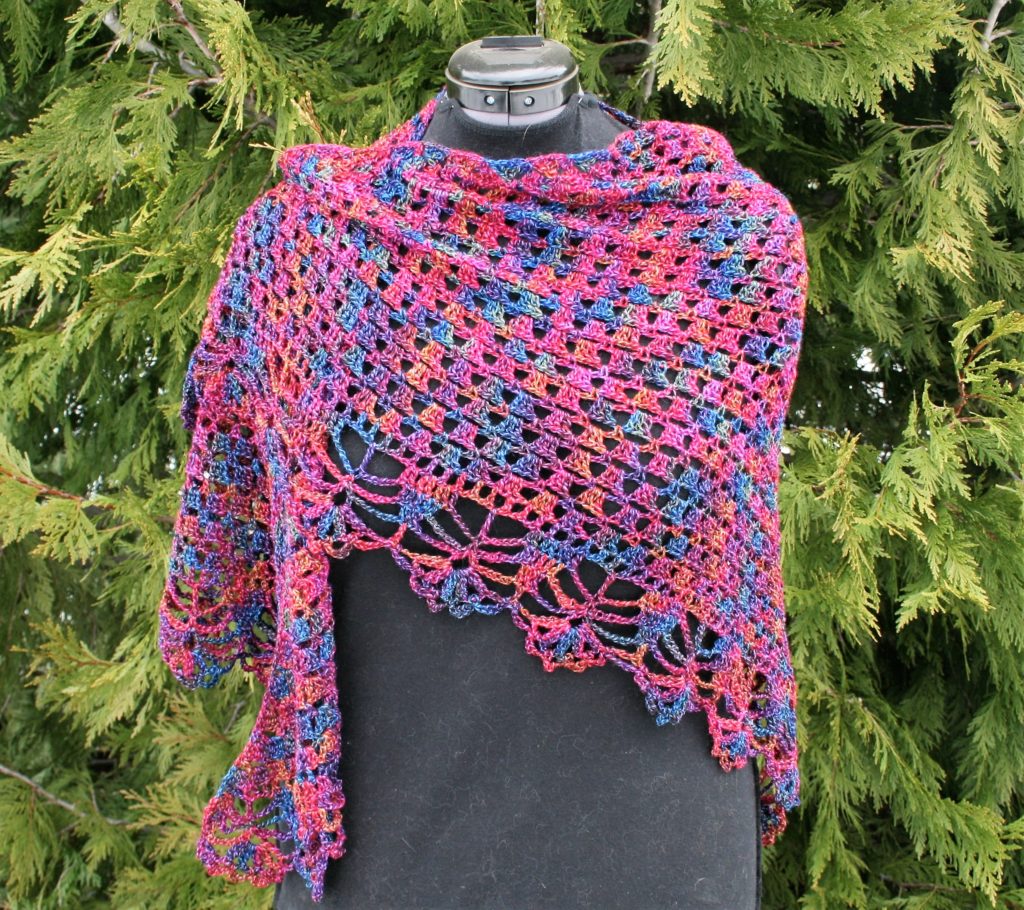
Serene Wrap Skirt- photo courtesy Prime Publishing
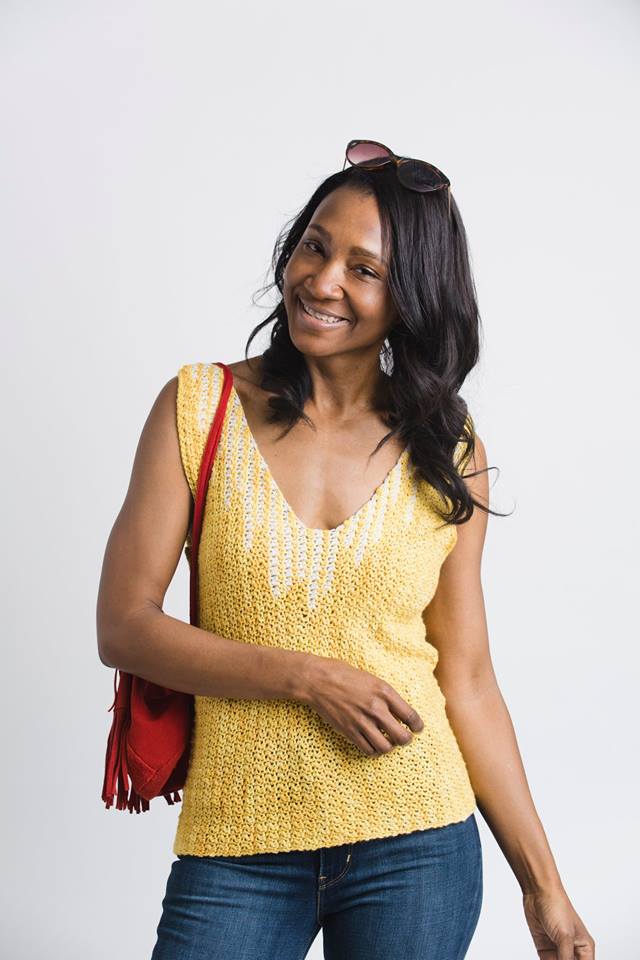
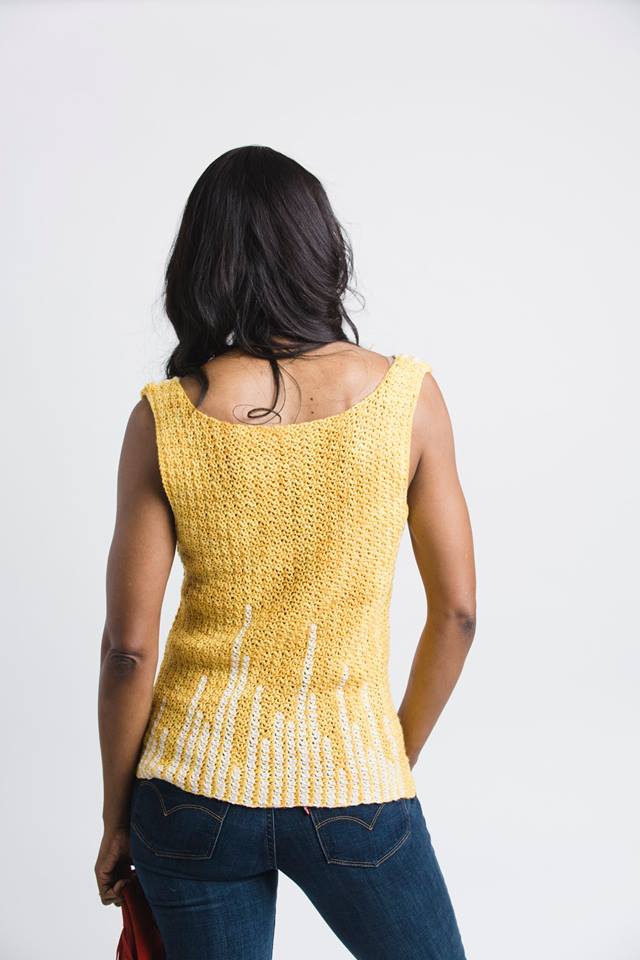
I have heard this design explained as, “Eye catching with a total style, this tank offers flattering
partial stripes that demands attention”. I cannot say that I disagree, but I
should add that it works up quicker than you might expect.
Soleil Stripes Tank, Photo courtesy of Prime Publishing
Since it is worked vertically this
tank is worked with yarn carries, so there are few ends to weave and simple
success is easy to achieve. In addition the stripes are only located at the
front edge of the neck and the lower edge of the back, so it is not
overwhelming with various points to keep straight.
The stitch pattern is a simple
combination of single and double crochets, so that the focus really is the
color changes.
Soleil Stripes Tank, photo courtesy of Prime Publishing
I was inspired to create this design
from the simple image that rested in my mind during some travel. I was walking
down a busy city street and the way that the light was playing off the windows
and reflecting the adjacent buildings. It created this staggered uneven stripes
that stuck in my mind.
So when I was playing with Anzula yarns I was drawn to place this image into a fabric, and hence this tank was created.
I am pretty happy with the results, I
hope you are too.
When I first created this design, I was planning on celebrating crochet during the National Crochet Month (every March), but now it has grown into a much longer celebration time….If you are visiting this site from the Yarnover Truck as part of the San Diego Yarn Crawl…Thank you! Please enjoy “my crochet story” and your free pattern.
I met Underground Crafter through the Crochet Guild of
America, actually I have my career in crochet because of CGOA. I never thought
that crochet could take me to the places it has.
I will admit that when I first learned about CGOA I didn’t
really know what to expect. I found an ad for it in a magazine, and figured I
would give membership a try.
I soon learned of the Masters program, then completed the Advanced Stitches &Techniques Program, which consists of 48 swatches and 13 question. Some of the swatches were things I had never heard of before, like foundation single crochet, so I learned some new skills and have my work reviewed. I remember that I was nervous, excited and a bit terrified to have my work reviewed. Fortunately, and eventually, I passed the program.
Later that year I was invited to the CGOA annual conference
to be recognized for my accomplishment. I was a bit reluctant….after all it was
a crochet conference….so people just sat around and crocheted?…But with
encouragement from family and friends I went, and I was hooked!
Where this one event took me
I met so many incredible people from so many walks of life.
It was an experience that changed my life, seriously. It was at this conference
that I sold my first design, and began my career as a crochet designer, that
lead to more teaching, that lead to volunteer work in crochet…that lead to
being a reviewer and a writer for the Masters Program, that lead to a seat on
the Board of Directors, and finally my title as President. It is hard to
believe that my career started only 7 years ago, from a membership that I took
a chance on a decade ago.
Even if I never took the chance at conference and started a
new path in my life, I was hooked as a supporter of CGOA for the simple fact
that it is the only organization that solely supports crochet. It is a unified
voice of crocheters in the craft industry, a central point for the history of
all things crochet, a source that encourages and expands the skills and
knowledge of crochet. It does all of this numerous volunteers coordinating over
twenty committees. I am constantly impressed with the ideas and energy of those
that love crochet.
I would continue to support CGOA simply because it supports
crochet.
In addition, please enjoy my free pattern, Quiet Night Wrap. I designed this pattern by candle light during the winter storms and my journey back to the 1800’s just a few weeks ago (find that story here). I hope you have enjoyed a month long celebration of crochet, personally I think I will try and celebrate it every day.
Quiet Nights Wrap
Quiet Nights Wrapby:
Linda Dean
Created in the dark during a winter storm, this simple 2 row repeat worked from the center back outward, will be a go to favorite for a triangle shawl. The ending edge really makes it a show stopper. This will be the wrap that everyone wants you to make for them.
Treble Crochet Two
Together (tr2tog): YO
twice, insert hook into stitch, YO, pull up a loop, (YO, pull through 2 loops)
twice, YO twice, insert hook into stitch, YO, pull up a loop, (YO, pull through
2 loops) twice, YO, pull through 3 loops.
The Pattern
Row 1: Ch 2, (sc, [ch 3, sc] 3 times) all in 2nd ch from hook, turn. -4 sc, (3) ch-3 sps
Row 2: Ch 4 (counts as dc + 1 ch now and throughout), 3 dc in next ch-3 sp, ch 1, (3 dc, ch 1, 3 dc) in next ch-3 sp (insert removable stitch marker in ch-1 sp to mark center of shawl), ch 1, 3 dc in next ch-3 sp, ch 1, dc in last sc, turn. 14 dc
Row 3: Ch 1,(sc, ch 3, sc) in same st, ch 3, sk ch-1 sp, sk 3dc, sc in next ch-1 sp, [ch 3, sk 3 dc, sc in ch-1 sp] across to center of shawl, ch 3, (sc, ch 3, sc) in center ch-1 sp, [ch 3, sk 3 dc, sc in next ch-1 sp] across to last ch- 1 sp, ch 3, sk 3 dc, sk ch-1 sp, (sc, ch 3, sc) in last dc, turn. -7 ch-3 sps
Row 4: Ch
4, 3 dc in next ch-3 sp, [ch 1, 3 dc in next ch-3 sp] rep across to center of
shawl, ch 1, (3 dc, ch 1, 3 dc) in center ch-3 sp, [ch 1, 3 dc in next ch-3 sp]
across, ch 1, dc in last sc, turn. -26 dc
Row 51: Ch 4, dc in same sp, [ch
1, sk 1, dc in next st] across to center of shawl, ch 1, (dc, ch 1, dc) in
center of shawl, ch 1, dc in next st, [ch 1, sk 1, dc in next st] across to ast
st, ch 1, (dc, ch 1, dc) in last st, turn.
Row 52: Ch 3, dc in next 4 sts, [ch 5, sk 2 ch-1 sps, tr in next ch-1 sp, ch 5, sk next 2 dc, dc in next dc, dc in next 6 sts] 12 times, ch 5, sk 2 ch-1 sps, tr in next ch-1 sp, ch 5, sk next 2 ch-1 sps, 3 dc in next ch-1sp (center of shawl), [ch 5, sk next 2 ch-1 sps, tr in next ch-1 sp, ch 5, sk next 2 dc, dc in next dc, dc in next 6 sts ] 12 times, ch 5, sk next 2 ch-1 sps, tr in next ch-1 sps, ch 5, sk next 2 dc, dc in next dc, dc in last 4 sts, turn.
Row 53: Ch 3, dc in next 3 sts, [ch 7, sc in tr, ch 7, sk ch-sp and next dc, dc in next st, dc in next 4 sts] 12 times, ch 7, sc in tr, ch 7, dc in next dc, (dc, ch 1, dc) in next dc, dc in next dc, [ch 7, sc in tr, ch 7, sk next ch-sp and dc, dc in next dc, dc in next 4 sts] 12 times, ch 7, sc in tr, ch 7, sk ch-sp and next dc, dc in next dc, dc in last 3 sts, turn.
Row 54: Ch 3, dc in next 2 sts, [ch 7 (sc, ch 5, sc) in sc, ch 7, sk ch-sp and next dc, dc in next 3 sts] 12 times, ch 7, (sc, ch 5, sc) in sc, ch 7, sk ch-sp, dc in next 2 sts, (dc, ch 1, dc) in ch-1 sp, dc in next 2 sts, [ch 7, (sc, ch 5, sc) in sc, ch 7, sk ch-sp and next dc, dc in next 3 dc sts] 12 times, ch 7, (sc, ch 5, sc) in sc, ch 7, sk ch-sp and next dc, dc in last 3 sts, turn.
Almost done….
Row 55: Ch 3, dc in next st, [ch 3
(tr2tog, ch 3) 4 times in ch-5 sp, tr2tog in same sp, ch 3, sk ch-sp and next
dc, dc in next st] 12 times, ch 3 (tr2tog, ch 3) 4 times in ch-5 sp, tr2tog in
same sp, ch 3, sk ch-sp, dc in next 3 dc, (dc, ch 1, dc) in ch-1 sp, dc in next
3 dc, [ch 3, ch 3 (tr2tog, ch 3) 4 times in ch-5 sp, tr2tog in same sp, ch 3,
sk ch-sp and next dc, dc in next st] 12 times, ch 3 (tr2tog, ch 3) 4 times in
ch-5 sp, tr2tog in same sp, ch 3, sk ch-sp and next dc, dc in last 2 sts, turn.
Row 56: Ch 1, sc in same st, ch 3,
sc in next st, {[ch 5, sc in next ch-3 sp] 5 times, sc in next ch-3 sp} 12
times, [ch5, sc in next ch-3 sp] 5 times, ch 5, (sc, ch 5, sc) in ch-1 sp, ch
5, sc in ch-5 sp, {[ch 5, sc in next ch-3 sp] 5 times, sc in next ch-3 sp} 12
times, [ch 5, sc in next ch-3 sp] 5 times, ch 5, sc in next dc, ch 3, sc in
next dc. Fasten off.
Weave in ends, block.
A Bonus
Thank you for participating in the San Diego Yarn Crawl…as an added bonus, you can download a PDF of this pattern here.
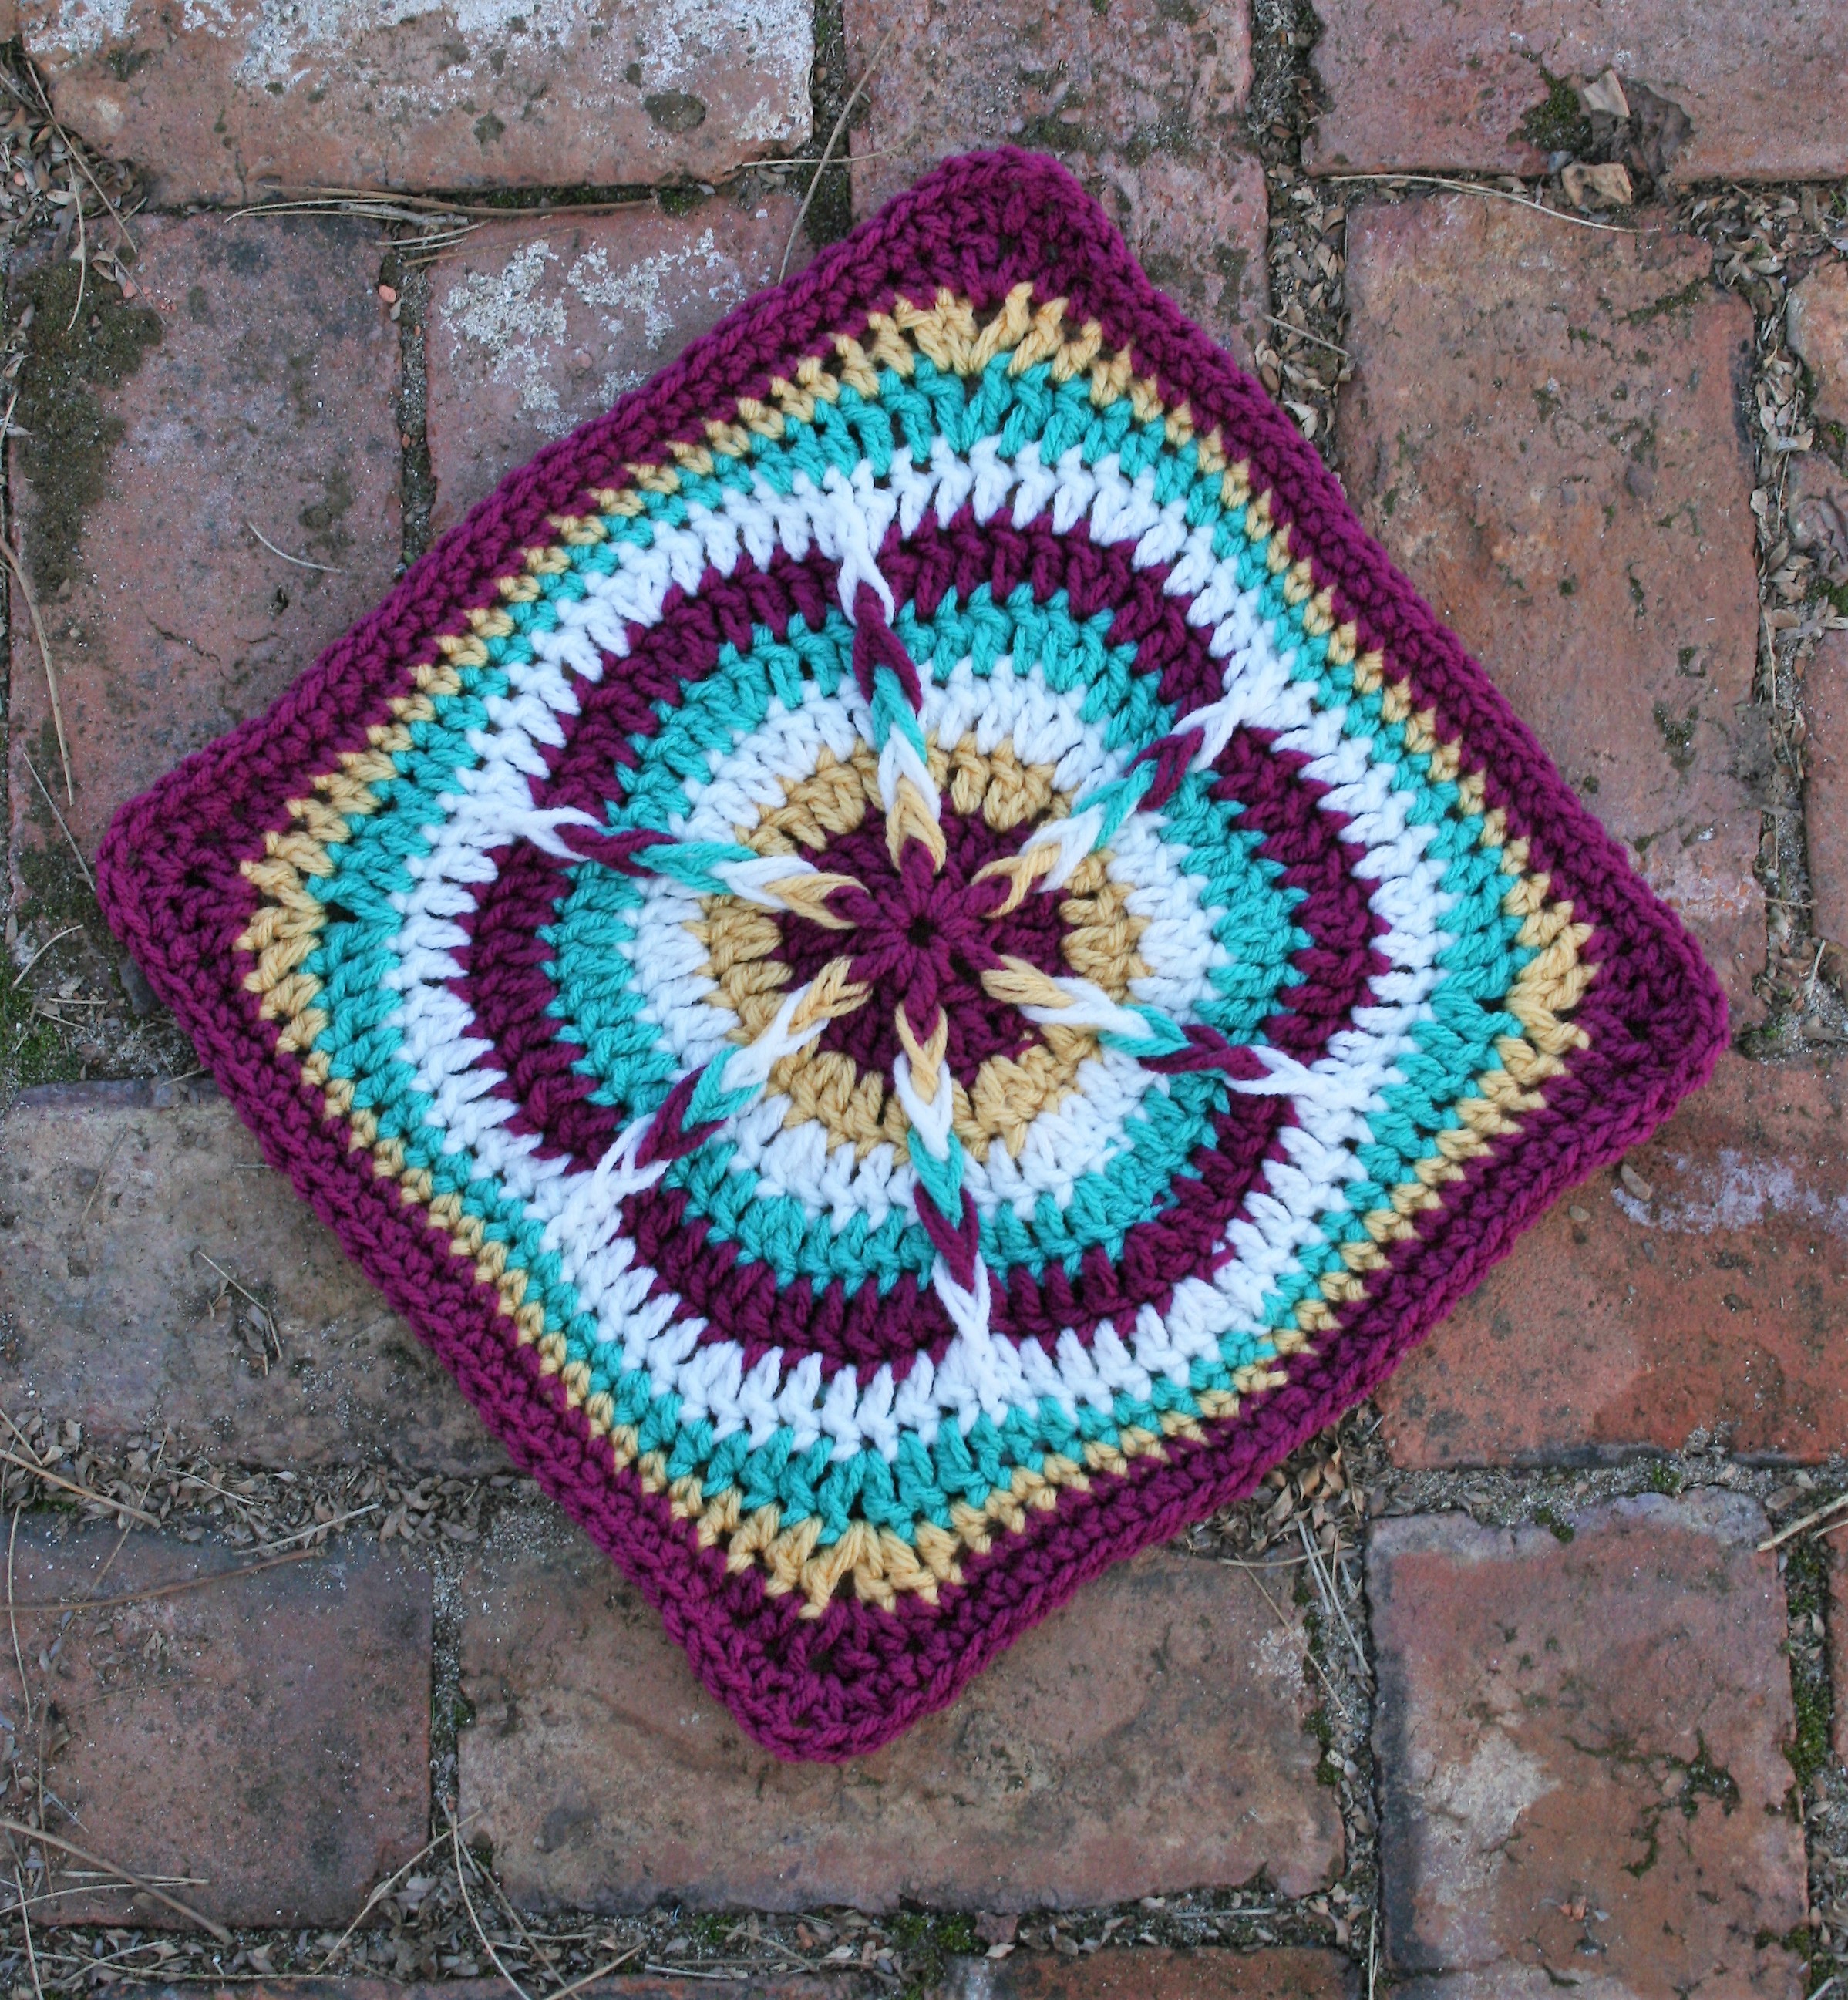
I feel very privileged to be able to share with you this latest design, the Festive Julie Ann Square. Inspired by my student Julie Ann, who loves to work in the round, and makes a festive atmosphere where ever she is going.
The square uses long post loops, to create a stunning color play of the eye. Working this square for some reason always makes me think of flowers, I guess that is one of the reasons I see it as festive.
Festive Julie Ann by Linda Dean
Bring in the New Year with a bright star of festival with this square that elongates some post stitches to create a planned bleeding of the colors.
Gauge: 12”x 12” square (30.5 x 30.5cm) –After Rnd 3 you should measure approximately 4″ (10cm)
Long Loop Front Post Double Crochet (LLfpdc): Working over post stitch of previous round, YO, insert hook around post of stitch 2 rows below from back to front and right to left, YO, pull up a loop about an inch in height, (YO, pull through 2 loops) twice.
Note that you will work a double crochet and a post stitch in the same stitch.
Rnd1: With A, ch 4, 11 dc in 4th ch from hook, join to top of beg ch. -12 dc
Rnd 2: Ch 3 (counts as a dc, now and throughout), fpdc in same st, 2 dc in next st, [(dc, fpdc in next st), 2 dc in next st] rep around, join. -18 dc, 6 fpdc
Rnd 3: Change to B, ch 3, dc in next st, LLfpdc in same st as last, dc in next st, 2 dc in next st, [dc in next 2, LLfpdc in same st as last, dc in next st, 2 dc in next st] rep around, join. -30 dc, 6 LLfpdc
Rnd 4: Change to C, ch 3, dc in next 2 sts, LLfpdc in same st as last, dc in next 2 sts, 2 dc in next st, [dc in next 3, LLfpdc in same st as last, dc in next 2 sts, 2 dc in next st] rep around, join. -42 dc, 6 LLfpdc
Rnd 5: Change to D, ch 3, dc in next 3 sts, LLfpdc in same st as last, dc in next 3 sts, 2 dc in next st, [dc in next 4, LLfpdc in same st as last, dc in next 3 sts, 2 dc in next st] rep around, join. -54 dc, 6 LLfpdc
Rnd 6: Change to A, ch 3, dc in next 4 sts, LLfpdc in same st as last, dc in next 4 sts, 2 dc in next st, [dc in next 5, LLfpdc in same st as last, dc in next 4 sts, 2 dc in next st] rep around, join. -66 dc, 6 LLfpdc
Rnd 7: Change to C, ch 3, dc in next 5 sts, LLfpdc in same st as last, dc in next 5 sts, 2 dc in next st, [dc in next 6, LLfpdc in same st as last, dc in next 5 sts, 2 dc in next st] rep around, join. -78 dc, 6 LLfpdc
Rnd 8: Change to D, ch 1, sc in same st, [sc in next 4 sts, hdc in next 3 sts, dc in next 2 sts, (dc, ch 1, dc) in next st, dc in next 2 sts, hdc in next 3 sts, sc in next 6 sts] rep around, join. -40 sc, 24 hdc, 24 dc, 4 ch-1 sps
Rnd 9: Change to B, ch 1, sc in same st, [sc in next 7 sts, hdc in next 2 sts, dc in next st, (dc, ch 1, dc) in ch-1 sp, dc in next st, hdc in next 2 sts, sc in next 9 sts] rep around, join. -64 sc, 16 hdc, 16 dc, 4 ch-1 sps
Rnd10: Change to A, ch 1, sc in same st, [sc in next 9 sts, hdc in next 2 sts, (dc, ch 1, dc) in ch-1 sp, hdc in next 2 sts, sc in next 11 sts] rep around, join. -80 sc, 16 hdc, 8 dc, 4 ch-1 sps
Rnd 11: Ch 1, sc in same st, [sc in next 10 sts, hdc in next 2 sts, (dc, ch 1, dc) in ch-1 sp, hdc in next 2 sts, sc in next 12 sts] rep around, join. Fasten off. Block. Weave in ends. -88 sc, 16 hdc, 8 dc, 4 ch-1 sps
Thank you to ELK Studio for putting together this Make it For Me event! what a nice way to kick off the new year, after months of crocheting gifts for everyone else it is time to rejuvenate and focus a bit more inward and create something for you! (Check out the entire list of month long projects here)
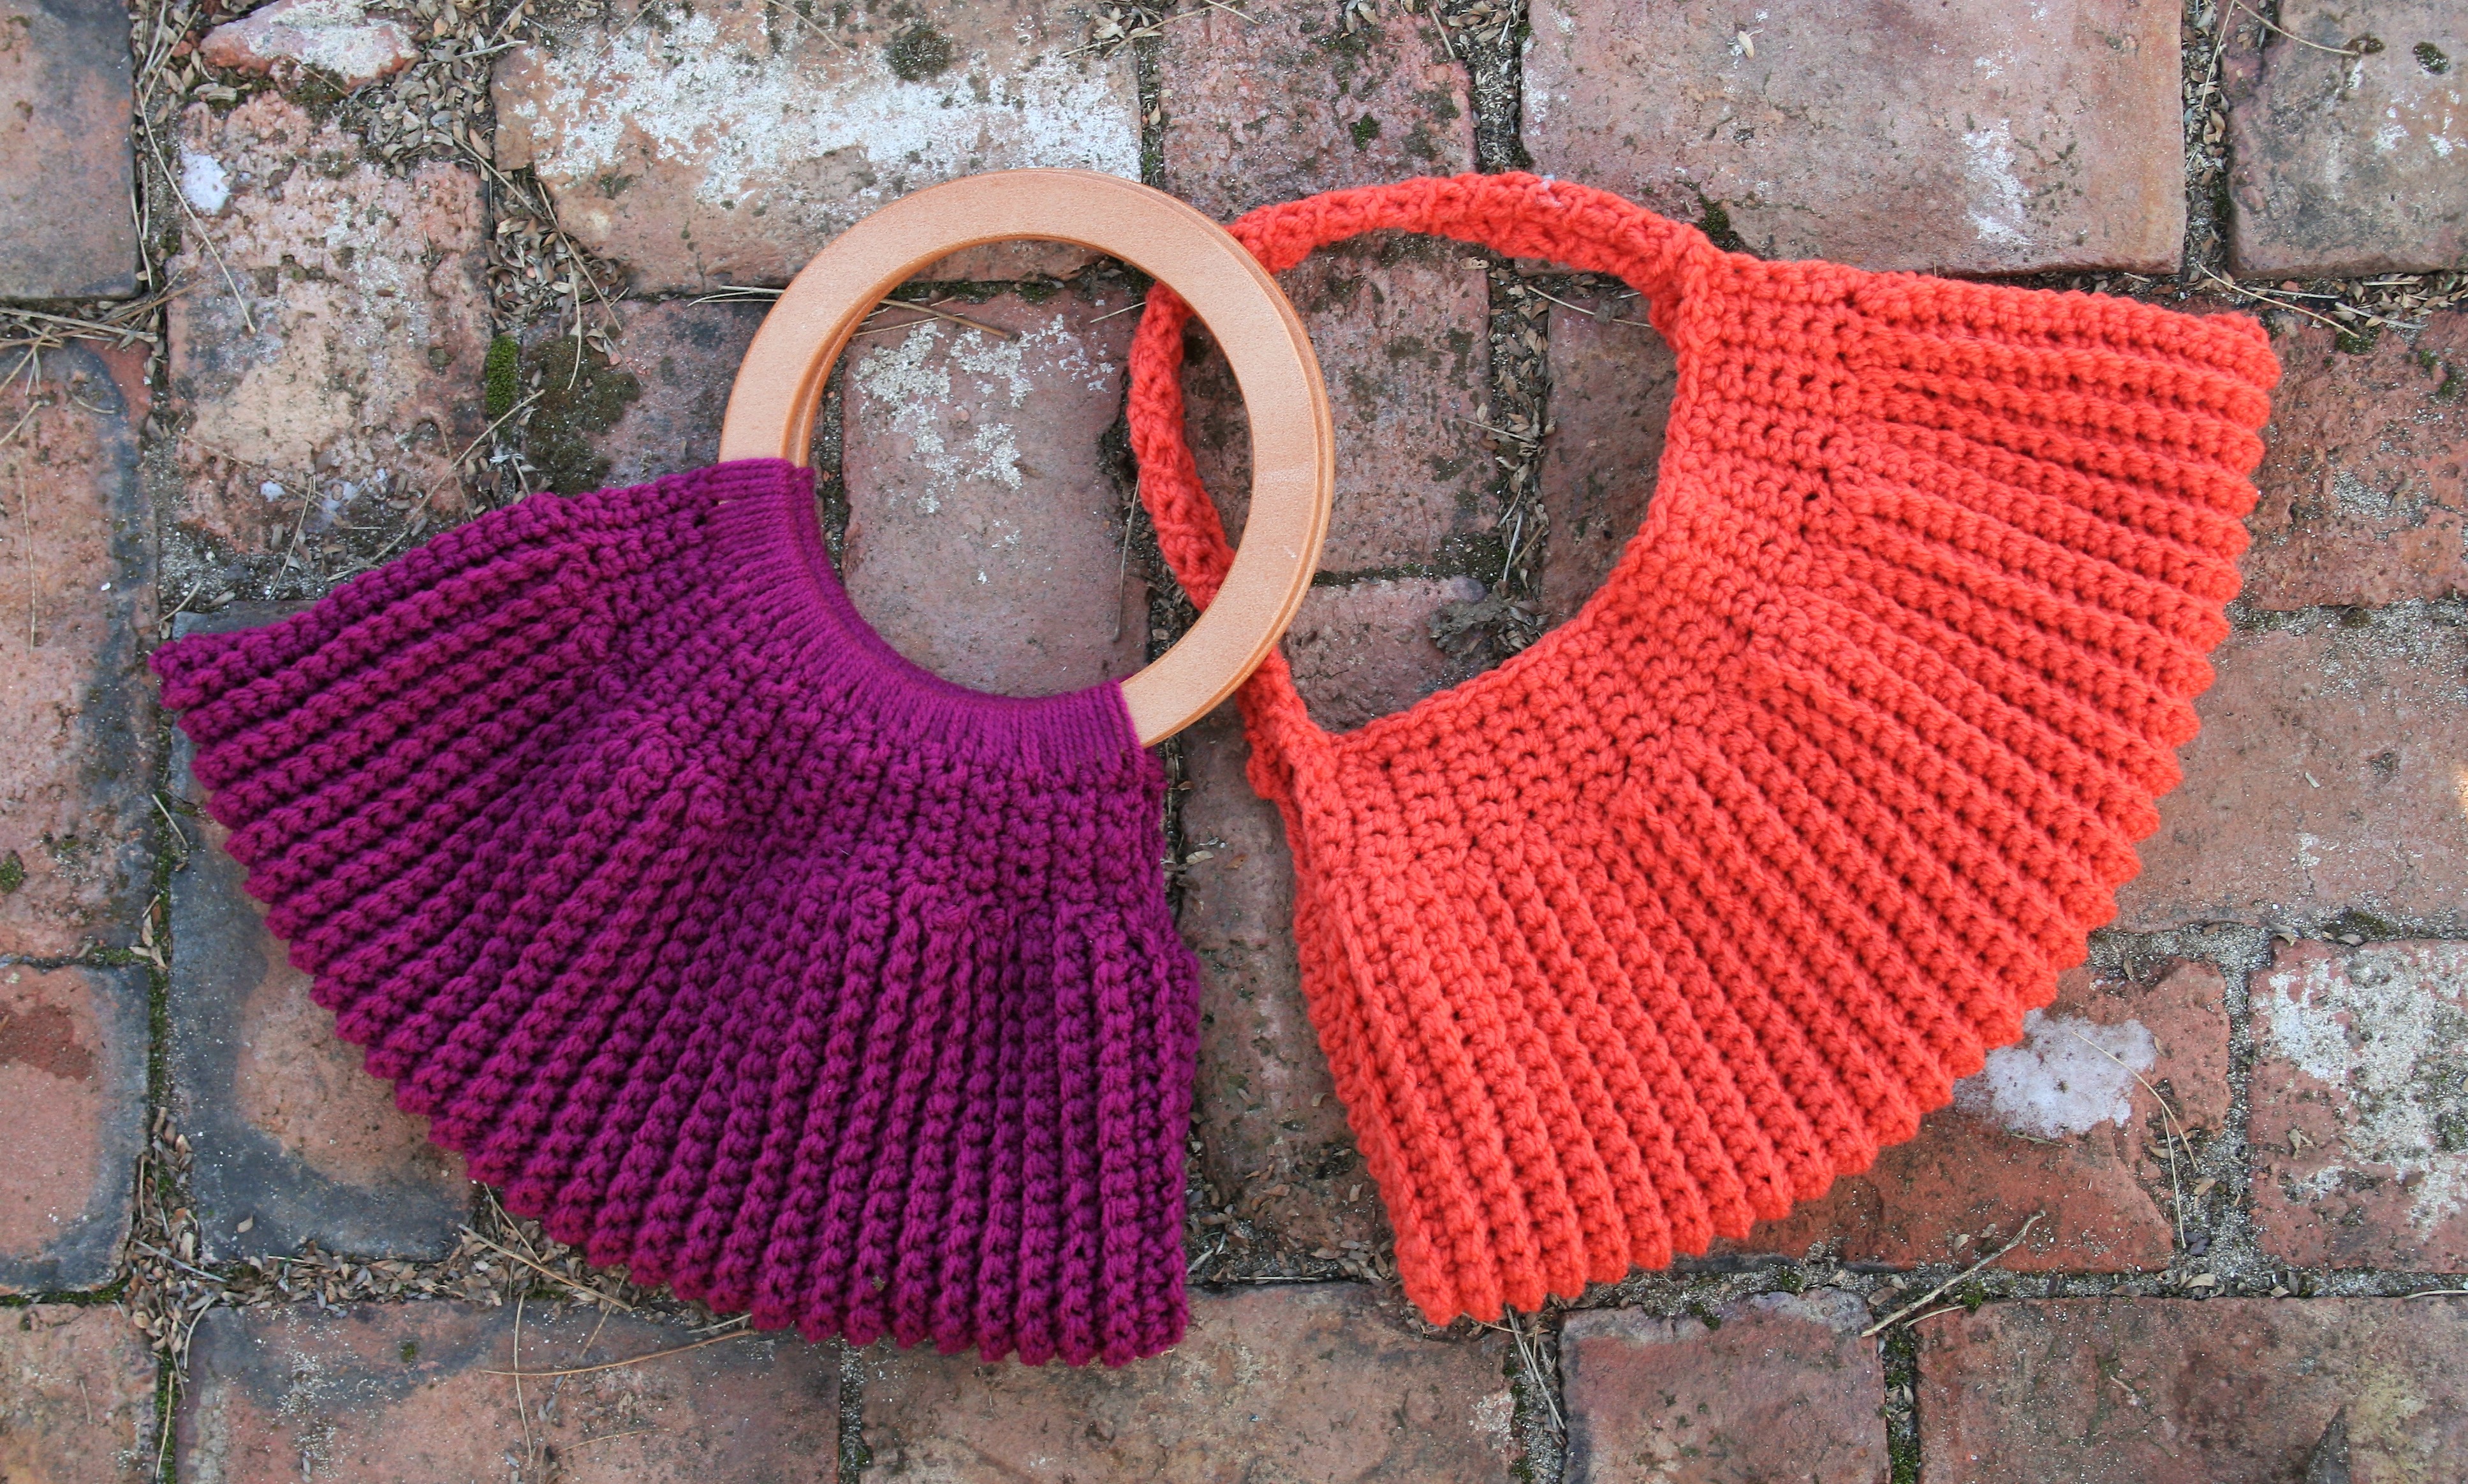
I am thrilled to be able to join this event with my Cathy’s Classic Handbag. It is made with less than one skein, so you can reach into your stash. I even provided two options for handles…I really like the wooden round handles, but reality…I enjoy crocheting and getting to the craft store or even ordering on line means I am not finishing it the same day I start, so I provided a crochet handle option too. (If you want to learn how to attach the wooden handles, I have some instructions to help you here).
This handbag was inspired by one of my students. Cathy always has a smile and carries herself with a rural, country chic charm. She brightens the room no matter what her day may have contained, and to get all dressed up I could see her with this classic style.
Cathy’s Classic Handbag by: Linda Dean
A classic handbag that is fast to work up and has a lot of charm. A bit of stretch and a bell shape add to this great purse. With optional handle options you can utilize a simple round wooden handle or crochet your own.
Ch 1, working along the row ends, 4 sc in first row end, working in a spiral (meaning that you are working in the round but are not joining the round, you continue working in the next stitch) to create a cord, blsc in the first sc worked in the end row, blsc in each sc until the cord measures about 14” (35.5cm), sl st to opposite end row from the beginning of the cord, sl st next 3 sts of cord to same st, sc in each row end across to beginning of the cord, fasten off.
Seaming
Folding handles together, whip stitch the open ends of the purse leaving between 1-2” open from the handles.