Perfect for the Chill- Shurs!

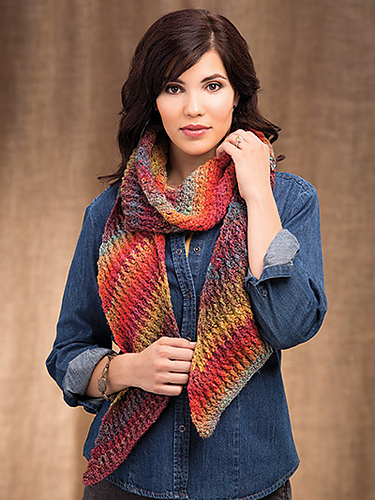
As winter is gripping part of North America and the arctic chill is setting in Manos del Uruguay released my latest pattern, which is perfect to keep warm! Shurs is a cowl that is just the right size, long enough to be wrapped twice for extra warmth and coverage, yet still short enough that wearing it unwrapped has a perfect amount of drape for a classic look.

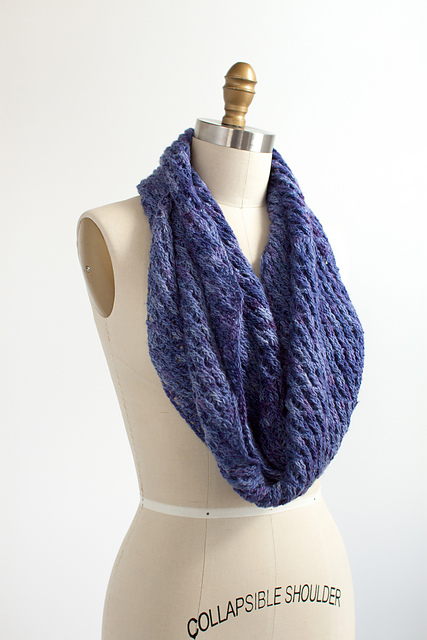
It is worked in what I refer to as a “cross-hatch” pattern. So, cross-hatch is actually an artist term the is comprised of short strokes made usually by pencil or charcoal that then has short strokes crossing in the opposite direction to create the shading and depth of the drawing. Almost like little “x”s that create an image.

I have worked this cowl similarly, with each row crossing the opposite direction of the last. It allows for an interesting visual effect, as you can catch glimpses of the stitches behind each other, but it also adds in a nice amount of stretch.

In addition to the “crossed” appearance, the stitches begin to stack up and give a very diagonal look, without having any increasing or decreasing stitches being worked. Instead this is a simple 2 row repeat, so it is a design that you can work rather quickly and easily, even for a crocheter that may not be completely confident in their work.

It is worked in Manos del Uruguay Clara, a yarn that is 100% superwash merino (meaning that it is a wool that is treated so that it does not felt, or shrink, but has all the great properties of wool like warmth and durability). It is a hand dyed sport weight yarn, that has a nice amount of spring to it while still having a nice stable yarn.

So, consider a quick project to keep warm this cold season, Shurs I feel is a good choice for this project.

Photos courtesy Fairmount Fibers, Ltd.

Planned Pooling with a V Stitch

The trend of creating an argyle color pattern from variegated yarn is becoming quite popular, but it is not the only effect you can get from planned pooling. Pooling is when certain colors “stack” or “group” together from a variegated yarn, and as planned pooling might suggest, you can plan where the colors fall from the yarn and create a pattern.

Usually this argyle effect is created with yarn that has a color repeat of at least 6-18” (15-46cm) and using what some call the moss or linen stitch. This stitch is a single crochet and a chain 1, with all single crochet stitches worked in the chain-1 space the row below.

Planned Pooling Scarf www.lindadeancrochet.com

Planned Pooling Scarf Photo courtesy Red Heart

When color repeats are longer, let’s say 24” (61cm) argyle may not be effective, but you can use other stitches to come up with various patterns. My Planned Pooling Scarf that has just been released by Red Heart Yarn, is worked in a longer color repeats, using a V stitch (a double crochet, chain 1, double crochet) worked in the chain-1 space of the V stitch of the row below. The V stitch uses more yarn then the “moss stitch” and the chain works to help give a little flexibility in getting the color placed in the correct place. (Marly Bird offers great tips in getting the yarn to pool in her video, here).

The Neon Stripes color of Red Heart Super Saver offers a really great opportunity to create this large stitch color pattern. I have also seen this yarn worked up in a pooled pattern with shell stitches, and popcorn stitches. It creates a similar color effect, but a definitely different texture.

Planned Pooling Scarf www.lindadeancrochet.com

Planned Pooling Scarf Photo courtesy Red Heart

This design creates a fabric that is a bit lighter than the argyle, which makes for a nice drape, and the color play makes for a very fun flair. The fringe gives it a classic feel, while the pooling is quite modern. Hope you feel inspired to give it a try.

Stress Free & Seamless… The Best of Crochet

ScannedImageI had a surprise in the latest special issue of Crochet! Magazine,(Stress Free Seamless Crochet, Fall 2016), I had another design on the cover! What was really surprising is that I was not even expecting this design to be in this issue.

LAVISH_LAYERS_SCARF_medium

Autumn Blaze Scarf Photo courtesy Annie’s

132120_small2The Autumn Blaze Scarf that adorns the cover is really an interesting pattern that creates a great texture while creating a fabric that is on the biased, meaning that it has increases and decreases worked every row to give it a much angled direction. This really allows yarn that has some length to the color repeats to shine.

DHARMA-tote_medium2

Dharma Tote Photo courtesy Annie’s

The second design I have in this issue also benefits from long color repeat yarn, the Dharma Tote uses crochet miter squares to bring color to life in angles. Miter squares are worked from two edges worked, a corner, and worked toward the opposite corner. There is essentially a decrease worked in the center of the worked row, and my continuing the row with a decrease every row, it reduces to a point.

One of the really nice features about miter squares is that you can easily work it as join as you go, by beginning an edge directly on a created square. I played around a bit with the square locations, as I really didn’t want everything facing the same direction, yet I didn’t want to create a square that would be difficult to create with too many joins. I added some leather strap handles, and this bag was ready to go. I love the stretch that it has, I can stuff it full of crochet samples for my classes, or items that my kids need for “insert name of event here”.

Both of the designs benefit from long color repeat yarns, there is a couple of reasons for this. First you do not have to think about color combinations. The yarns already have some harmony in the palette of color, thus making sure that your finished product will be pleasing to the eye. Second, the long spans of color allow for the design to be highlighted. Whenever color changes are short, a little of every color works into almost any stitch, and things looked speckled. When to color change is long, you can create a shape in the color, as with Dharma Tote, you can see the directions for the squares. Neither of these designs would shine if they were speckled or in solid colors.

Make it for Me! Free Pattern

ScannedImageI am so excited that I have been invited to join a vast array of talented designers to participate in the Elk Studios “Make it for Me” event. For the entire month of January, Elk Studios has been featuring a new design, from various designers, to encourage crocheters to make a little something for themselves. The rush of the holiday season creates hooks and yarn flying, but not usually in a project for the stitcher.

Today I am happy to share my Corkscrew Scarf. This is a fun project that can work up quickly in a wide variety of yarns, and is easily adjusted in length or width to make a scarf that fits just the way you want it.

The Corkscrew scarf was originally created as a project that “new to crochet” students could practice some stitches, while learning how to read patterns, in the crochet classes that I teach at my local yarn store, Lofty Lou’s. You can find me there most Tuesday mornings from 10-1:00, so if you happen to find yourself in the California Foothills, east of Sacramento, look us up and stop by.

corkscrew

Corkscrew Scarf by Linda Dean

You will find the pattern below, if you prefer a printable version, you can download it here,  Beginner Project-Corkscrew Scarf. If you enjoy this pattern and want to explore more of my designs, check out more of my free and for sale patterns here. I hope you enjoy the Corkscrew Scarf, and take a little time to enjoy a time of Make it for Me.

Corkscrew Scarf

by: Linda Dean

Twist and Turn! This fun scarf works up quickly and is a whimsical addition to any wardrobe.

Skill level:  Beginner

Finished measurements: 2.5”x 72”

Gauge: is not critical for this project

Material List:

  • Size I/9/5.5mm hook
  • Approximately 200yrd of medium weight yarn, sample used: (multi color)Plymouth Yarn Encore Colorspun medium weight 75% acrylic, 25% wool yarn (3.5oz/100g/200yrd/183m), 1 skein color# 7512 or (solid) Berroco Ultra Alpaca medium weight 50% Super Fine Alpaca, 50% Peruvian Wool yarn (3.5 oz/100g/215yrd/189m) 1 skein color #62178
  • Tapestry Needle


Abbreviations:

ch: chain

dc: double crochet

rep: repeat

sc: single crochet

sk: skip

sl st: slip stitch

st(es): stitches

Row 1: Ch 182, dc in 4th ch from hook, 2dc in each ch across, turn.

Row 2: Ch 4 (counts as dc and ch 1), dc in next s, *ch 1, dc in next st; rep from * across, turn.

Row 3: Ch 3 (counts as dc), dc in same st, *ch 1, dc in ch-1 sp; rep from * across to last st, dc in last st, turn.

Row 4: Ch 1, sc in same st, *ch 1, sc in ch-1 sp; rep from * across to last 2 sts, ch 1, sc in last st, finish off.

Finishing    Weave in ends; twist scarf as desired.

© 2015 Linda Dean Crochet    #2015000T1   lindadeancrochet.com   Copying prohibited, intended for private use only


Designs In Movement…Some of My Latest Thoughts

ScannedImageSo the long days of summer are now shortening, children or headed back to school, and that can really only mean one thing…Autumn is almost here. M01220_CWOct14_CVR

I have a couple of new designs out, that I think ring true for fall. In the October 2014 Issue of Crochet World Magazine (available digitally now, and on newsstands September 2, 2014) I have a hat, Birds Eye Border, and a Scarf, Hourglass Cables.

Hourglass Cables Scarf 1

Hourglass Cables Scarf Photo courtesy of Annie’s

I enjoy both of these designs so let me tell you a little about them. The Hourglass Cable Scarf is one that is not you simple rectangle, I was playing with movement and enjoyed how this technique created an in and out effect to the edge of the fabric. I added the cables and was astonished at how fun it was, yet simple to keep track of. So the increase/decrease effect gives visual interest while the cables give great texture (while actually highlighting the curves). But using a variegated or striping yarn the details are even more highlighted, as the color shift gives an additional element of focus.

I even enjoyed this technique enough to offer a video of it through Annie’s (you can find it here).

Bird's Eye Border Hat

Bird’s Eye Border Hat Photo courtesy of Annie’s

The next design is the Birds Eye Border Hat. In this design I was once again inspired by movement, I was attempting to create an open circle in the middle of a fabric, and found that I enjoyed how it edged, and though a highlight of this around the face might be nice, thus the hat was created. It has a slight air of whimsy, and can be personalized by weaving a scarf through the openings or adding bead work. It has a lot of possibilities, and yet is simple to put together.

I hope you enjoy the designs and that they encourage you to play with movement in your own work.