Music Tapestry Block for Crochet Celebration

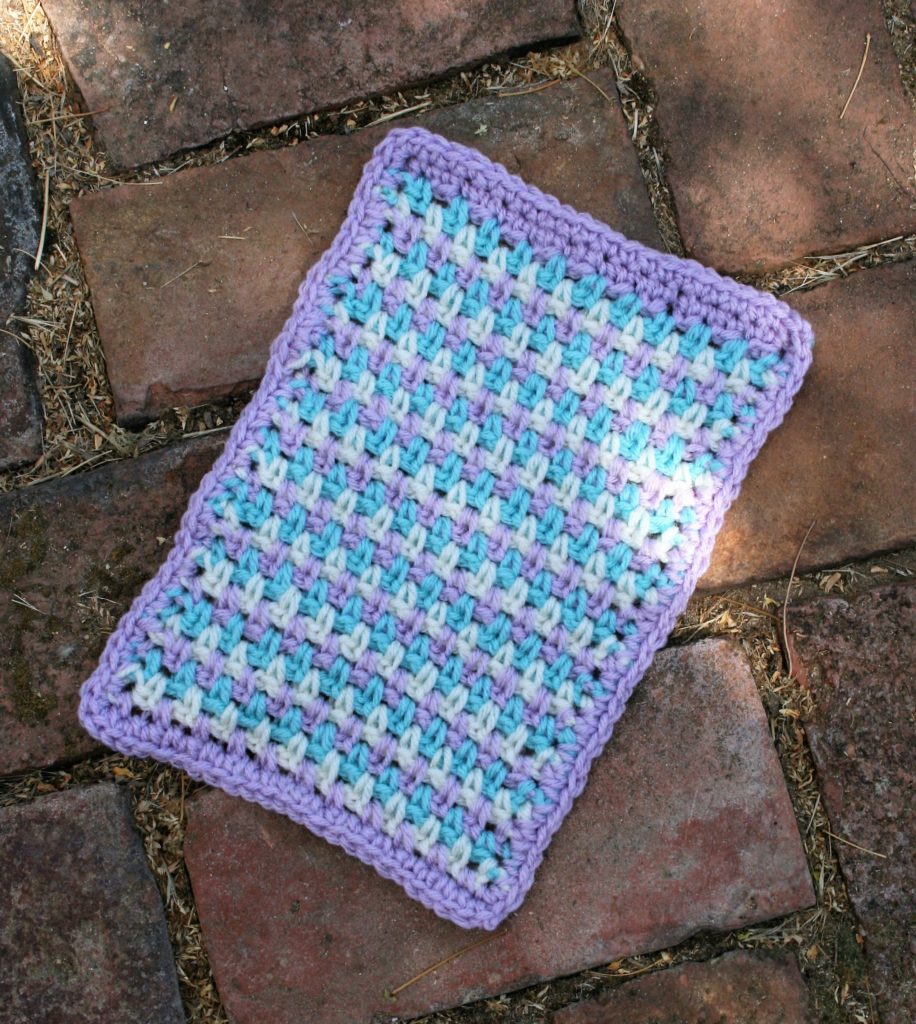
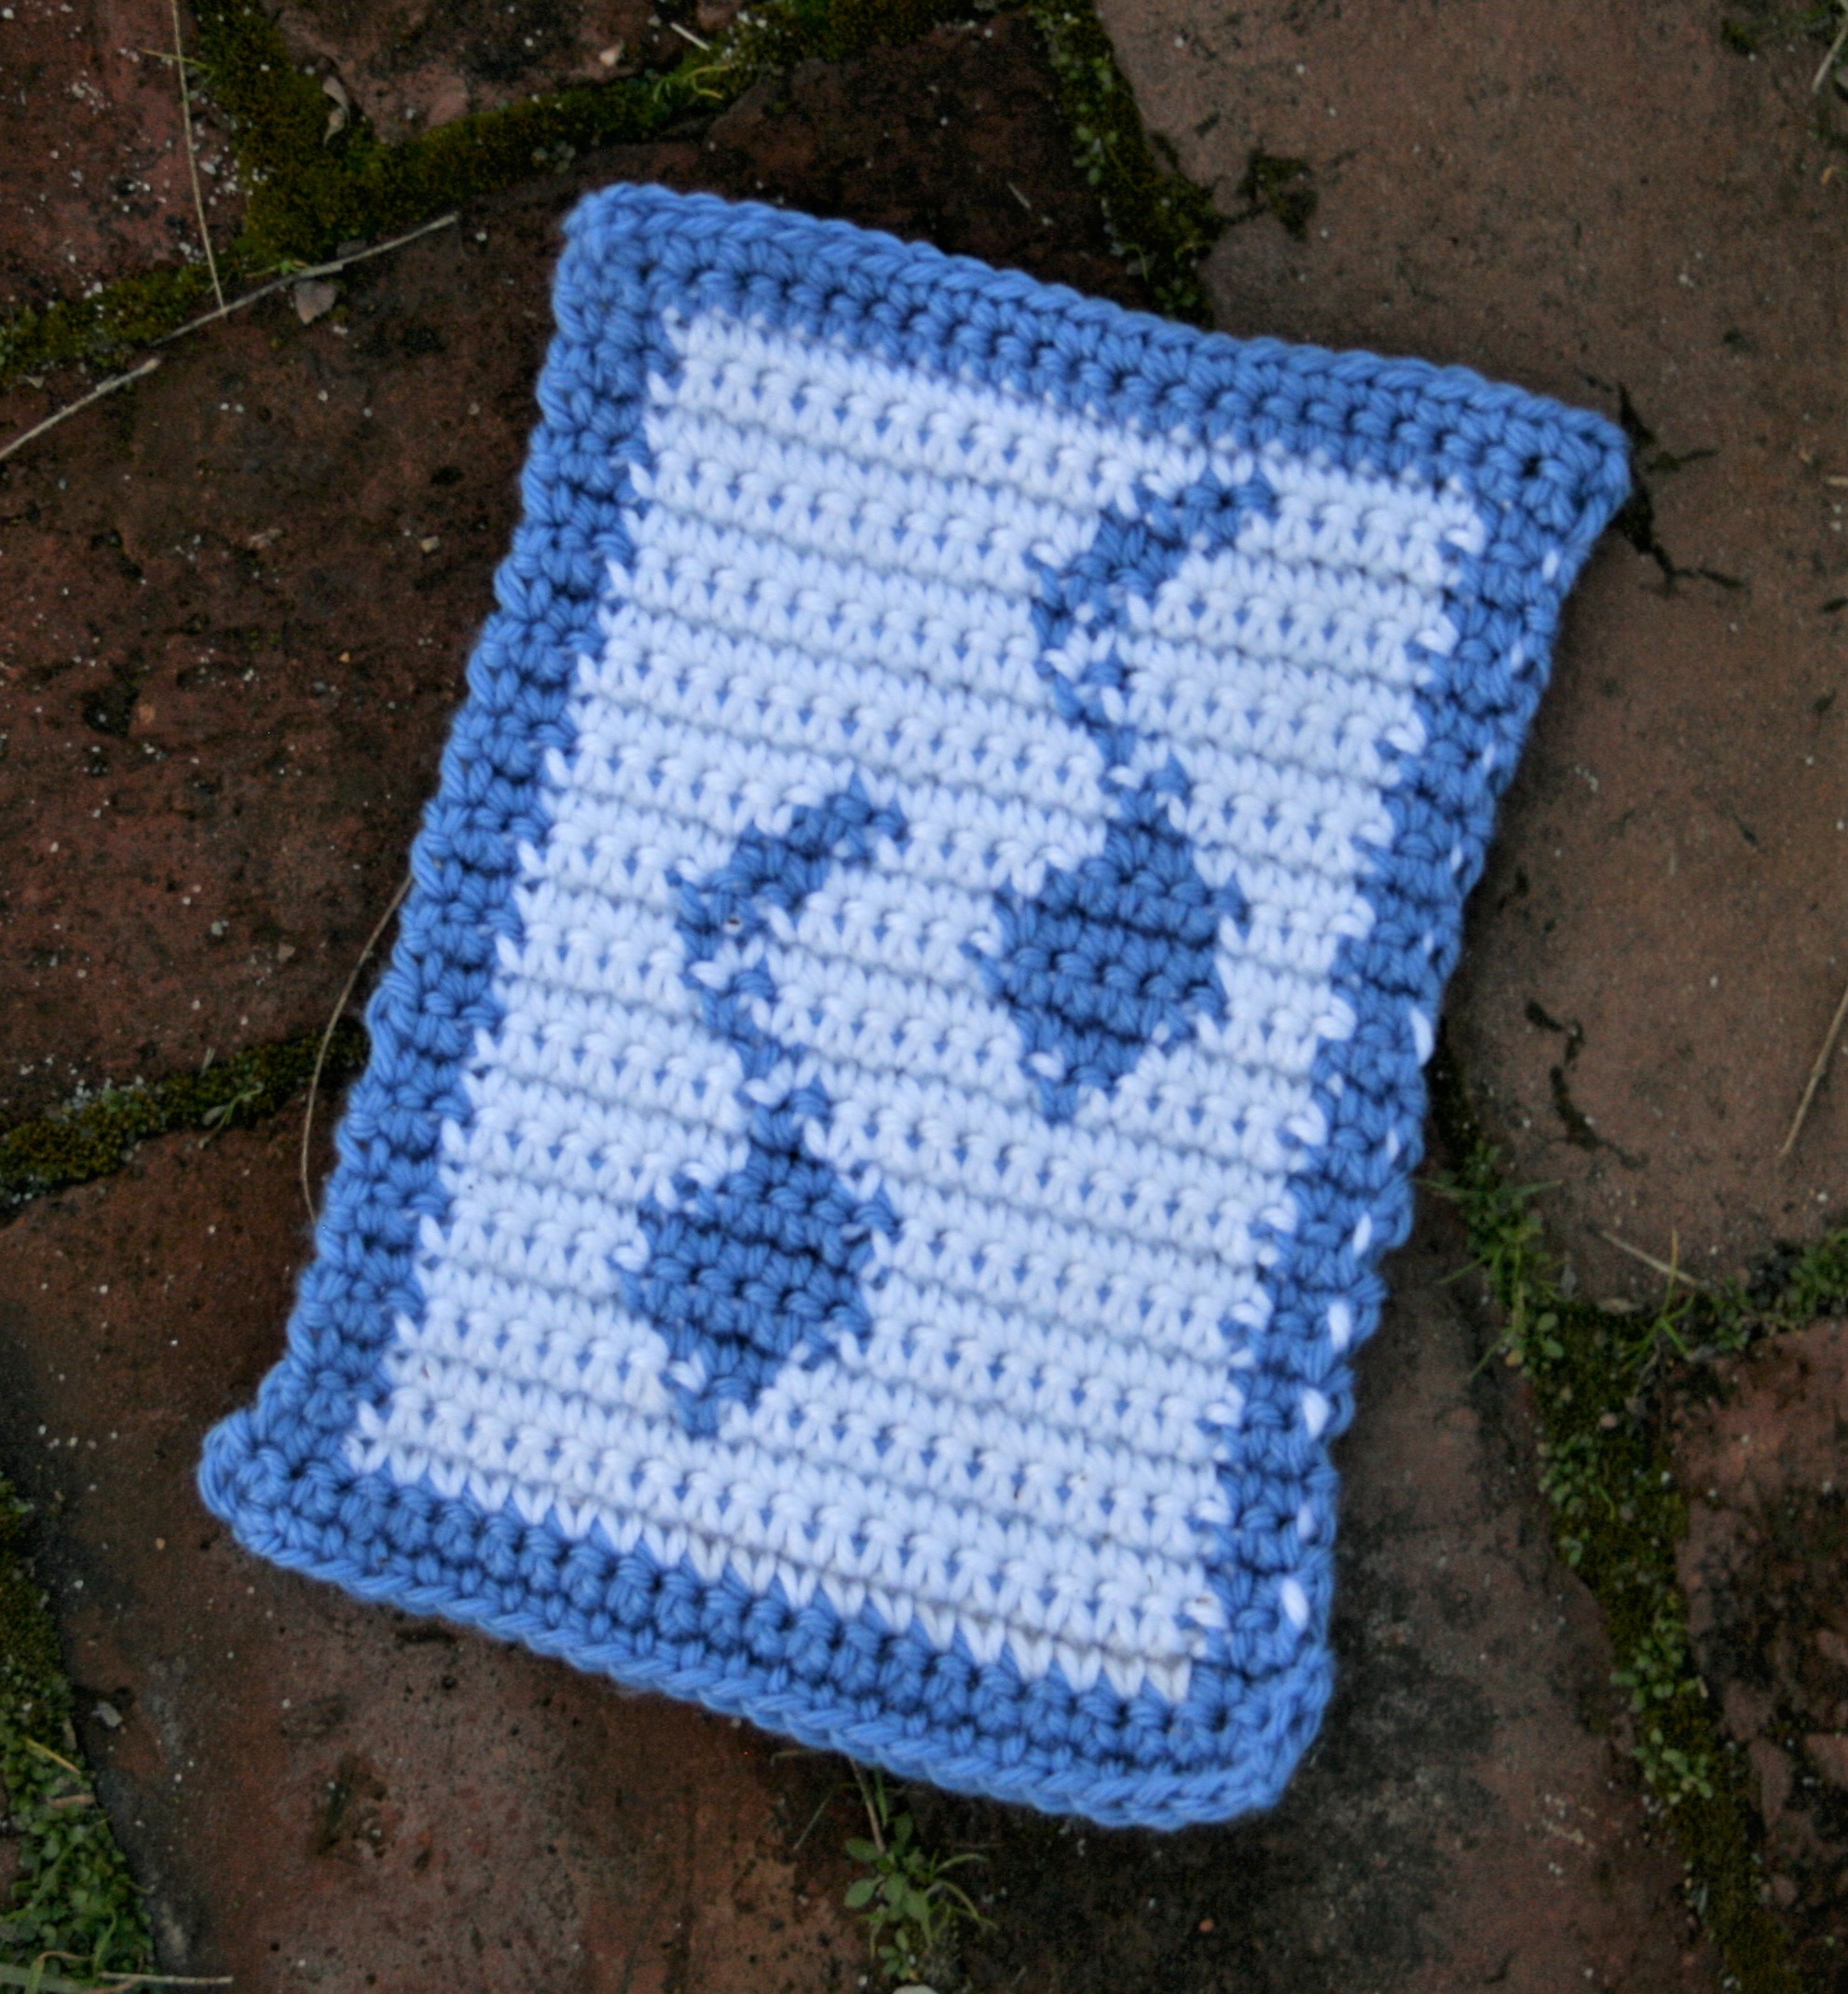
Do you hear the Music? Happy National Crochet Month! I am part of the annual Crochetville Blog tour to celebrate the event. This year the theme is Crochet Concert and features how music can be an inspiration, as my inspiration I have created a Music Tapestry Block to Celebrate crochet.

I Celebrate Crochet with Music

As my contribution to this tour I have created a Music Block. Use this block for various things including as a contribution to Warm Up America.

Music Block

You can donate to Warm Up America as a nationwide organization. Donating locally is encouraged, however donations can be sent to their office to be assembled. Assembled blankets will be donated through the United States.

Tapestry Crochet to Create Music

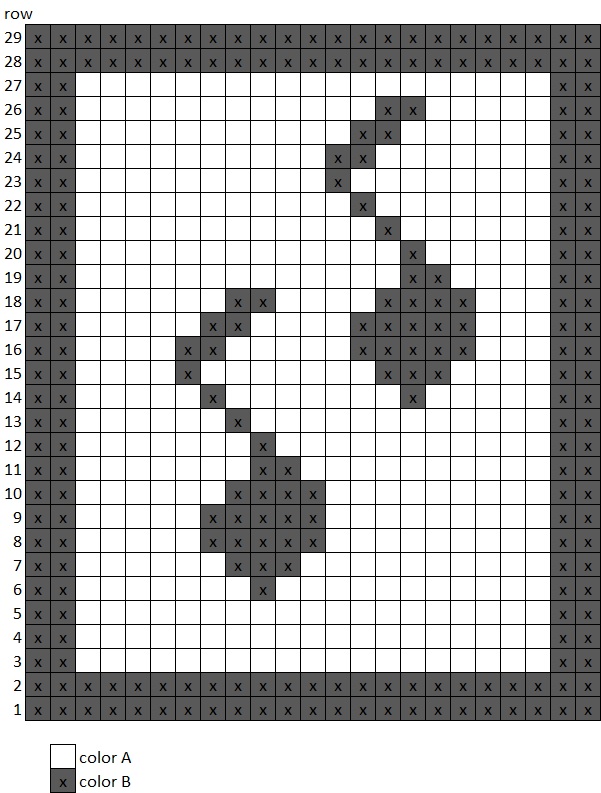
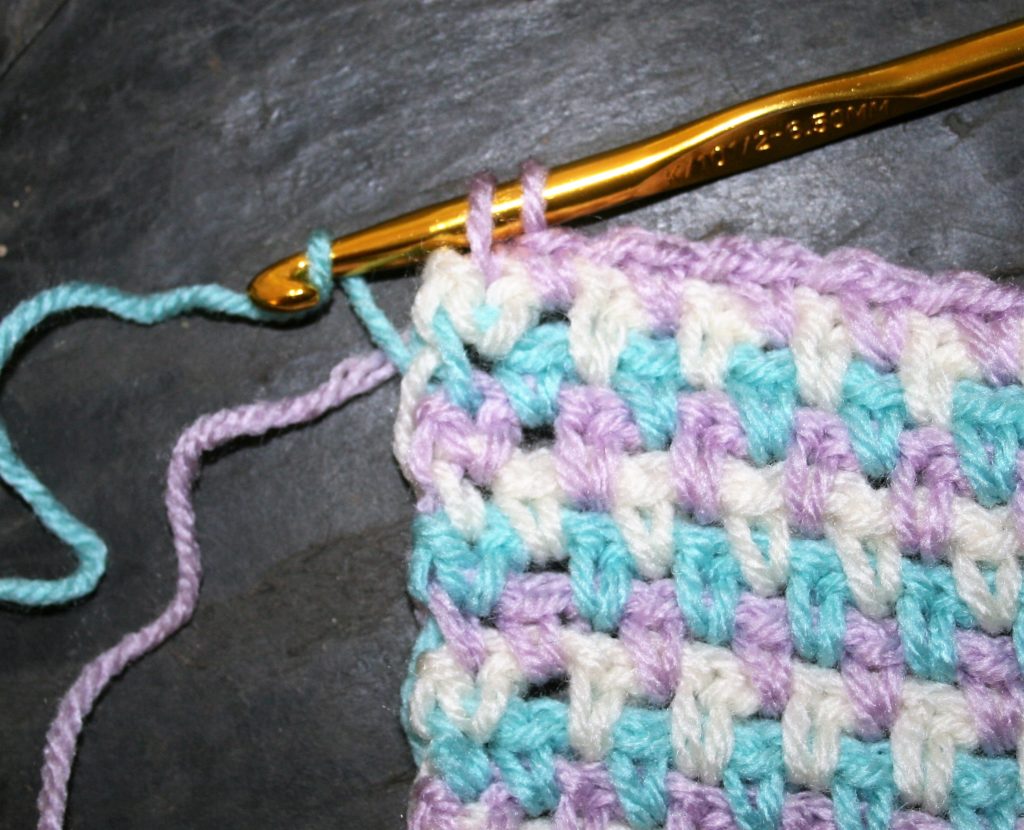
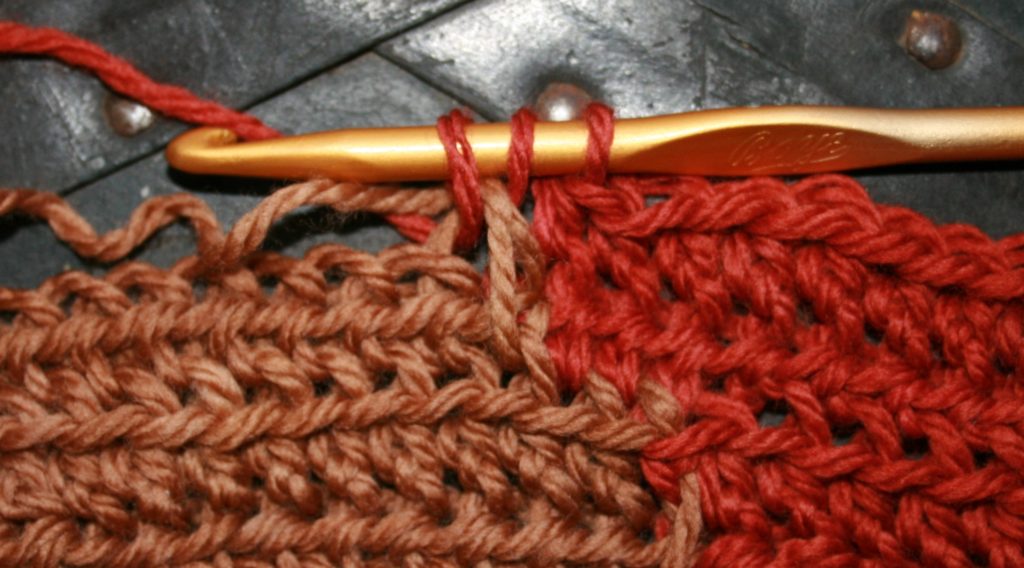
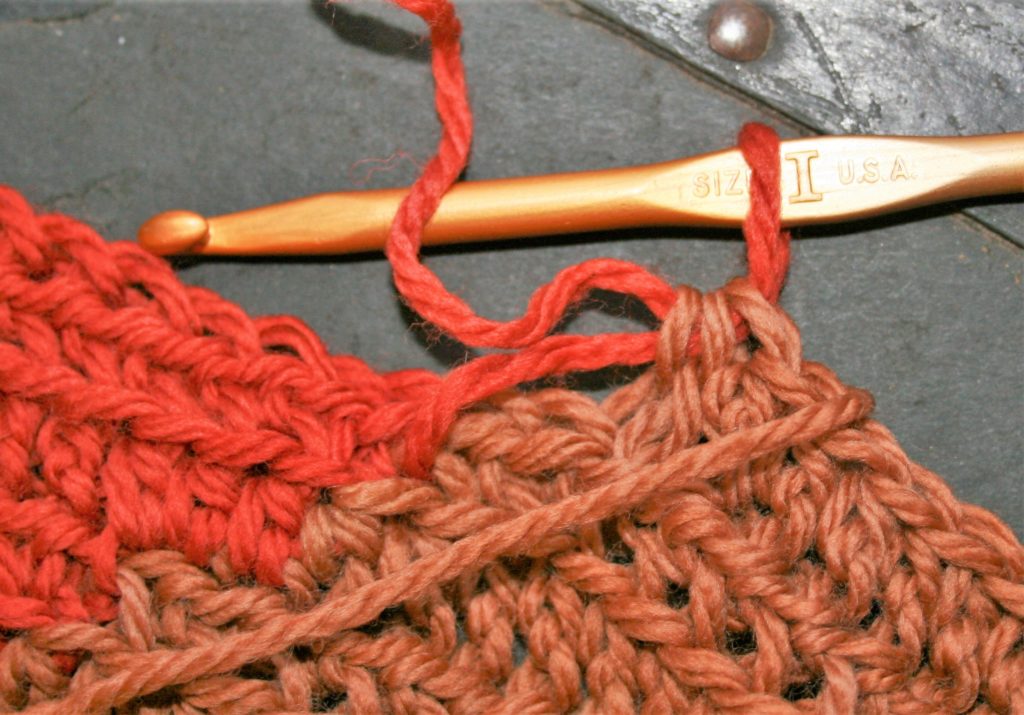
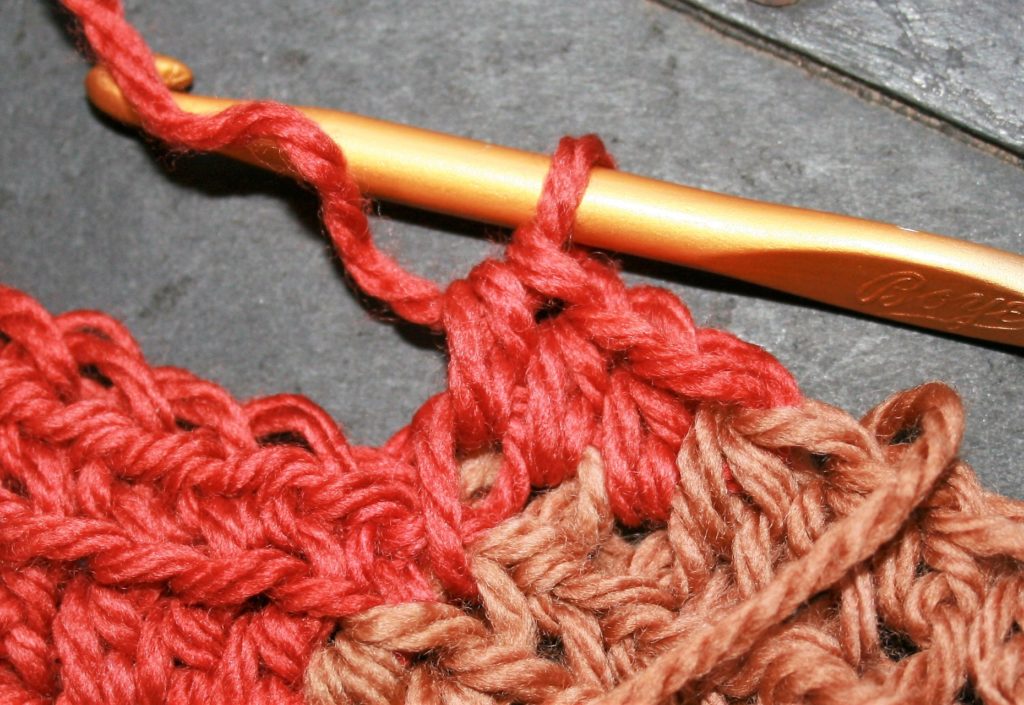
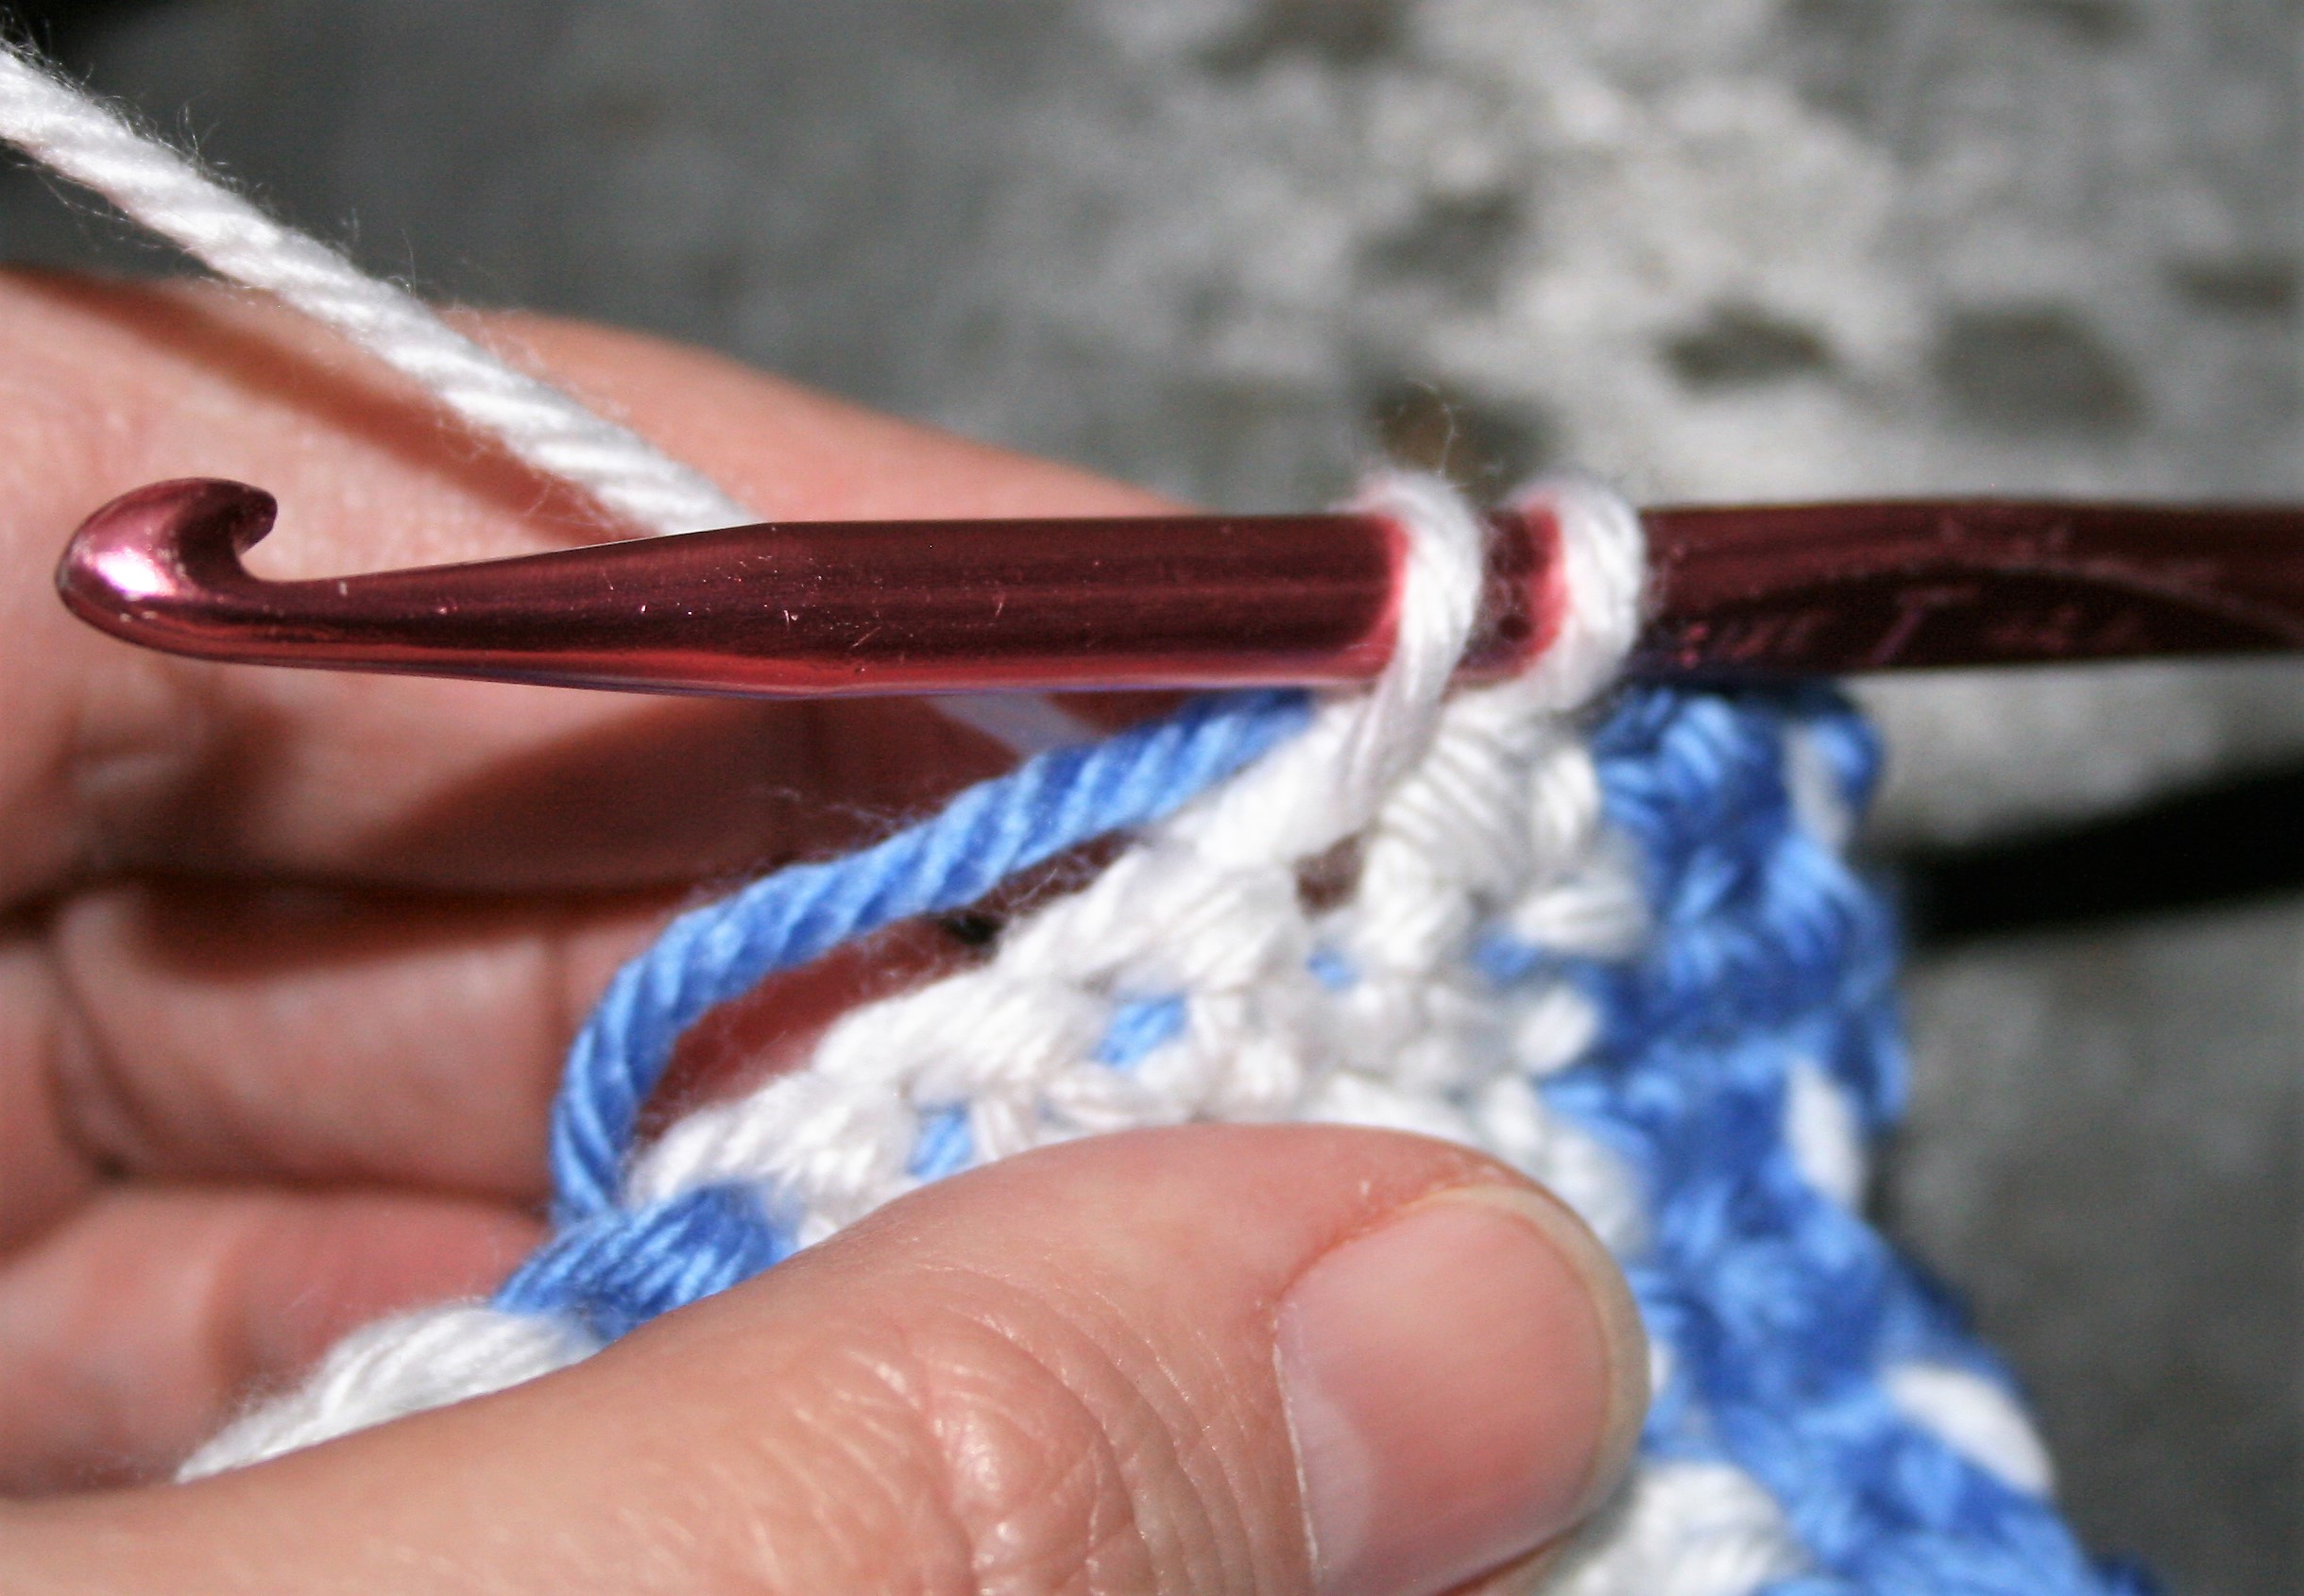
The Music Block gives you an opportunity to learn Tapestry Crochet. Tapestry Crochet is a technique of color work that has you crocheting over the unused color. This reduces finish work and creates a solid, somewhat dense, fabric.

Tapestry Crochet is worked entirely in single crochet with color changes.

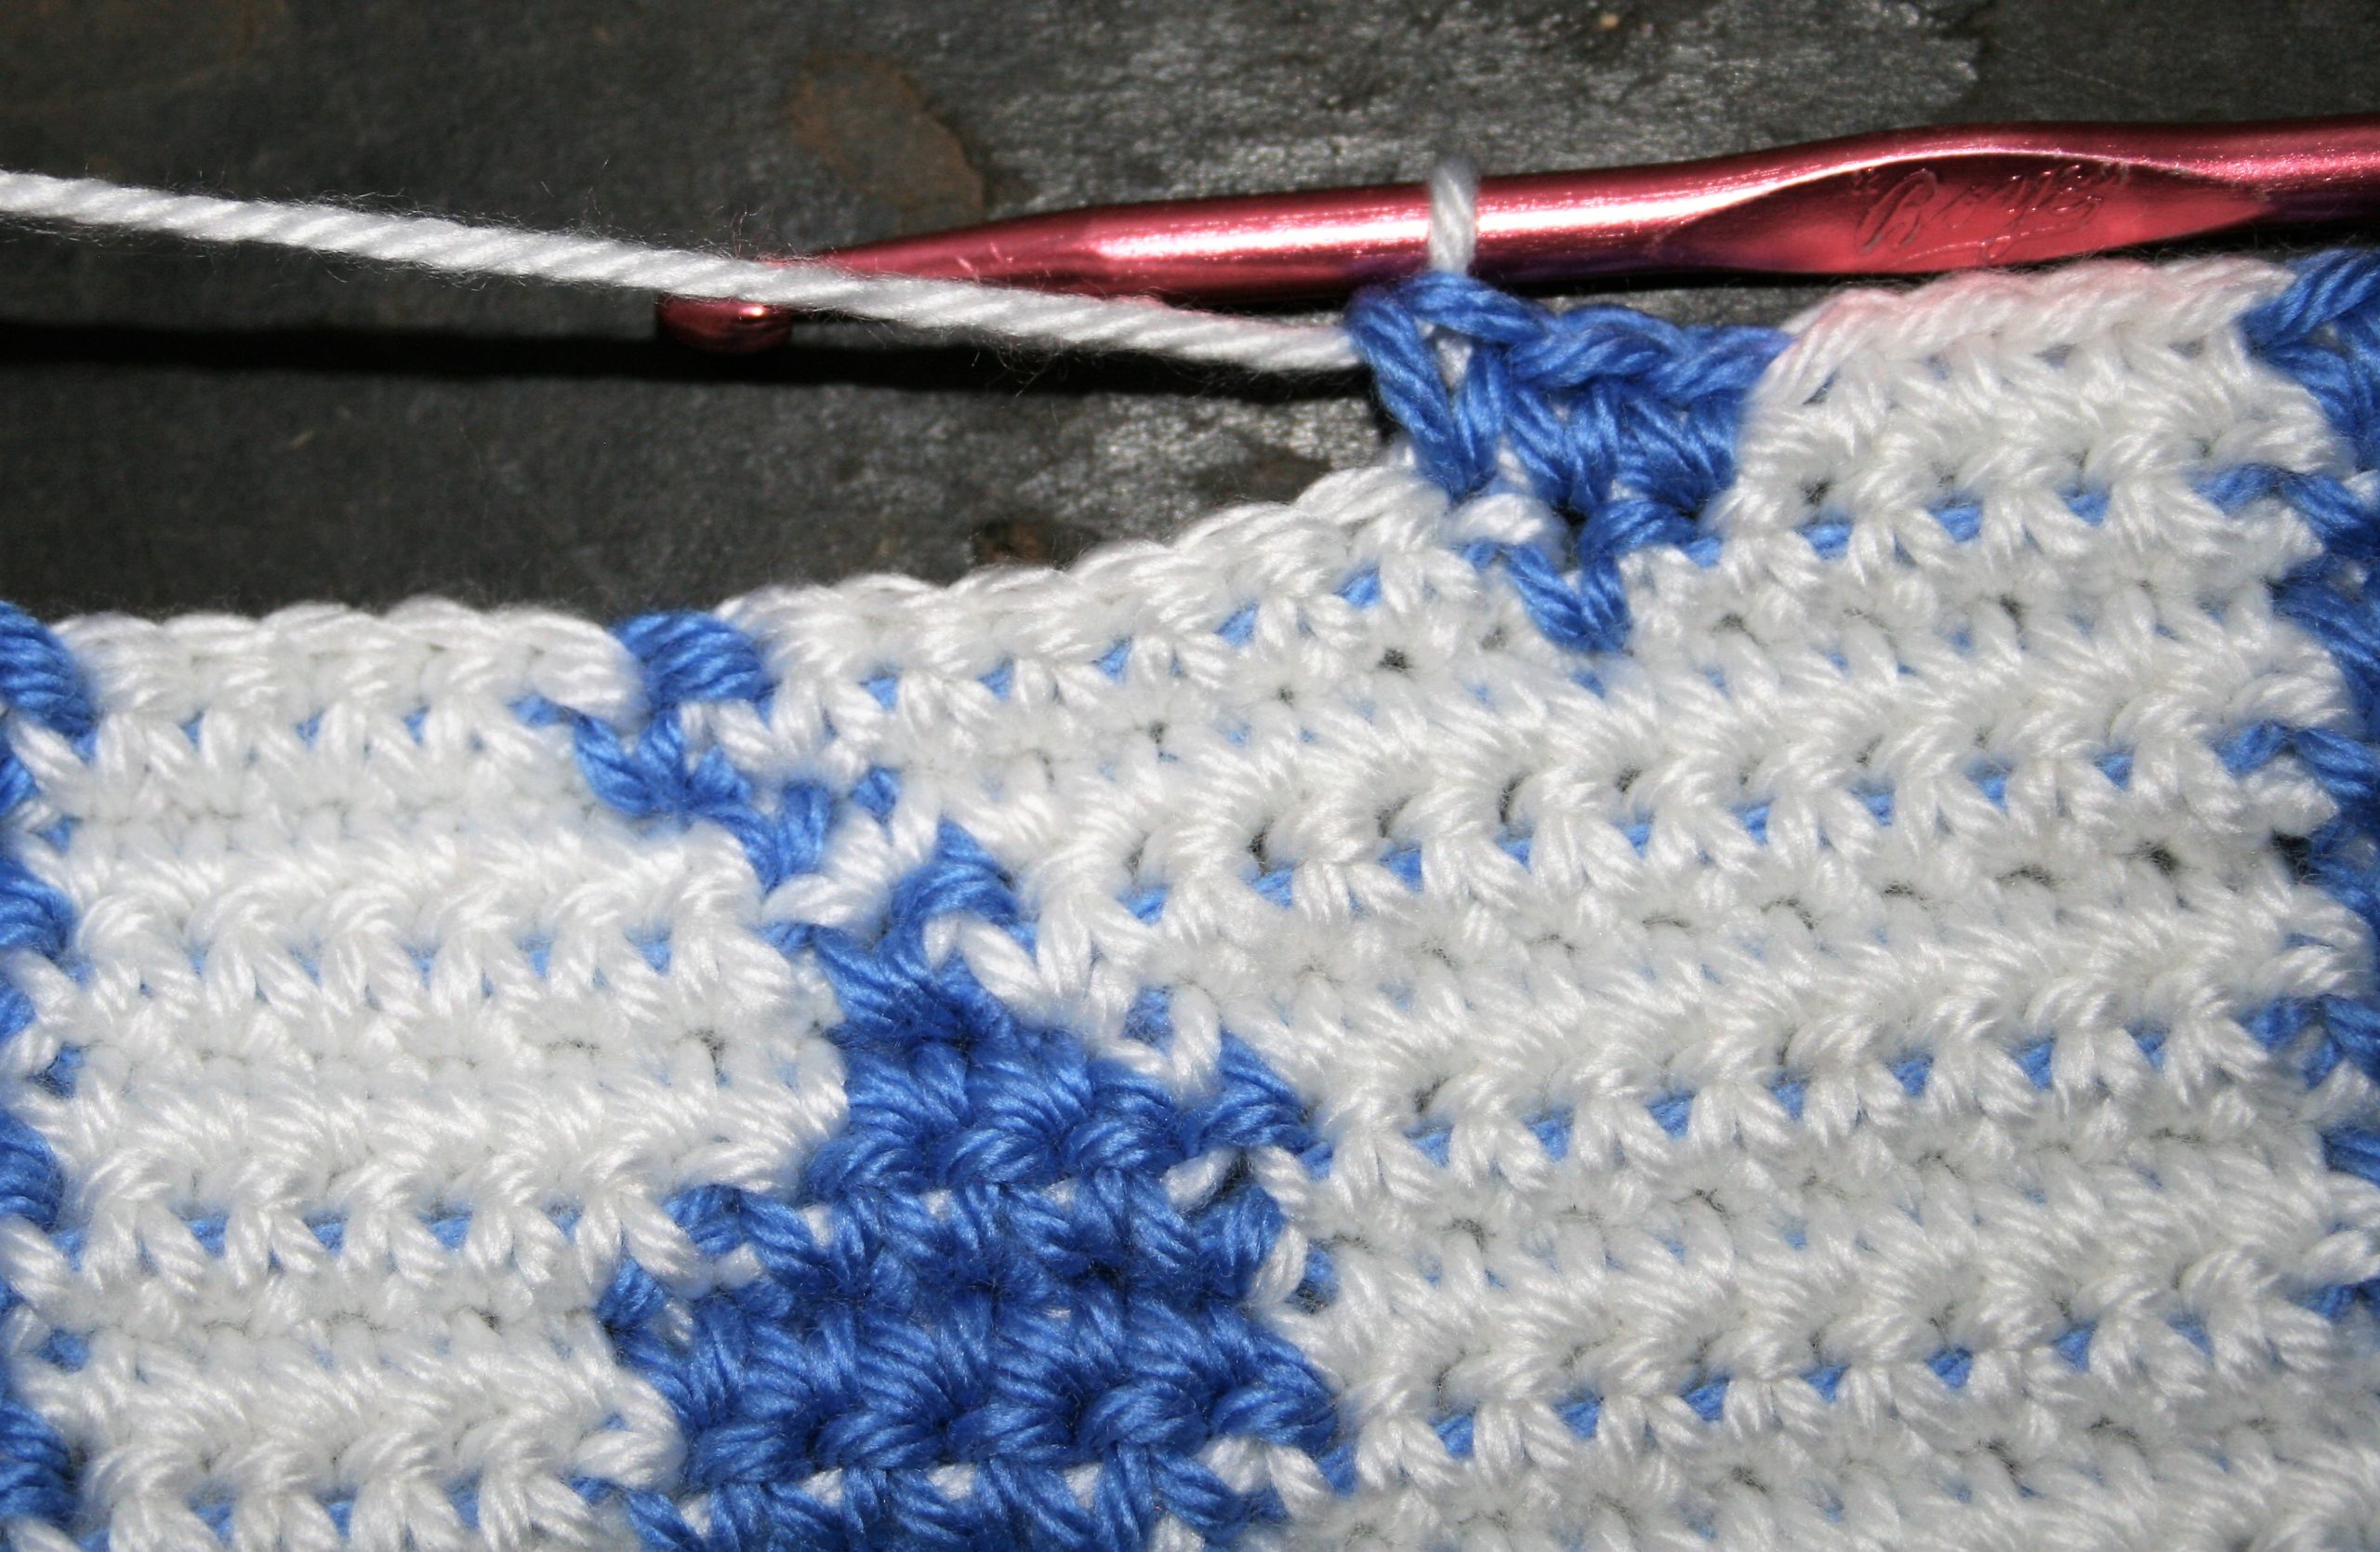
Worked entirely in Singe Crochet (Double Crochet if you are using UK terms). Worked with a chart, where each block is 1 stitch. Just remember to work back and forth in the chart, meaning read right to left for odd number rows and left to right for even number rows. (Needs tips for changing color…check here).

Crochet over the unused color, and carry it across. This reduces finish work while creating a charted design.

Enjoy this technique, and take some time to celebrate crochet this month.

Music Block

Gauge

Gauge: Square measures 7”x 9”

Materials

  • Medium weigh yarn, two colors (A), (B)
  • I/9/5.50 mm crochet hook

With Color B, chain 24, sc in 2nd ch from hook. Follow chart for design.

1 For Me, 1 For You- Triple Linen

Help me help local communities by creating blocks for Warm Up America, by making a block for yourself and one for a community project with this free pattern. I will be creating a new block every two weeks and sharing it with you, I just ask that make one for donation.

Warm Up America is a nation wide organization that encourages local donations, but will also except donations to be sent to their office so that blocks can be assembled and then blankets can be donated through the United States.

Triple Linen Block

Even is you do not want to participate with Warm Up America, please consider creating blocks, or blankets for your local community. There are various places in every community that accept donations.

Triple Linen Block

This block features color change, that does not require you to break the yarn. You can carry the yarn up the edge, as the color changes every row, and then finish the sides with edging.

Learn the best color changes.

Learn tips For Carrying Yarn on Edges.

Gauge: Square measures 7”x 9”

Materials

Medium weigh yarn, three colors (A), (B), (C)

K/10 1/2 /6.50mm crochet hook/

Block Pattern

Ch 24

Row 1: With (A), sc in second ch from hook, sc in each ch across, change to (B), turn. -23sc

Row 2: Ch 1, sc in same st, (ch 1, sk 1 st, sc in next st) ten times, sc in last st, change to (C) turn.

Row 3:  Ch 1, sc in same st, (ch 1, sk 1 st, sc in next ch-1 sp) ten times, sc in last st, change to (A) turn.

Row 4:  Ch 1, sc in same st, (ch 1, sk 1 st, sc in next ch-1 sp) ten times, sc in last st, change to (B) turn.

Row 5-29: Rep Rows 2-4

Row 30-31: Rep Row 2 & 3.

Rnd 1: Working around edges of block, sc evenly working 3 sc in each corner.  Fasten off. Weave in ends.

A Bit of a Color Change Difference

Some color changes are a bit different than others. The way to change the color in a stitch is the same, I discuss that here. However, there times when a couple of other little tricks can make the color change smoother, and your fabric much more eye catching.

One of these times is when the color change may occur within the rows with a shift of the stitches, like a line of color moving diagonally. The color change is not exactly in the same location as the row below, so to have a really clean look you may have to start a new yarn each time or end up with a color strand laying awkwardly across different color stitches.

A diagonal color change, without ends to weave in, and a visually consistent look.

I for one really do not want to weave in as many ends as it would require to shift a color change every row, so there are a couple techniques I use to reduce the ends while keeping a smooth color edge.

For starters, when I change the color I toss the “old” color stand over the fabric, so that it is on top of the stitches. After completing the row of stitches and returning to the color change point, if I am changing the color before the last stitch of the color I change the color but leave a slightly loose tension in the new yarn. I then crochet over this yarn until I reach the same color, and crochet the next stitch over the loose tension strand in the same color stitch.

When the color change happens after the last time it was changed.
The loop brown strand, is the pulling up of the color a row below, then it is worked over until the color is changed.
The color change is completed, and the “old” yarn is then tossed to the opposite side of the fabric, over the fabric. This helps assure that the yarn is in the correct location for working on the returning row.

If the color change occurs after the last stitch of the color, I pull the yarn that will be changed up and crochet over it until the stitch it needs to be changed in.

When the color change happens before the last time it was changed.
Leave a little slack in the yarn when it changes color.
Crochet over this “slacked” yarn, until at least into the same color below.

Essentially I am working over the color change yarn until it is needed. This helps me keep a smoother look while actually being able to stay sane while working up and finishing the fabric.

Yarn Optical Illusions

Sometimes you need to have a couple of yarn tricks to ensure that your project turns out the best it possibly can. One of these tips or tricks is understanding dye lots.

These 3 balls are the same color, but the dye lot has some slight shifts, so this fabric uses a different ball every 2 rows.

Dye lots are the critical factor for several, but not all yarns, and essentially it is telling you a specific time period that a yarn was created. This can be important to ensure that the colors from one skein matches that of another. If you want to ensure that your project has the same consistent color then you have to ensure the dye lots of the yarns match. Well, that is the given rule, but I have found that not even this is consistent.

So then what do you do if the color between the yarn skeins happen to be just a couple of shades off? I have had this happen, even within the same dye lots. It is uncommon in most commercial yarns, but it can become apparent in hand dyed or hand painted yarns, and how to fix it is to trick the eye.

The best practice is to work a couple of rows from one skein, and then a couple of rows from another and switch between at least 2 different skeins; sometimes I might even switch every couple of rows between 3 skeins. By making these changes in a consistent manner it creates an optical illusion to the eye and the subtle color differences will blend together when you look at it. This is much more beneficial than having a visually obvious line of exactly where your yarn changed in your project.

I would suggest that even if you suspect that there is a difference in the color shades that you use this alternating skeins in rows technique simply for the fact that when you are so close to your work the subtle details are not visible. When you step away and look at your work from afar and can see a visual line in your work, it feels like a punch in the gut, and unintended mistake. Some people find a way to live with it, others rip it all back. So, I error on the side of caution.

Yes, this will lead to more ends being woven in (I have some tips here). No one is really ever thrilled about that, however if I am going to spend the time to use a beautiful and unique yarn, I might was well take a couple of extra steps to ensure that my final project is the best that it can be.

Stress Free & Seamless… The Best of Crochet

ScannedImageI had a surprise in the latest special issue of Crochet! Magazine,(Stress Free Seamless Crochet, Fall 2016), I had another design on the cover! What was really surprising is that I was not even expecting this design to be in this issue.

LAVISH_LAYERS_SCARF_medium

Autumn Blaze Scarf Photo courtesy Annie’s

132120_small2The Autumn Blaze Scarf that adorns the cover is really an interesting pattern that creates a great texture while creating a fabric that is on the biased, meaning that it has increases and decreases worked every row to give it a much angled direction. This really allows yarn that has some length to the color repeats to shine.

DHARMA-tote_medium2

Dharma Tote Photo courtesy Annie’s

The second design I have in this issue also benefits from long color repeat yarn, the Dharma Tote uses crochet miter squares to bring color to life in angles. Miter squares are worked from two edges worked, a corner, and worked toward the opposite corner. There is essentially a decrease worked in the center of the worked row, and my continuing the row with a decrease every row, it reduces to a point.

One of the really nice features about miter squares is that you can easily work it as join as you go, by beginning an edge directly on a created square. I played around a bit with the square locations, as I really didn’t want everything facing the same direction, yet I didn’t want to create a square that would be difficult to create with too many joins. I added some leather strap handles, and this bag was ready to go. I love the stretch that it has, I can stuff it full of crochet samples for my classes, or items that my kids need for “insert name of event here”.

Both of the designs benefit from long color repeat yarns, there is a couple of reasons for this. First you do not have to think about color combinations. The yarns already have some harmony in the palette of color, thus making sure that your finished product will be pleasing to the eye. Second, the long spans of color allow for the design to be highlighted. Whenever color changes are short, a little of every color works into almost any stitch, and things looked speckled. When to color change is long, you can create a shape in the color, as with Dharma Tote, you can see the directions for the squares. Neither of these designs would shine if they were speckled or in solid colors.