I am so excited to be participating in the Make it for Me with ELK Studio (for all the designs check it out here!). This year I have been inspired to create the Italian Spy Handbag as a Free pattern.
This handbag was inspired by a conversation with a friend that happens to be a fashion designer. She was discussing a crochet fabric with me, and I was discussing shapes with her. The further we went along in the discussion, I had a vision of the perfect small handbag I needed for day trips to the city.
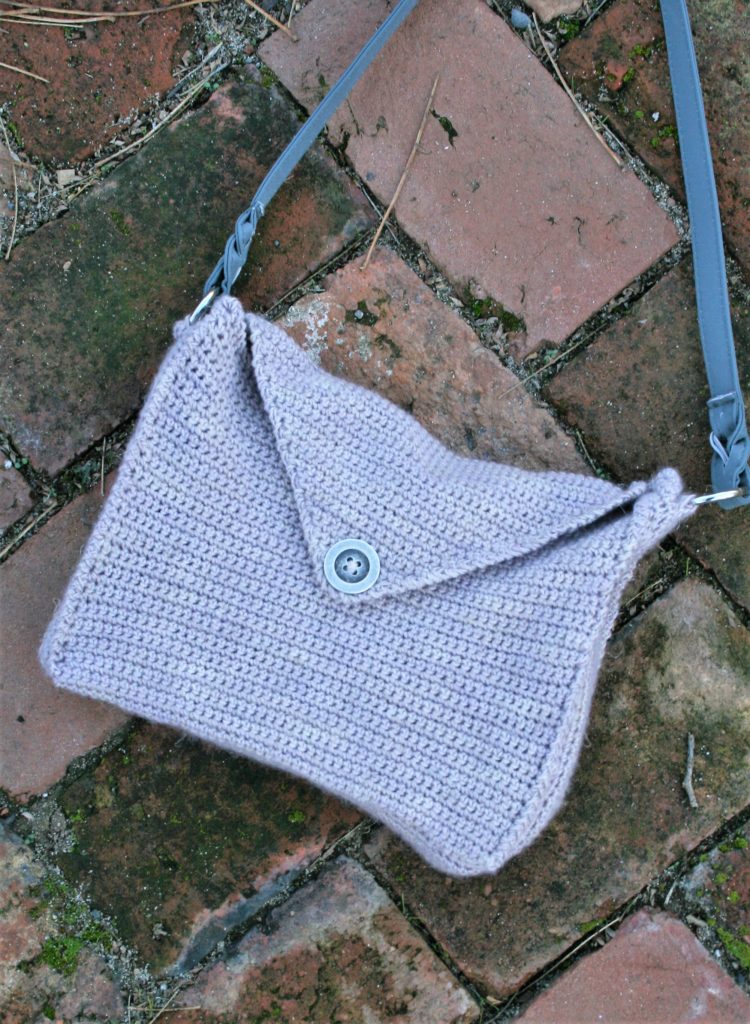
For me, a day in the city is San Francisco. I always want to travel with only the essentials, as there is a lot of walking….much more then I typically do in an average day.
So, I want a handbag that can carry the essentials, not weigh a lot, and one that I can comfortably keep close. The Italian Spy fits that build.
It is a simple pattern that uses less then one skein, and utilizes a simple tight stitch. But, just because it is worked in single crochet do not under estimate the overall effect of the fabric, or how it can easily show your mistakes. The pattern is worked in one piece, and then folded and seamed. There is an option to stiffen the sides and bottom, and options for the finishing edge.
I hope you give it a try for you prefect day out handbag. Enjoy.
Italian Spy Handbag
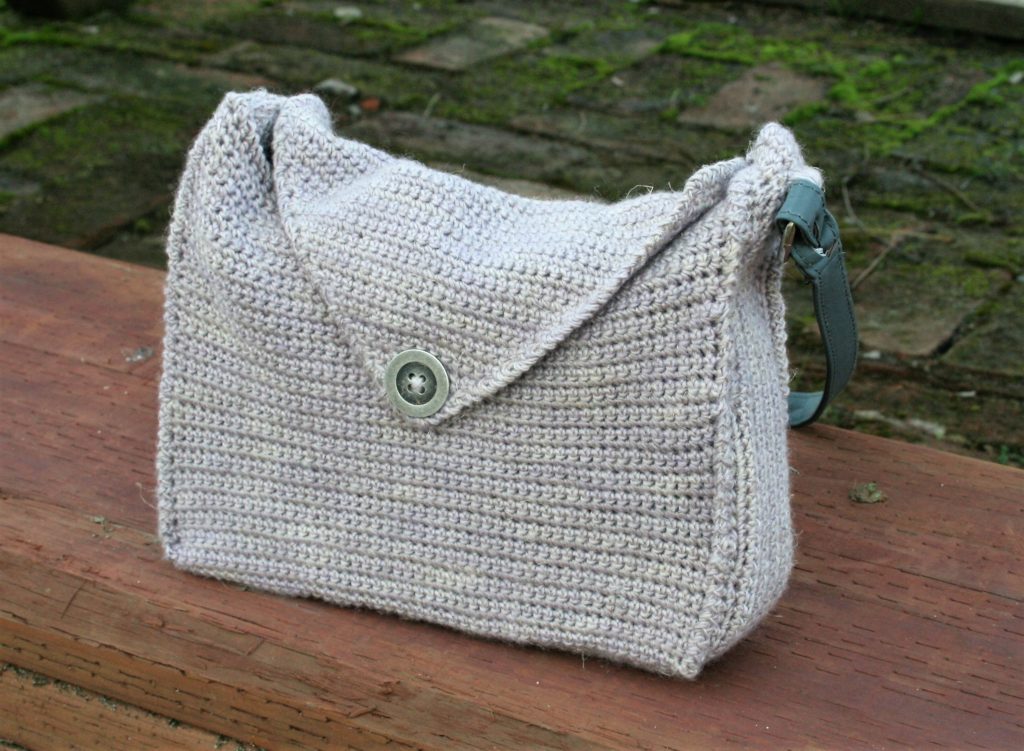
Finished Size
10”x7”x2”
Materials
Hook: F/5/3.75mm
Manos del Uruguay Milo light weight 65% Merino wool, 35% linen yarn, (380yrd/350 m/3.5 oz/100 g) 1 skein, colorway #2607 Boreal
- 1” Button
- 24” handle
Gauge
Gauge 22 sts/ 25 rows=4”
Front
Ch 50
Row 1: sc in 2nd ch from hook, sc in each ch across, turn. -49sc
Row 2-42: Ch 1, sc in each st across, turn.
Row 43: Ch 1, sc in each st across, ch 42, fasten off.
Sides Worked with Body
Row 44: Join with slip stitch to Row 43 at first st of row (opposite end of end just fastened off), ch 43, turn, sc in 2nd ch from hook, sc in each ch across, sc in each sc across, and sc in each ch, turn. -133sc
Row 45-55: Ch 1, sc in each st across, turn. Fasten off at the end of Row 55.
Back
Row 56: Skipping 42 sts, join to next st, ch 1, sc in same st, sc in next 48 sts, turn. -49sc
Row 57-100: Ch 1, sc in each st across, turn.
Flap
Row 101: DO NOT CH, sc2tog, sc until 2 sts rem, sc2tog over last 2 sts, turn. -47sc, (2) sc2tog
Row 102-120: Rep Row 101. -7sc, (2) sc2tog
Row 121: Buttonhole Row, DO NOT CH, sc2tog, sc in next st, ch 3, sk 3 sts, sc in next st, sc2tog over last 2 sts, turn. –(1) ch-3 sp, 2sc, (2) sc2tog
Row 122-123: Rep row 101. Fasten off at the end of Row 123. -1sc, (2) sc2tog
Optional Insert (to create more stiffness)
Ch 132
Row 1: Sc in 2nd ch from hook, sc in each ch across, turn. -131sc
Row 2-10: Ch 1, sc in each st across, turn. Fasten off at the end of Row 10.
Optional Assembly of Insert
Lay Insert section over the Sides Worked with Body Portion, Seam the insert to the Sides over Body in any preferred method, such as whip stitch with a needle or slip stitch with a crochet hook. For even more stiffening, you can place a strip of plastic or cardboard that measure 1” x 25”, and place it between the Insert and Side worked with Body
Assembly
Fold Front and Back toward each other, and Fold Sides toward Front and Back, seam side of Side to Front, and seam side of Side to Back, on each side of the handbag.
Working over seamed edges, and all unfinished edges, work Reverse Single Crochet or Corded Edge Stitch around to finish.
Sew button on Front to align with Button Hole of Flap.
Sew Handles to Sides.
If Flap is curling, use an iron to seam if flat.