A free pattern means that it is that time again, the New York Sheep and Wool Festival (a.k.a Rhinebeck)! Just like most everything else this year, it will be done a bit differently…as in virtually (find out information here).
This means that you do not have to live in or travel to Duchess County New York. You can be anywhere in the world and take classes, visit booths, and get a little hint of the New England turning leaves.
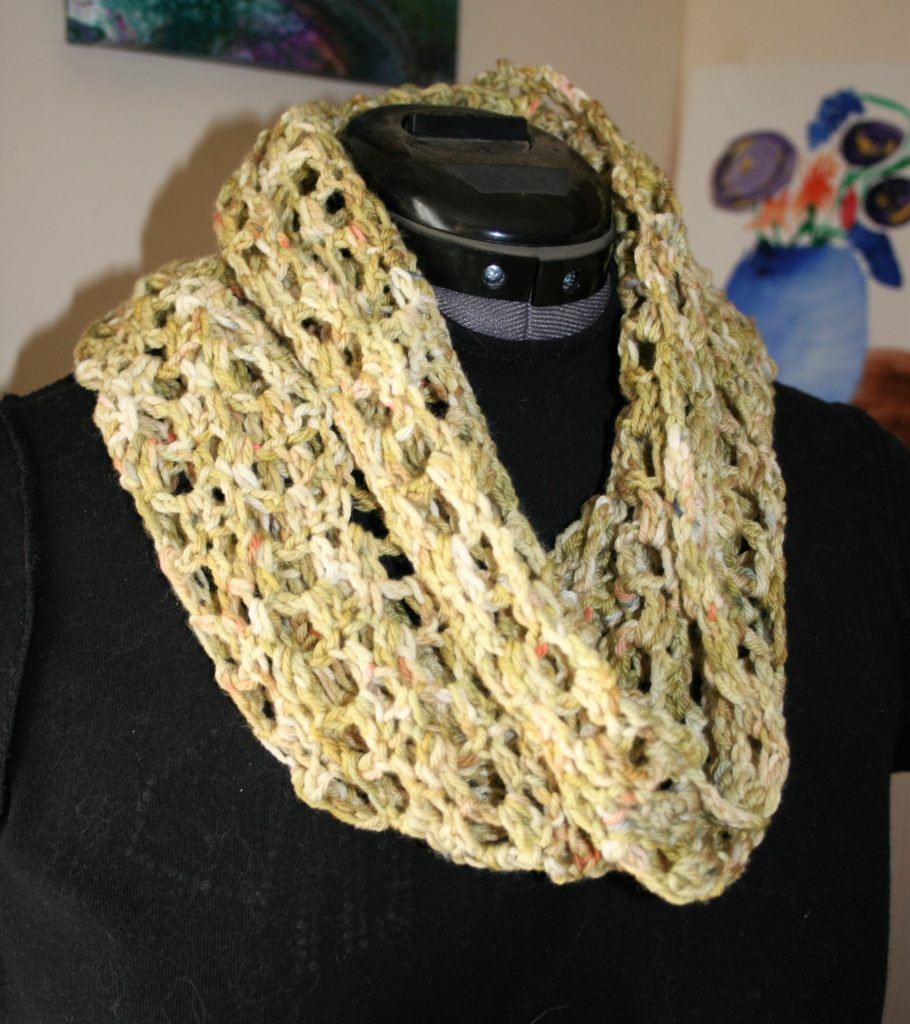
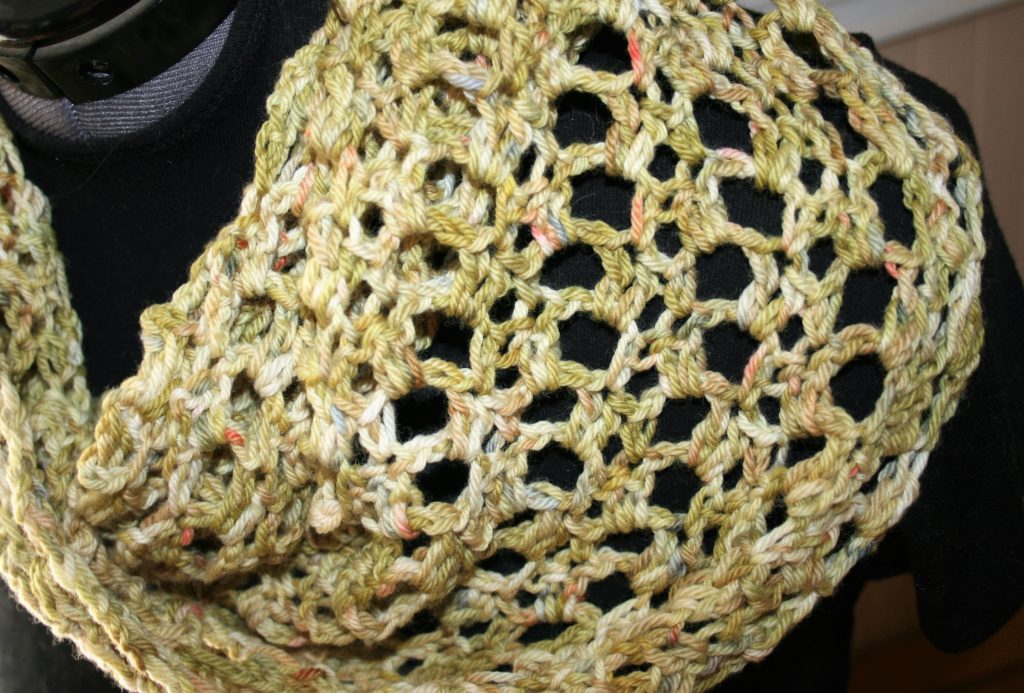
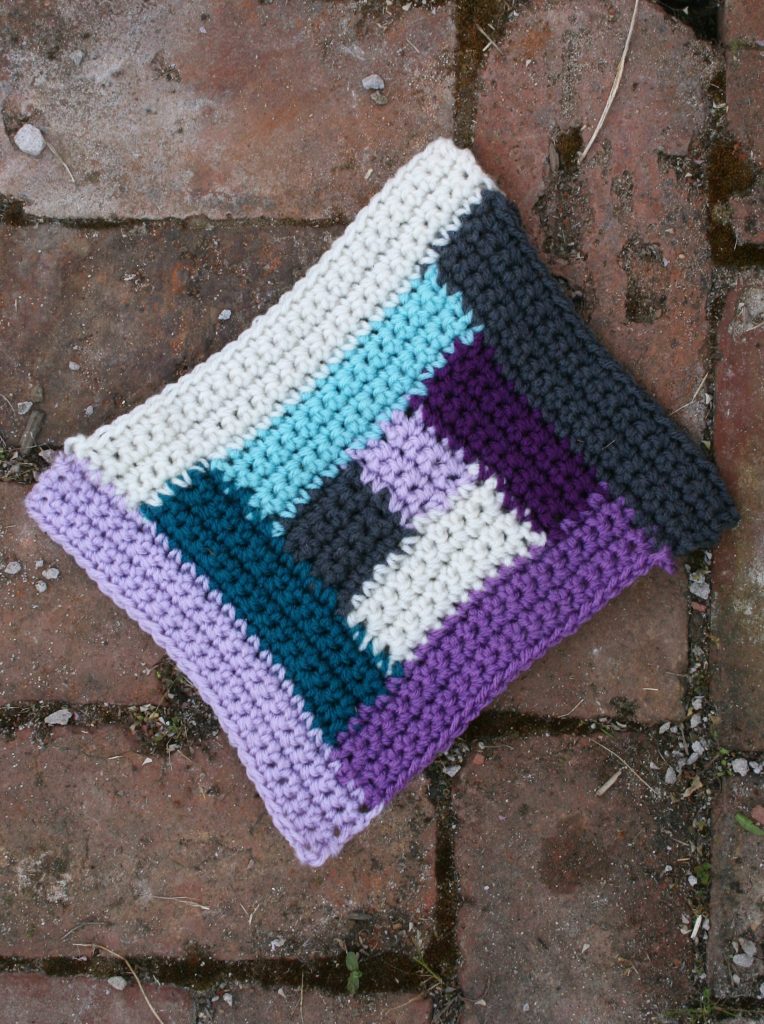
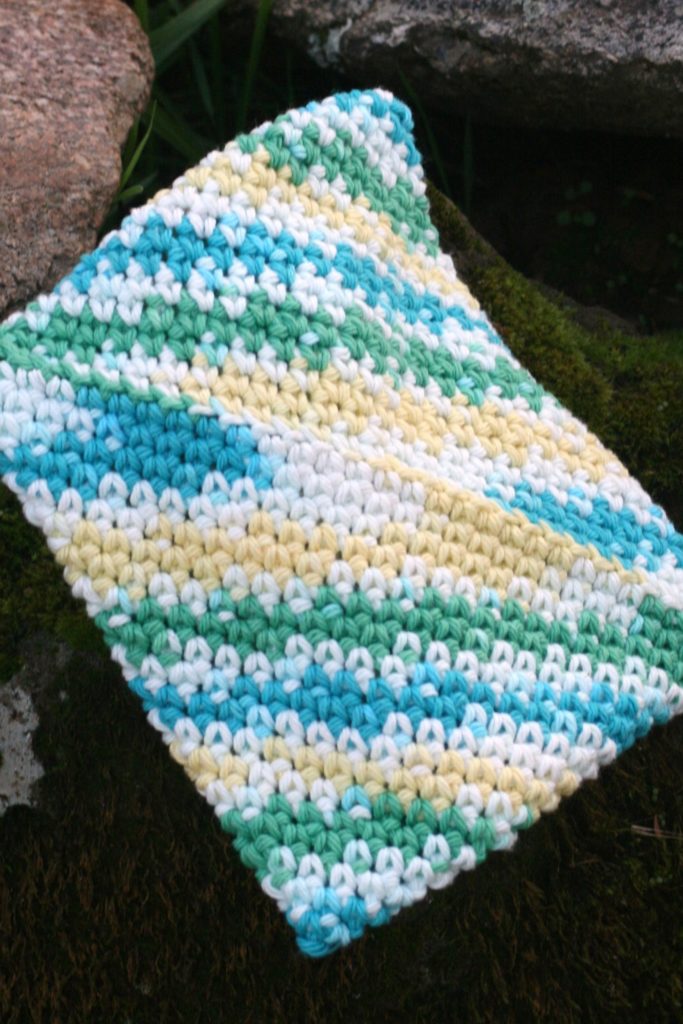
Lisa’s Ladder Cowl
For the last several years I have been teaming up with Lisa Souza Dyeworks and providing a free pattern to accompany her limited addition colorway for the week. This year is no different.
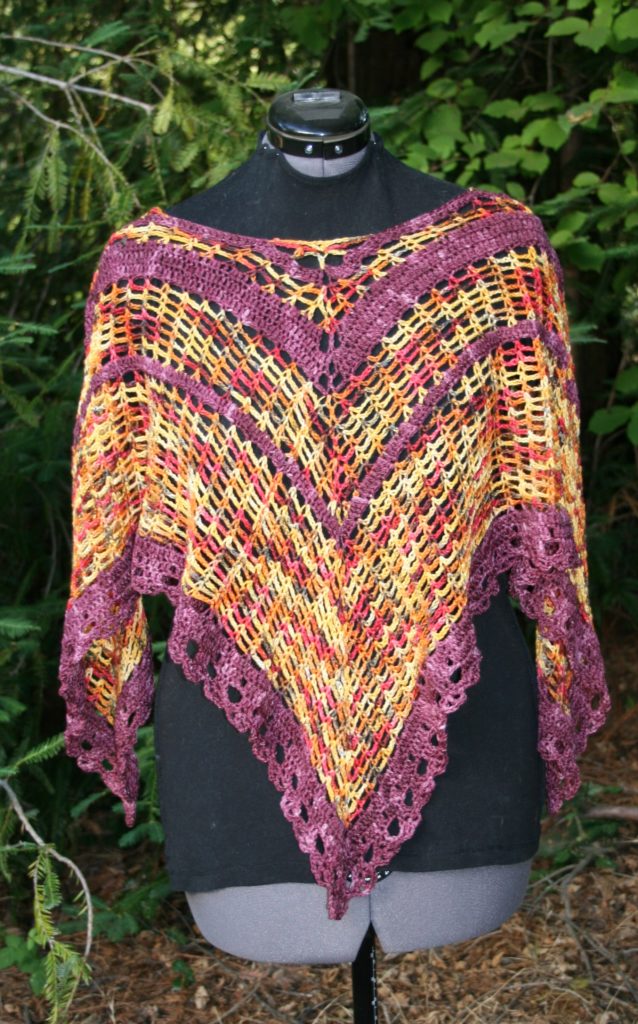
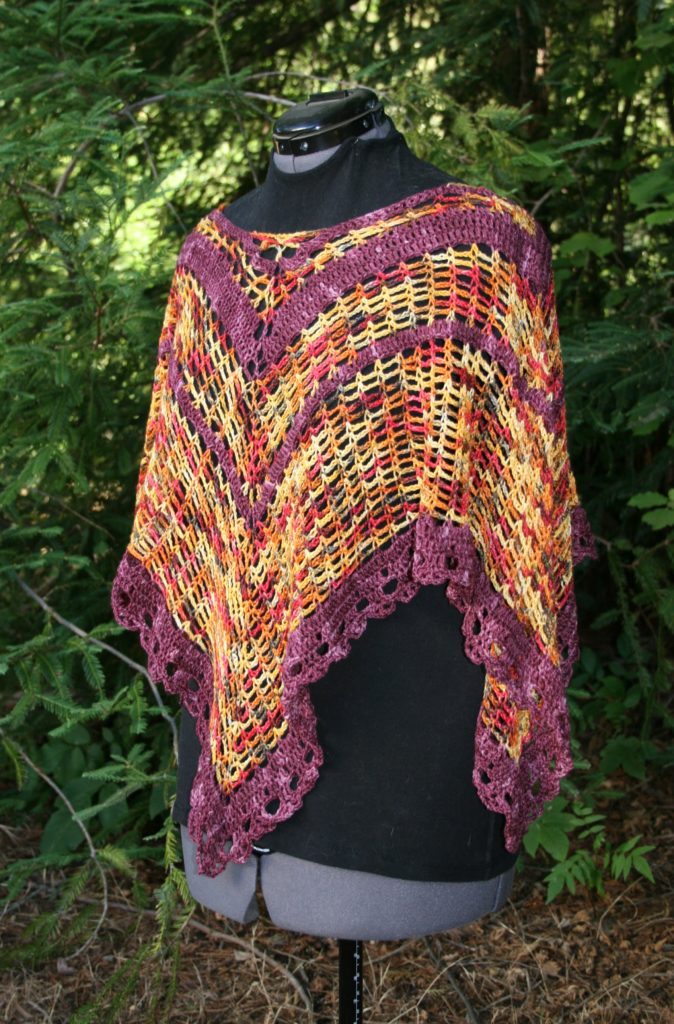
I think everyone needs a little pick me up in July, so I am releasing my latest free pattern. I hope to brightens the dances of your hook.
Worked from the neck outward, this is a poncho that easily adds a bit of flare to any wardrobe. The simple stitch pattern lends to great coloring pooling and a fabulous drape.
Phoenix Poncho
Size
40” square
Skill Level
Intermediate
Gauge
5 (sc, ch-3) sts/ 13 rows=4”
Materials
H/8/5.0 mm crochet hook
Alexandra The Art if Yarn Silverton Fine weight 75% Superwash Merino/ 15% Nylon/ 10% Tencel yarn (434yrds/397m/3.5oz/100g) 1 skein each color Wine (A), Fire (B)
Notes
When joining at the end of round 1 ensure that the round is not twisted.
Neck Edging is worked as four separated corner points.
Pattern
Rnd 1: With A, ch 150, dc in 4th ch from hook, dc in next 36 chs, [ch 2 (corner made), dc in next 37 chs] rep 3 times, ch 2, sl st to top of beg ch, (weave tail into base of the beg chain to close ring) change to B. – 148 dc, 4 ch-2 sps
A little bit of an airy stitch…
Rnd 2: Ch 1, sc in same st, {[ch 3, sk 3, sc in next st] rep across to ch-2 corner, ch 1, (sc, ch 3, sc) in ch-2 sp, ch 1, sc in next st,} 3 times, [ch 3, sk 3, sc in next st] rep across to ch-2 corner, ch 1, (sc, ch 3, sc) in ch-2 sp, ch 1, sl st to join. – 40 (ch-3) sps, 8 (ch-1) sps
Rnd 3: Ch 1, sc in same st, {[ch 3, sc in next sc] across to corner, ch 3, dc in ch-3 sp of corner} rep 4 times, ch 3, sc in next sc, ch 3, sl st to join. – 4 dc, 52 (ch-3)sps
Rnd 4: Ch 1, sc in same st, {[ch 3, sc in next sc] across to corner, ch 3, (sc, ch 3, sc) in dc} rep 4 times, ch 3, sc in next sc, ch 3, sl st to join, change to A.
Making it a bit more solid…
Rnd 5: Ch 3, {[3 dc in ch-3 sp, dc in sc] rep across to corner, ch 3, dc in ch-3 corner sp, ch 3, dc in sc} rep 4 times, 3 dc in ch-3 sp, dc in sc, 3 dc in ch-3 sp, sl st to join.
Rnd 6: Ch 3, [dc in each dc across to corner, 3 dc in ch-3 sp, (dc, ch 3, dc) in dc, 3 dc in ch-3 sp] rep 4 times, dc across to first st, sl st to join.
Rnd 7: Ch 3, [dc in each dc across to corner, ch 3, dc in ch-3 sp, ch 3] rep 4 times, dc across to first st, sl st to join, change to B.
Phoenix Poncho
Back to being airy…
Rnd 8: Ch 1, sc in same st, {[ch 3, sk 3, sc in next st] rep across to corner, ch 3, (sc, ch 3, sc) in dc, ch 3, sc in next dc} rep 4 times, [ch 3, sk 3, sc in next st] 3 times, sl st to join.
Rnd 9: Ch 1, sc in same st, {[ch 3, sc in next sc] across to corner, ch 3, dc in ch-3 sp of corner} rep 4 times, ch 3, [sc in next sc, ch 3] across to first st, sl st to join.
Rnd 10: Ch 1, sc in same st, {[ch 3, sc in next sc] across to corner, ch 3, (sc, ch 3, sc) in dc} rep 4 times, ch 3, [sc in next sc, ch 3] rep across to first st, sl st to join.
Rnd 11-14: Rep Rnds 9 & 10.
Rnd 15: Rep Rnd 9, changing to A at join.
A bit of solid…
Rnd 16: Ch 3, {[3 dc in ch-3 sp, dc in sc] rep across to corner, 3 dc in ch-3 sp, (dc, ch 3, dc) in dc} rep 4 times, 3 dc in ch-3 sp, [dc in sc, 3 dc in ch-3 sp] rep across to first st, sl st to join, change to B.
Needs to be airy…
Rnd 17: Rep Rnd 8.
Rnds 18-33: Rep Rnds 9 & 10, change to A at the join of Rnd 33.
Rnd 34: Rep Rnd 9.
Rnd 35: Rep Rnd 16.
Let’s finish it up…
Rnd 36: Sl st in next st, ch 3, dc in next 4 sts, ch 1 sk 1, {[dc in next 5 sts, ch 1, sk 1] rep across to corner, (dc, ch 1, dc, ch 1, dc) in ch- 3 sp, ch 1, sk 1} rep 4 times, [dc in next 5 sts, ch 1, sk 1] across to first st, sl st to join.
Rnd 37: Sl st in next st, ch 3, dc in next 2 sts, {[ch 3, sk dc, sk ch-1 sp, sk dc, dc in next 3 dc] rep across to corner, ch 3, sk dc, sk ch-1 sp, sk dc, dc in next ch-1 sp, ch 1, dc in next dc, ch 1, dc in ch-1 sp} rep 4 times, [ch 3, sk dc, sk ch-1 sp, sk dc, dc in next 3 dc] across to first st, ch 3, sl st to join.
Rnd 38: Sl st in next st, ch 5, (dc, ch 2, dc) in same st, sc in ch-3 sp, sk next dc, {[(dc, ch 2, dc, ch 2, dc) in next dc, sc in ch-3 sp] across to corner, sk next dc (dc, ch 2, dc, ch 2, dc, ch 2, dc, ch 2, dc) in corner dc, sc in ch-3 sp} rep 4 times, [(dc, ch 2, dc, ch 2, dc) in next dc, sc in ch-3 sp] across to first st, sl st to join. Fasten off. Weave in ends.
Neck Edging, Work in each corner
Row 1: From any corner, join with B to stitch 7 away from corner, ch 3 (counts as dc), dc in corner, sk next 6 sts, dc in next st, turn.
Edging: Ch 2 sc in base of dc, ch 3, sk 3 sts of neck, sc in next st, turn, ch 5, dc in center dc of Row 1, ch 1, dc in same st, ch 5, sk 3 sts from join of Row 1, sc in next st, turn, ch 3, sc in join of Row 1, ch 2, sl st to center dc in Row 1. Fasten off. Weave in ends.
Help me help local communities by creating blocks for Warm Up America,
by making a block for yourself and one for a community project with this free
pattern. I will be creating a new block every few weeks and sharing it with
you, I just ask that make one for donation.
Warm Up America is a nationwide organization that
encourages local donations, but will also except donations to be sent to their
office so that blocks can be assembled and then blankets can be donated through
the United States.
Even if you do not want to participate with Warm Up America, please consider creating blocks, or blankets for your local community. There are various places in every community that accept donations.
Bricks Block
Bricks Block
Gauge: 7”x 9” rectangle
Materials
Medium weight yarn
K/10 1/2 /6.5 mm crochet hook
Notes
When changing bricks you do not turn the fabric like a page of a book, instead you turn it to the side and work on another side of the square.
First Brick
Row 1: Ch 6, sc in 2nd ch from
hook, sc in each ch across, turn. -5sc
Rows 2-4: Ch 1, sc in each st across, turn.
Row 5: Ch 1, sc in each st across, change
to new color, do not turn.
Second Brick
Row 6: Ch 1, Working down the ends of the
rows sc in the end of each row, turn. -5sc
Rows 7-9: Rep Rows 2-4.
Row 10: Rep Row 5.
Third Brick
Row 11: Ch 1, working down the ends of the
rows sc in the end of each row, sc in each st on edge of block 1, turn. -10 sc
Rows 12-14: Rep Rows 2-4.
Row 15: Rep Row 5.
Fourth Brick
Row 16: Ch 1, working down the ends of the
rows sc in the end of each row, sc in each st of next block, turn. -10 sc.
Rows 17-19: Rep Rows 2-4.
Row 20: Rep Row 5.
Fifth Brick
Row 21: Ch 1, working down the ends of the
rows sc in the end of each row, sc in each st and row ends of next blocks,
turn. -15 sc.
Rows 22-24: Rep Rows 2-4.
Row 25: Rep Row 5.
Sixth Brick
Row 26: Ch 1, working down the ends of the
rows sc in the end of each row, sc in each st and row ends of next blocks,
turn. -15 sc.
Rows 27-29: Rep Rows 2-4.
Row 30: Rep Row 5.
Seventh Brick
Row 31: Ch 1, working down the ends of the
rows sc in the end of each row, sc in each st and row ends of next blocks,
turn. -20 sc.
Rows 32-34: Rep Rows 2-4.
Row 35: Rep Row 5.
Eighth Brick
Row 36: Ch 1, working down the ends of the
rows sc in the end of each row, sc in each st and row ends of next blocks,
turn. -20 sc.
Rows 37-39: Rep Rows 2-4.
Row 40: Rep Row 5.
Ninth Block
Ninth Brick
Row 41: Ch 1, working down the ends of the
rows sc in the end of each row, sc in each st and row ends of next blocks,
turn. -25 sc.
Rows 42-44: Rep Rows 2-4.
Row 45: Rep Row 5.
Tenth Brick
Row 46: Ch 1, working down the ends of the rows sc in the end of each row, sc in each st and row ends of next blocks, turn. -25 sc. Fasten off, weave in ends, block.
There are times when crochet shares a perspective that I was
not aware existed. I was invited to join an on-line conference call of crochet enthusiasts
recently, and as I was sitting back and listening to the discussions, I was
struck by a topic I had never considered. The heritage of a pattern, and how it
connects us to others.
This particular topic was around a pattern for a pot holder.
Some Stories of Connection
I listened to a story of how a learned family pattern has
continued through generations. How even after the legacy of the pattern has
passed the skill is picked up by another and still being created and shared
throughout the family. Connecting multiple
generations and family tree branches, as so many had memories of this one pot
holder pattern that was created by the family matriarch.
I heard another regarding a very similar pot holder pattern
and how it was the captivating project that encouraged them to further their
own crochet skills so as to create the pattern themselves.
Still more was the eagerness of others to learn this pattern
to make the same connections with family and each other.
My Take Aways
I was in awe of how one simple pattern was connecting all of
these people, and how they shared that it was a connection throughout those
that they love.
Everyone may not crochet, but the legacy of a simple crochet
pattern has connected these families. That to me is mesmerizing, as I have no
connection to those in my family that crocheted before me. I may have some
hooks that belonged to my great-grandmother, but I never met her, I have never
seen any of her handiwork. There are no family patterns in my family that holds
these vivid memories for me, but it a wonderful to know that these exist of
others, and I feel honored to have heard their stories.
If you want to create attempt this legacy potholder, below is a similar pattern to those that were engaging the memories of others. I have used this pattern for several years to help new crocheters practice their skills.
Free Pattern
Diagonal Corners Pot Holder
Diagonal Corners Pot Holder
Materials List
Size J/10/6.0mm hook
Approximately 90yd of medium weight yarn, sample used: Lily Sugar’n Cream medium weight 100% USA Grown Cotton yarn (2oz/56.7g/95yrd/86m), 1 skein color# 102002 Mod Ombre
Removable Stitch Marker
Tapestry Needle
Details
Finished measurements: 7”x 6.5”
Gauge: is not critical for this project
Getting Started
Rnd1: Ch 30, 3sc in 2nd ch from hook, sc in next 27 ch, 3 sc in last ch, working in back loops of beg ch, sc in next 27 ch.
Rnd 2: Without joining, work sc in next 2 sts, insert stitch marker in last st created, sc in each st around to marker.
Rnds 3-18: Sc in each st around.
Finishing
Leaving a long tail, cut yarn and pull through loop on hook. (Finished off.) Fold the edges of round 18 together to allow pot holder to lay flat. Thread tapestry needle through long tail and weave through both sides of Round 18, sewing seam together. Weave ends in.
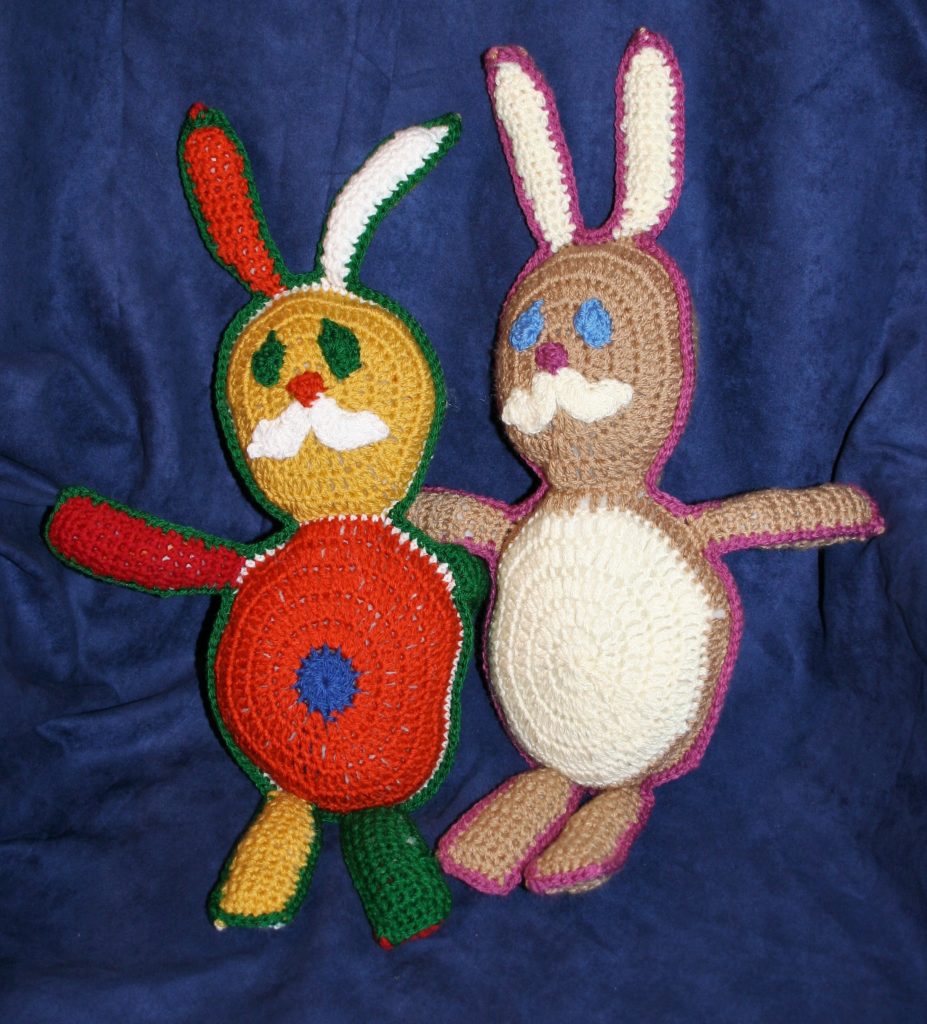
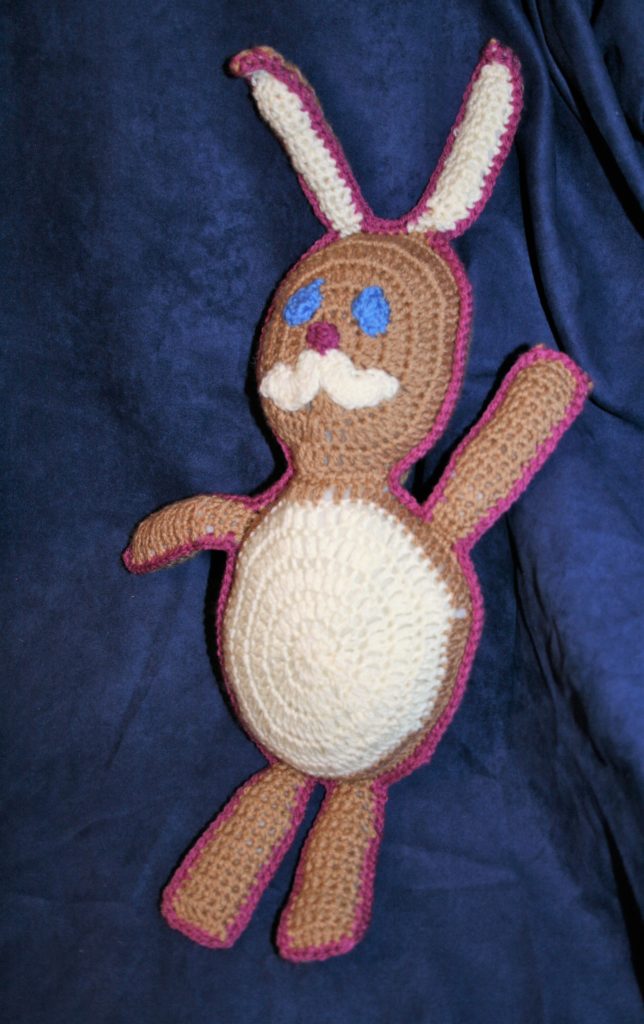
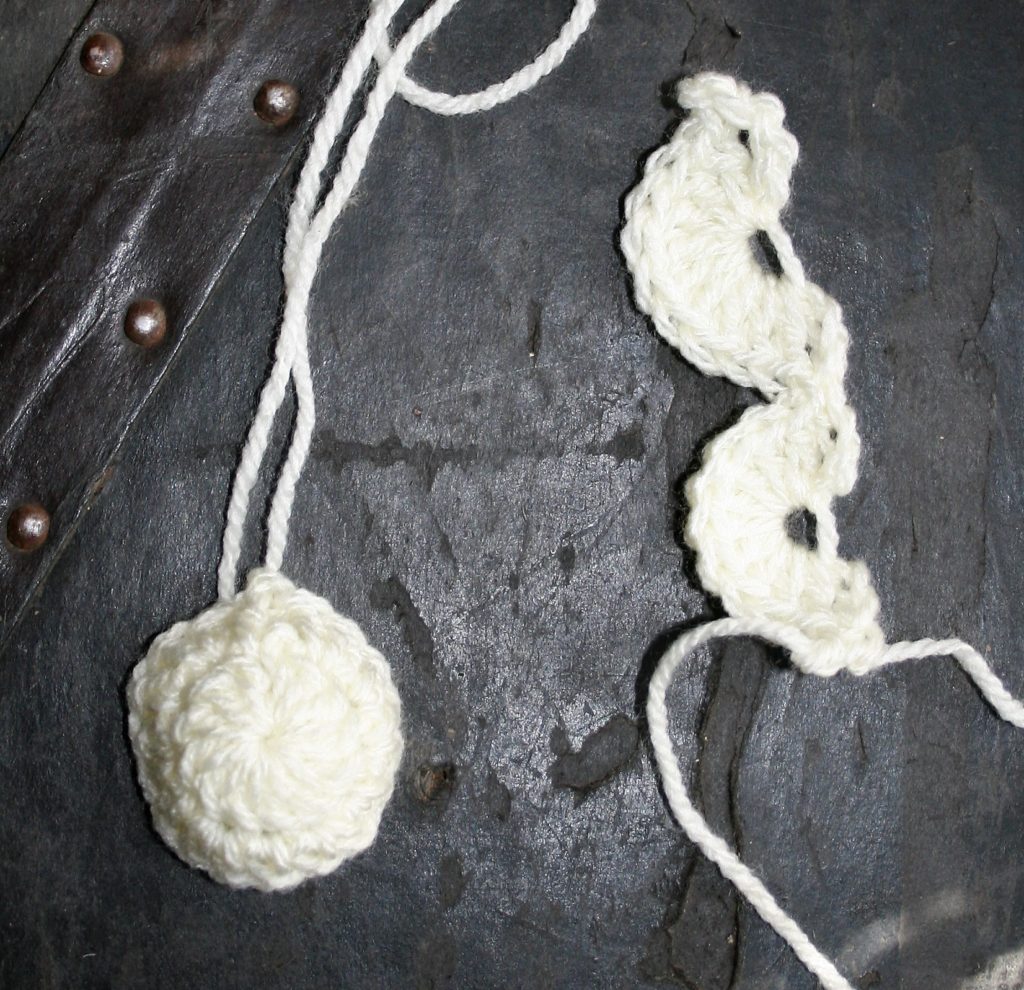
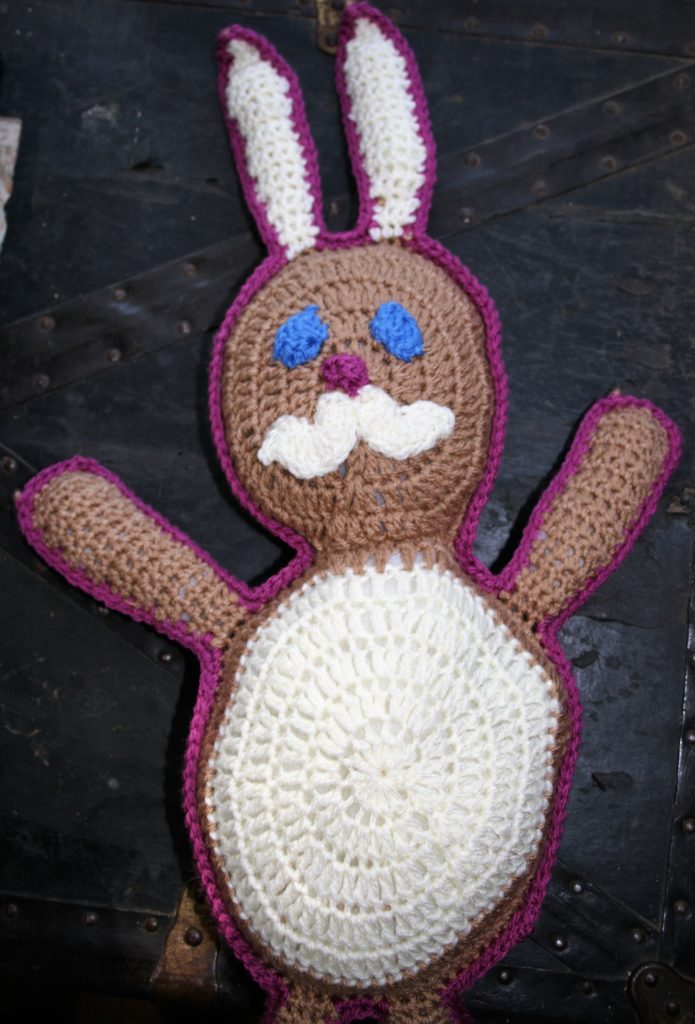
I have always had a soft spot for Rabbits, and as such I have always loved this time of year as it brings out Easter Bunnies everywhere. I have created a simple free pattern for a toy bunny, that might be just perfect for a little one in your life. This is an amigurumi for the beginner, as it has minimal shaping, I like the rustic charm.
Jack the Scrap Rabbit and Jack the Rabbit
This free pattern is part of the 2020 Softie CAL! There are many great designs to keep you inspired, check all of them out here. Also, don’t miss the giveaways.
Materials
Lion Brand Basic Stitch Premium 100% acrylic medium weight yarn (3.5 oz/100g/219yd/200m) colors: MC-#126 Goldmine, CC1-#98 Cream, CC2-#142 Boysenberry, CC3- #109 Coastal (OR, make a Scrap Jack, by using any medium weight yearn on hand)
Poly-Fils Crafters Choice Dry Polyester Packing Fiber Fill
G/6/4.25mm crochet hook
Note…Save your time weaving in ends. Instead of weaving in ends, simply push the ends to the wrong side of the fabric, when seaming and stuffing ensure that the ends are with the stuffing.
Round 2: Ch 3, dc
in same st, 2 dc in each st around, sl st to join. -28dc
Round 3: Ch 3, dc
in same st, dc in next st, [2 dc in next st, dc in next st] around, sl st to
join. -42 dc
Round 4: Ch 3, dc
in same st, dc in next 2 sts, [2 dc in next st, dc in next 2 sts] around, sl st
to join. -56 dc
Round 5: Ch 3, dc
in same st, dc in next 3 sts, [2 dc in next st, dc in next 3 sts] around, sl st
to join. Fasten off. -70 dc
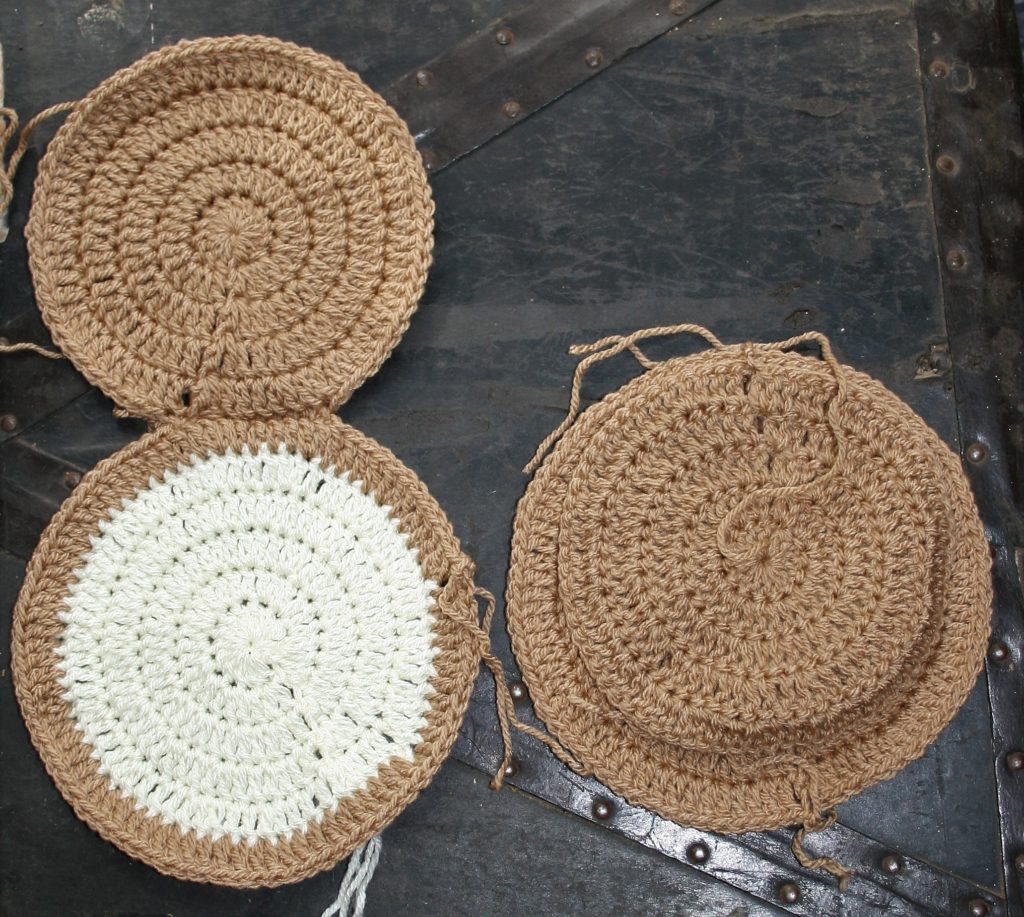
Back (Make 1)
Round 1: With MC,
Magic Loop, ch 3, 13 dc in loop, pull loop closed, sl st to top of beg ch. -14
dc
Round 2: Ch 3, dc
in same st, 2 dc in each st around, sl st to join. -28dc
Round 3: Ch 3, dc
in same st, dc in next st, [2 dc in next st, dc in next st] around, sl st to
join. -42 dc
Round 4: Ch 3, dc
in same st, dc in next 2 sts, [2 dc in next st, dc in next 2 sts] around, sl st
to join. -56 dc
Round 5: Ch 3, dc
in same st, dc in next 3 sts, [2 dc in next st, dc in next 3 sts] around, sl st
to join. -70 dc
Round 6: Ch 3, dc
in same st, dc in next 4 sts, [2 dc in next st, dc in next 4 sts] around, sl st
to join. Fasten Off. -84 dc
Belly (Make 1)
Round 1: With CC1,
Magic Loop, ch 3, 13 dc in loop, pull loop closed, sl st to top of beg ch. -14
dc
Round 2: Ch 3, dc
in same st, 2 dc in each st around, sl st to join. -28dc
Round 3: Ch 3, dc
in same st, dc in next st, [2 dc in next st, dc in next st] around, sl st to
join. -42 dc
Round 4: Ch 3, dc
in same st, dc in next 2 sts, [2 dc in next st, dc in next 2 sts] around, sl st
to join. -56 dc
Round 5: Ch 3, dc
in same st, dc in next 3 sts, [2 dc in next st, dc in next 3 sts] around, sl st
to join, change to MC. -70 dc
Round 6: Ch 3, dc
in same st, dc in next 4 sts, [2 dc in next st, dc in next 4 sts] around, sl st
to join. Fasten Off. -84 dc
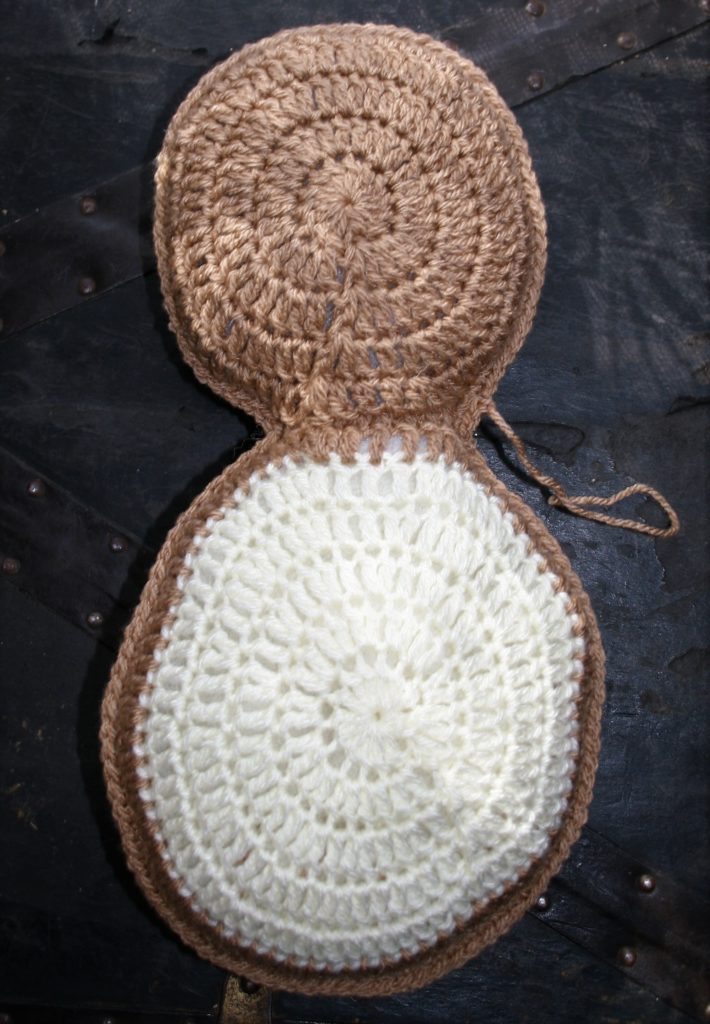
Two heads, a Belly and a Back
Joining Head to Body
With Right sides facing each other, stack 1 Head on the
Back, working through stitches of both fabrics, sl st in 10 stitches. Repeat
with last Head and Belly.
Join a head to a body, with rights sides facing each other when joining.
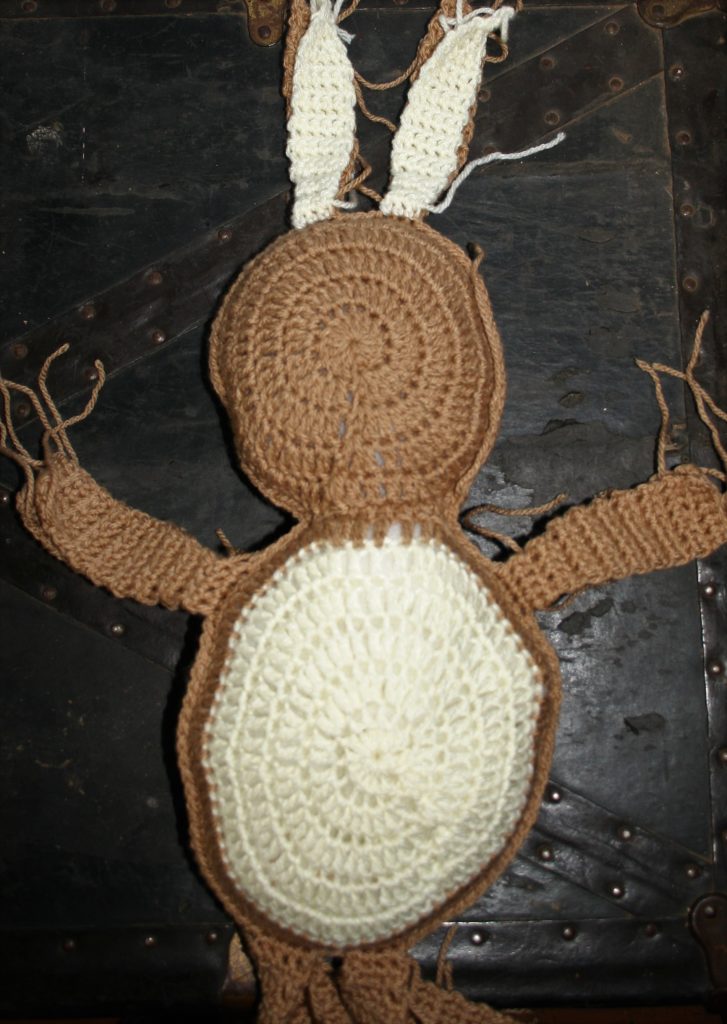
With Wrong Sides facing each other, stack the 2 sides on top
of each other, working through stitches of both fabrics, sc around the entire
outer edge of sides, filling with poly-fil before completely finishing. (Tip:
Begin joining near neck to ensure that the neck of both sides matchup)
Putting the wrong sides facing each other of head/body seam the body together and stuff it as you go.
Arms/Legs
Working in the joining round of Head and Body, find your
personal placement for 2 legs and 2 arms. You will work a front side and back
side of each, and these will be seamed together in the final steps.
Front Side
Row 1: With MC, working
in front loop, sc in 4 sts, turn. -4 sc
Row 2 & 3: Ch
1, sc in each st across, turn. -4 sc
Row 4: Ch 1, 2 sc
in first st, sc in each st across, turn. -5 sc
Row 5: Ch 1, sc
in each st across, turn. -5 sc
Row 6: Ch 1, 2 sc
in first st, sc in each st across, turn. -6 sc
Row 7-18: Ch 1,
sc in each st across, turn. Fasten off at the end of Row 18.
Back Side
Row 1: With MC, working
in back loop, sc in 4 sts, turn. -4 sc
Row 2 & 3: Ch
1, sc in each st across, turn. -4 sc
Row 4: Ch 1, 2 sc
in first st, sc in each st across, turn. -5 sc
Row 5: Ch 1, sc
in each st across, turn. -5 sc
Row 6: Ch 1, 2 sc
in first st, sc in each st across, turn. -6 sc
Row 7-18: Ch 1,
sc in each st across, turn. Fasten off at the end of Row 18.
Ears
Working in the joining round of Head find your personal placement for 2 ears. You will work a front side and back side of each, and these will be seamed together in the final steps.
Special Stitches
Single Crochet Two Together (sc3tog): Insert hook into indicated stitch, yo, pull through a loop, insert hook into next stitch, yo, pull through a loop, yo, pull through all 3 loops on hook.
Single Crochet Three Together (sc3tog): Insert hook into indicated stitch, yo, pull through a loop, [insert hook into next stitch, yo, pull through a loop] twice, yo, pull through all 4 loops on hook.
Front Side
Row 1: With CC1, working
in front loop, sc in 3 sts, turn. -3 sc
Row 2 & 3: Ch
1, sc in each st across, turn. -3 sc
Row 4: Ch 1, 2 sc
in first st, sc in each st across, turn. -4 sc
Row 5: Ch 1, sc
in each st across, turn. -4 sc
Row 6: Ch 1, 2 sc
in first st, sc in each st across, turn. -5 sc
Row 7-15: Ch 1,
sc in each st across, turn. -5 sc
Row 16: Ch 1, sc2tog, sc in next st, sc2tog, turn. – 2 sc2tog, 1 sc
Row 17: Ch 1, sc
in each st across, turn. -3 sc
Row 18: Ch 1,
sc3tog, turn. -1 sc3tog
Row 19: Ch 1, sc
in only st, fasten off.
Back Side
Row 1: With MC, working
in back loop, sc in 3 sts, turn. -3 sc
Row 2 & 3: Ch
1, sc in each st across, turn. -3 sc
Row 4: Ch 1, 2 sc
in first st, sc in each st across, turn. -4 sc
Row 5: Ch 1, sc
in each st across, turn. -4 sc
Row 6: Ch 1, 2 sc
in first st, sc in each st across, turn. -5 sc
Row 7-15: Ch 1,
sc in each st across, turn. -5 sc
Row 16: Ch 1,
sc2tog, sc in next st, sc2tog, turn. – 2 sc2tog, 1 sc
Row 17: Ch 1, sc
in each st across, turn. -3 sc
Row 18: Ch 1,
sc3tog, turn. -1 sc3tog
Row 19: Ch 1, sc
in only st, fasten off.
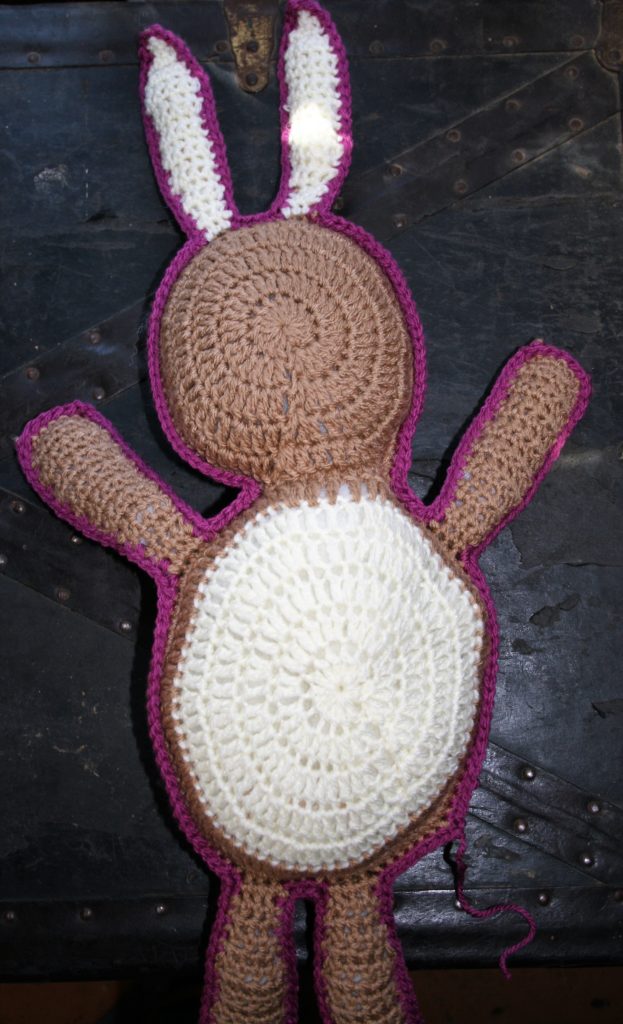
Working two side of each arm/leg/ear, join to the seam of the body. One side in a front loop, one side in a back loop.
Seaming All Arms/Legs/Ears
With CC2, join to any edge seam of body or head, sc in each
st across to next arm/leg/ear, working through both fabrics, evenly sc in ends
of rows and stitches, filling with poly-fil before completing seaming, continue
all the way around body, sl st to join. Fasten off.
Working all around the edge of the body, seam and stuff the arms/legs/ears
Upper Lip (Mustache)
With CC1 Ch 18, sc in 2nd ch from hook, sk next 3
chs, 9 dc in next ch, sk 3 chs, sl st in next ch, sk 3 chs, 9 dc in next ch, sk
next 3 chs, sc in last ch. Fasten off. With Shells facing downward, whip stitch
lip to face.
Tail
Round 1: With
CC1, Magic loop, ch 3, 8 dc in loop, pull loop closed, sl st to join.
Round 2: Ch 3, dc
in same st, dc in next st, [2 dc in next st, dc in next st] around, sl st to
join. Fasten off. Whip stitch tail to back of body, filling with poly-fil
before completing seaming.
Tail and Upper LIp
Nose
With CC2, ch 3, 2 dc in 3rd ch from hook, fasten
off. Whip stitch at sl st of lip.
Eyes (Make 2)
With CC3, ch 3, 5 dc in 3rd ch from hook, fasten off. Whip stitch to face.