As we enter a New Year, I always find myself reflecting on the previous 12 months. This time I found some interesting understandings that I had overlooked; disconnect between my head and my hands.
With the constantly changing dynamics of 2020 I needed to keep my hands busy. I needed to keep a rhythm and flow of yarn in my hand, yet I had difficulty designing. My mind did not want to count stitches. It did not want to think of stitch patterns or colorways. My mind did not want to plan, my hands just wanted to move.
What I realized is something that has always been part of me, that I am most creative when I am calm. This was something that was constantly in peril in the last several months. I have been mentally juggling various situations in various days. Handling the changes of focus that have been tossed my way daily has made its effect, as most of the designs that I released in my pattern line have been designs that I had designed earlier.
However, I have been finding a new way to focus artistically. I have been rediscovering things that inspired me as a child. I stumbled across various little trinkets that had held my attention when I was younger. A couple of mismatched barrettes that I always thought were so pretty. A picture on a playing card, just a couple of kittens, but the monochromatic feel always captivated me. Even some fabric that my mom had purchased to make me a sundress. The dress was never made, but I always smiled when seeing the little rows of yellow roses.
This has helped me feel grounded. I still may not feel like my designing muscles are ready to fully flex, but at least I feel like there is a way to calm my mind for an artistic focus…so maybe I can find a happy medium between my head and my hands.
There are points in your life that you can reflect back on and realize that was where everything went in a different direction. For me one such point is the CGOA Masters Advanced Stitches & Techniques Program. Some may recognize my name as a teacher or designer or even past president of CGOA, but none of that would be true if not for that portfolio.
I remember when I first learned of the program, when Advanced Stiches & Techniques was first released in May of 2010. A group of fiber artists were discussing how they were getting master certification in weaving and yarn spinning. I was in awe that such certifications even existed, as I had never heard about it before. Then I get my first newsletter from CGOA and was thrilled to learn that they offered just such a program.
Getting started
I purchased it the day it was released, and waited patiently for it to arrive in the mail. As soon as I open the envelope I was enthralled and captivated by the 29 page document. Picking up a skein of yarn I began working each swatch as it was listed.
I will admit I was a bit apprehensive. There were times I came across stitches I had never worked. There were patterns that had no description or picture of what it should look like. However, I continued on. In honesty, I was so excited that I completed the entire 48 swatches and 13 questions in a matter of days. Not wanting to appear too eager, or speedy in my work I waited a week or so before contacting the CGOA office to set up a review. Unbeknownst to me, the course was so popular, that by the time I had requested a review it already had a four week backlog.
Over the next four weeks waiting to be assigned a reviewer, I anxiously looked over my work, practiced a few of the new stitches, and tried to stay calm. There was no point in second guessing myself.
The wait
Then the time came to send of my portfolio. I was a complete mixture of feelings. Essentially taking a test from a professor I had never met, and they were going to tell me if I could actually crochet. I am self-taught, and even though I had been crocheting for 25 years at this point I had never had someone scrutinize my work. What if they told me I was joke? What if I was only making mistakes? Then I remembered those fiber artists, and how in their discussions they had talked about how much they learned about themselves and their work through the review process for their certifications. How it improved their weaving, their spinning.
After finally passing the review process, I realized I did learn a lot about myself, and improved my crochet. The program forced me to consider things, stitches and techniques that I had just taken for granted. By understanding more about my stitching I have improved my work.
Moving Forward
The rest of my adventure grew from this. Now that I had actually completed this recognition program I had friends and family ask me to teach them to crochet. It is a bit mind boggling that people that have known me as a crocheter only now think I can actually successfully crochet because I received a certificate, but it is what it is.
Then being invited by CGOA to be recognized as a Master at a graduate ceremony at their next annual conference took me into the world of design and further professional growth. I also made lifelong friends whose diverse backgrounds create a unique tapestry in my life, it is always amazing how crochet can unite. I found another family one that understands and embraces me in an entirely different way than I had ever experienced before.
It is always interesting to see how different events can present themselves from contact made years earlier. This last week I was approached to help on a Sheep to Shawl team.
What is a Sheep to Shawl?
A Sheep to Shawl is an age old competition that I have seen several times at many Fiber Festivals. Each competition has slightly different rules, but only slightly. Essentially it is a team of people (usually seven) that work in a set time limit. In this time limit they prep a sheep fleece, teasing the wool and carding it. They then spin it into “singles”, then ply these “singles” together to create yarn. The yarn is then woven on a loom to create a shawl of set dimensions by the competition.
I dusted off my spinning wheel…
This is usually entirely completed in 4 hours.
A Virtual event…
With the current situation of the world most Fiber Festivals have been canceled or re-imagined. The Lambtown Festival in Dixon, California has re-imagined this competition in a virtual setting.
Teams are allowed a total of 28 hours to complete this process, but need to provide all these hours on a Zoom presentation. The 28 hours essentially creates this shawl in the same time setting as in-person, as the hours are counted from every participant.
This means that everyone is working quickly, in their own home setting,. Then figuring out how to get need supplies to the next participants to complete the steps. It is an interesting undertaking.
Where I am Invited
So in this new setting a couple of ambitious woman decided to challenge the notion of this being a woven shawl, and see if one can be crocheted instead. I honestly am not aware of any competition that has ever worked up a crochet shawl, and we are hoping to set a new level of encouragement and interest in crochet.
This is where I was brought in. I learned to spin yarn several years ago, but I haven’t put it to practice much in the last 9 years. So, I dusted off my wheel last weekend and spun up some singles.
There are times when crochet shares a perspective that I was
not aware existed. I was invited to join an on-line conference call of crochet enthusiasts
recently, and as I was sitting back and listening to the discussions, I was
struck by a topic I had never considered. The heritage of a pattern, and how it
connects us to others.
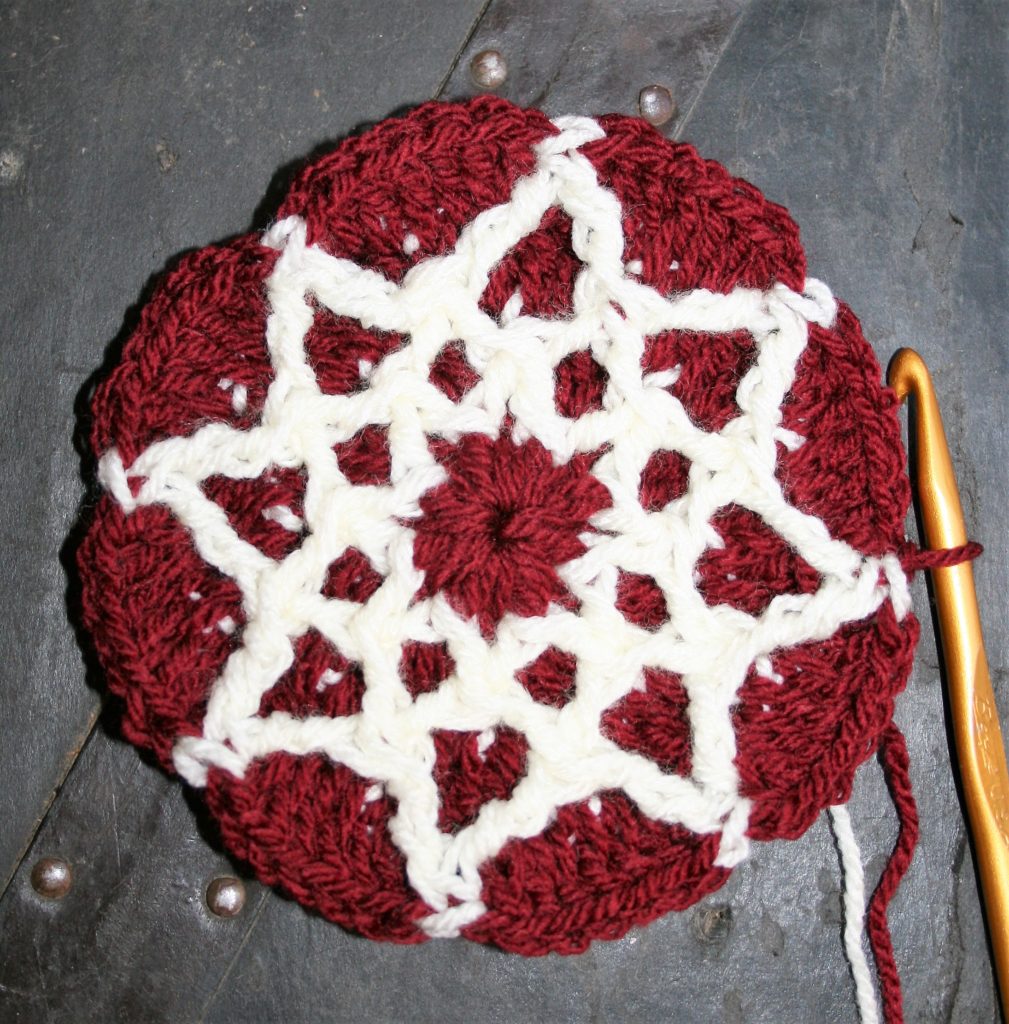
This particular topic was around a pattern for a pot holder.
Some Stories of Connection
I listened to a story of how a learned family pattern has
continued through generations. How even after the legacy of the pattern has
passed the skill is picked up by another and still being created and shared
throughout the family. Connecting multiple
generations and family tree branches, as so many had memories of this one pot
holder pattern that was created by the family matriarch.
I heard another regarding a very similar pot holder pattern
and how it was the captivating project that encouraged them to further their
own crochet skills so as to create the pattern themselves.
Still more was the eagerness of others to learn this pattern
to make the same connections with family and each other.
My Take Aways
I was in awe of how one simple pattern was connecting all of
these people, and how they shared that it was a connection throughout those
that they love.
Everyone may not crochet, but the legacy of a simple crochet
pattern has connected these families. That to me is mesmerizing, as I have no
connection to those in my family that crocheted before me. I may have some
hooks that belonged to my great-grandmother, but I never met her, I have never
seen any of her handiwork. There are no family patterns in my family that holds
these vivid memories for me, but it a wonderful to know that these exist of
others, and I feel honored to have heard their stories.
If you want to create attempt this legacy potholder, below is a similar pattern to those that were engaging the memories of others. I have used this pattern for several years to help new crocheters practice their skills.
Free Pattern
Diagonal Corners Pot Holder
Diagonal Corners Pot Holder
Materials List
Size J/10/6.0mm hook
Approximately 90yd of medium weight yarn, sample used: Lily Sugar’n Cream medium weight 100% USA Grown Cotton yarn (2oz/56.7g/95yrd/86m), 1 skein color# 102002 Mod Ombre
Removable Stitch Marker
Tapestry Needle
Details
Finished measurements: 7”x 6.5”
Gauge: is not critical for this project
Getting Started
Rnd1: Ch 30, 3sc in 2nd ch from hook, sc in next 27 ch, 3 sc in last ch, working in back loops of beg ch, sc in next 27 ch.
Rnd 2: Without joining, work sc in next 2 sts, insert stitch marker in last st created, sc in each st around to marker.
Rnds 3-18: Sc in each st around.
Finishing
Leaving a long tail, cut yarn and pull through loop on hook. (Finished off.) Fold the edges of round 18 together to allow pot holder to lay flat. Thread tapestry needle through long tail and weave through both sides of Round 18, sewing seam together. Weave ends in.
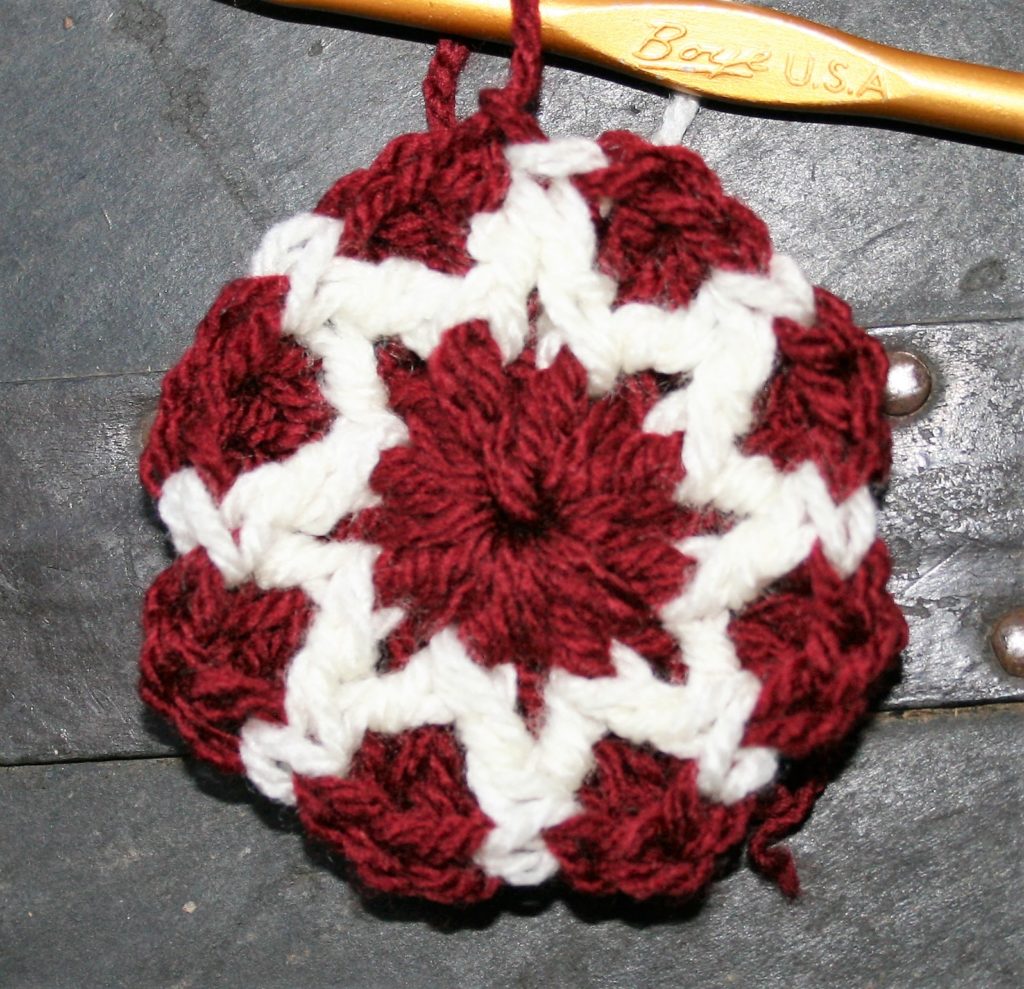
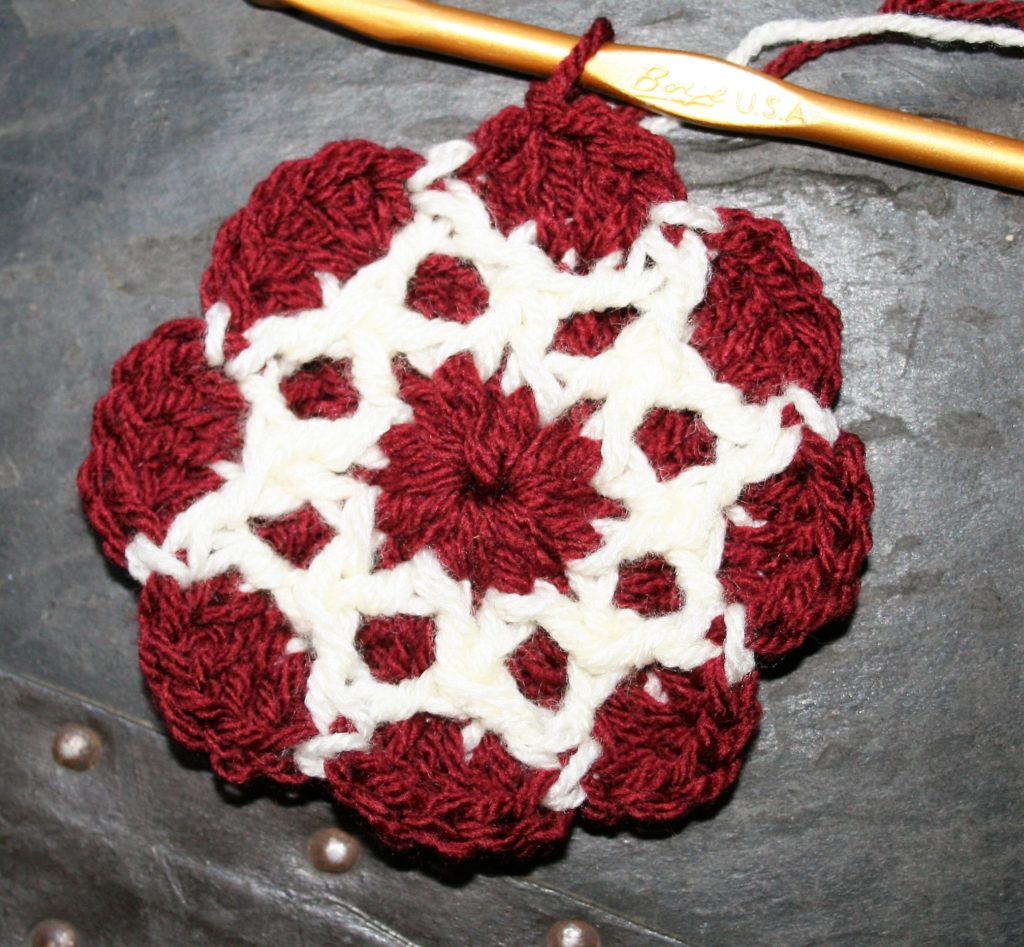
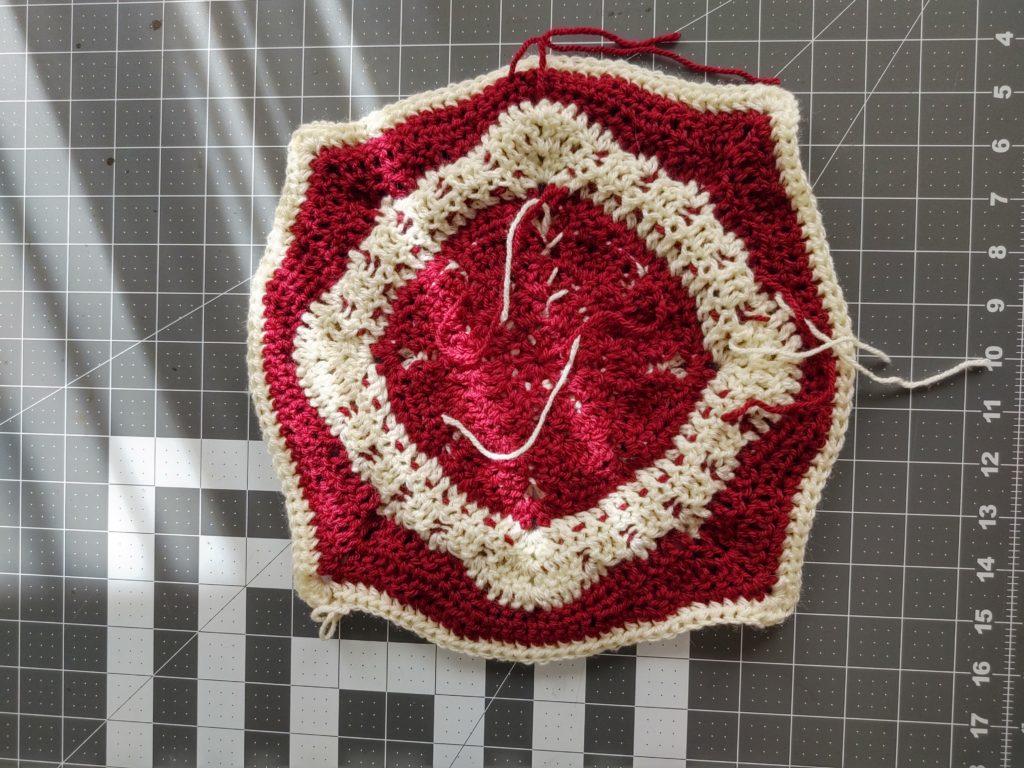
For my part I worked a square that utilizes carrying your throughout the project, crocheting over the color you are not working. This allows for some specialized color changes without having to weave in a bunch of ends.
After you complete the smaller 6″ square, you then really put this square on its head, by moving the corners to the sides. This causes the square to rest on its point.
Square measures 12” x 12” (at end of Round 6, square
measures 6” x 6”)
Materials
J/10/6.00mm crochet hook
Lion Brand Basic Stitch Premium medium weight 100% premium acrylic yarn (3.5 oz/100g/219yrds/200m) 1 skein each color #141 Plum (MC), #98 Cream (CC)
Abbreviations:
Beg: Beginning
Bpdc: back post double crochet
Bphdc: back post half double crochet
Bpsc: back post single crochet
CC: contrasting color
Ch: chain
Dc: double crochet
Fpdc: front post double crochet
Fphdc: front post half double crochet
Hdc: half double crochet
MC: main color
Rnd: round
Sc: single crochet
Sl st: slip stitch
Sp: space
St(s): Stitch(es)
Special Stitches
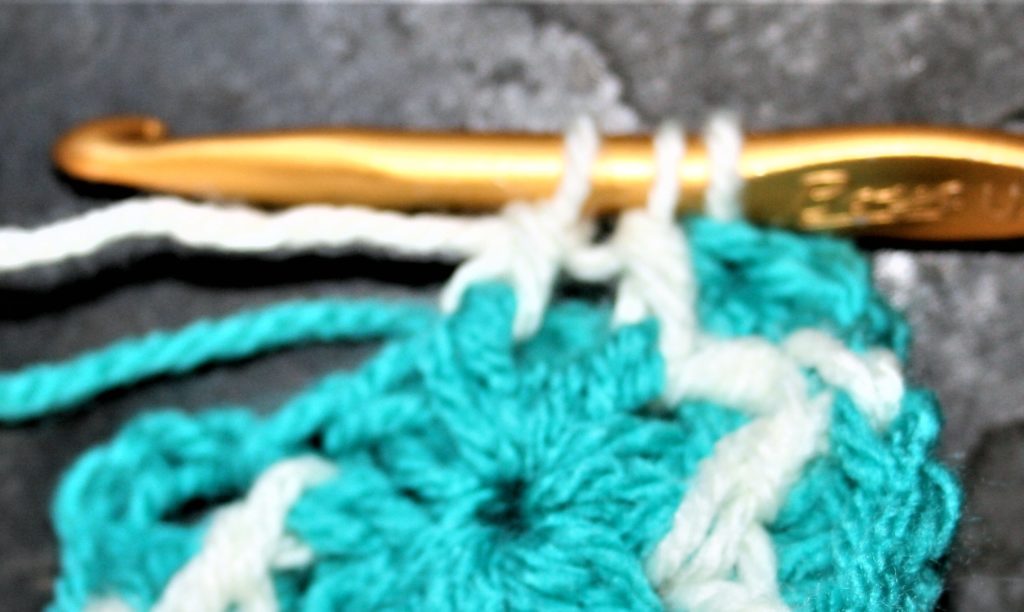
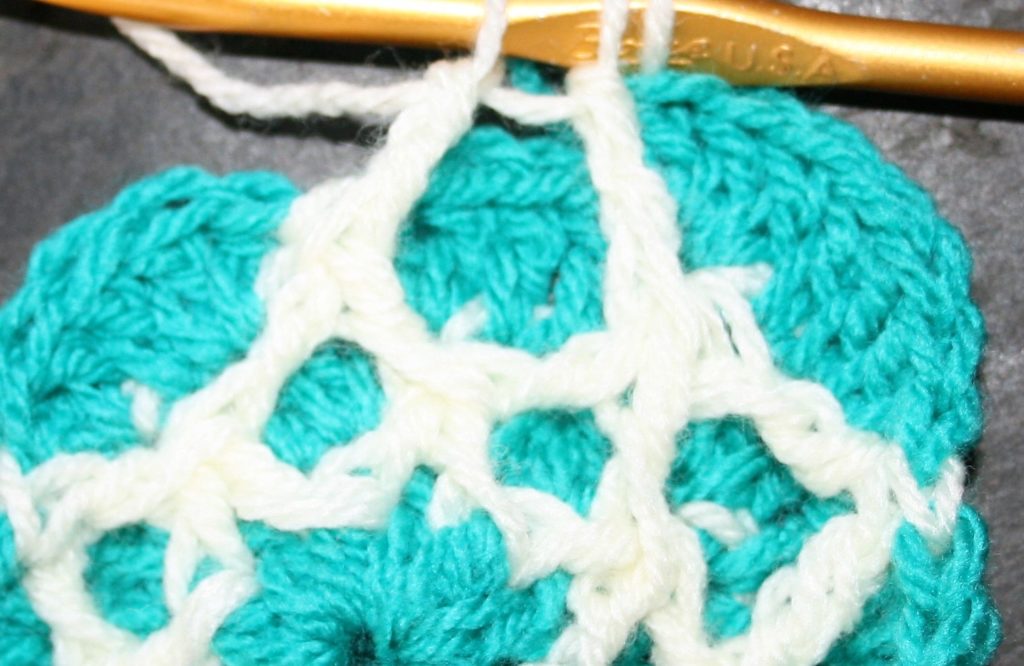
Front Post Double Crochet Two Together (Fpdc2tog): Yarn over, insert hook from front to back and then to front again around post of stitch last worked into (or around st indicated) on previous row, yarn over and pull up a loop, yarn over and draw through 2 loops on hook, skip next st on rnds 2 and yarn over, insert hook from front to back and then to front again around post of next stitch (or around st indicated), yarn over and pull up a loop, yarn over and draw through 2 loops on hook, yarn over and draw through all 3 loops on hook.
Front Post Treble Crochet Two Together (Fptr2tog): Yarn over twice, insert hook from front to back and then to front again around post of indicated stitch, yarn over and pull up a loop, [yarn over and draw through 2 loops on hook] twice, yarn over twice, insert hook from front to back and then to front again around post of indicated stitch, yarn over and pull up a loop, [yarn over and draw through 2 loops on hook] twice, yarn over and draw through all 3 loops on hook.
Notes
Leave unused color behind your work and work over unused
color when possible.
The Smaller Block
Rnd 1: With MC, ch
4 (last 3 chains count as dc), 15 dc
in 4th ch from hook, join to top of beg ch. -16 dc
Rnd 2: Ch 3 (counts
as tr here and throughout), dc in same st, dc in next st, change color to
CC, fpdc2tog, change color to MC, [2 dc in next st (behind fpdc2tog), 1 dc
in next st (used for 2nd leg of fpdc2tog), change color to
CC, fpdc2tog, change color to MC] repeat around, slip stitch in top of beg ch-3
to join. – 8 fpdc2tog, 24 dc
Working stitch location of “legs” of fpdc2togCompleted Round 2
Rnd 3: Ch 3, dc
in same st, change color to CC, fpdc2tog over last and first fpdc2tog, change
color to MC, skip next st, 2 dc in next st, dc in next fpdc2tog, [2 dc in next
st, change color to CC, fpdc2tog over last-used and next fpdc2tog, change color
to MC, sk next st, 2 dc in next st, dc in next fpdc2tog] repeat around, sl st in
top of beg ch-3 to join. -8 fpdc2tog, 40
dc
Completed Round 3
Rnd 4: Ch 3, dc
in same st, dc in next 3 sts, 2 dc in next st, change color to CC, fptr2tog
over last and first fpdc2tog of previous row, change color to MC, [skip next
st, 2 dc in next st, dc in next 3 sts, 2 dc in next st, change color to CC,
fptr2tog over last-used and next fpdc2tog, change color to MC] repeat around,
sl st in top of beg ch-3 to join. -8
fptr2tog, 56 dc
Working stitch location for “legs” of fptr2togCompleted Round 4
We start making corners
Rnd 5: Ch 3, dc
in next st, hdc in next 2 sts, sc in next 3 sts, change color to CC, fphdc
around fptr2tog, change color to MC, sc in next 3 sts, hdc in next 2 sts, dc in
next 2 sts, change color to CC, (fpdc, ch 1, fpdc) around fptr2tog (corner made), change color to MC, [dc
in next 2 sts, hdc in next 2 sts, sc in next 3 sts, change color to CC, fphdc
around fptr2tog, change color to MC, sc in next 3 sts, hdc in next 2 sts, dc in
next 2 sts, change color to CC, (fpdc, ch 1, fpdc) around fptr2tog, change
color to MC] repeat around, sl st in top of beg ch-3 to join. Fasten off CC. -4 fphdc, 4 (fpdc, ch 1, fpdc) corners, 16
dc, 16 hdc, 24 sc
Rnd 6: Ch 2 (counts as hdc), [hdc in each st across
to ch-1 sp, (dc, ch 1, dc) in ch-1 sp] repeat around, hdc in last st, sl st in
top of beg ch-2 to join. Fasten off. – 68
hdc, 4 (dc, ch 1, dc) corners, (19 sts on each side of square)
Making the Bigger Square
Rnd 7: With CC,
join to any ch-1 corner sp, ch 3, (dc, ch 1, 2 dc) in same sp as join, bpdc around
each st to next ch-1 sp, [(2dc, ch 1, 2 dc) in ch-1 sp, bpdc around each st to next
ch-1 sp] repeat around, sl st in top of beg ch-3 to join. -76 bpdc, 4 (2 dc, ch 1, 2 dc) corners
Rnd 8: Ch 3, dc
in next st, (dc, ch 1, dc) in ch-1 sp, [dc in next 3 sts, change color to MC,
fpdc2tog, change color to CC] five times, {dc in next 3 sts, (dc, ch 1, dc) in
ch-1 sp, [dc in next 3 sts, change color to MC, fpdc2tog, change color to CC] five
times} repeat around, dc in last st, sl st in top of beg ch-3 to join. -20 fpdc2tog, 72 dc, 4 (dc, ch 1, dc)
corners
Rnd 9: Ch 3, dc
in next 2 sts, {(dc, ch 1, dc) in ch-1 sp, dc in next 6 sts, [change color to
MC, fpdc2tog over previous and next fpdc2tog, change color to CC, sk next st, dc
in next 3 sts] 4 times, dc in next 3 sts} repeat around omitting last 3 dc on
last repeat, sl st in top of beg ch-3 to join. Fasten off both colors. -16 fpdc2tog, 84 dc, 4 (dc, ch 1, dc)
corners
We are moving the corner…
Rnd 10:Note corner location will shift in this round. With MC, join to any ch-1 sp, ch 1, sc in same sp, bpsc around next 4 sts, bphdc around next 4 sts, bpdc around next 5 sts, (dc, ch 1, dc) in next st, bpdc around next 5 sts, bphdc around next 4 sts, bpsc around next 4 sts, [sc in ch-1 sp, bpsc around next 4 sts, bphdc around next 4 sts, bpdc around next 5 sts, (dc, ch 1, dc) in next st, bpdc around next 5 sts, bphdc around next 4 sts, bpsc around next 4 sts] repeat around, sl st in first sc to join. –32 bpsc, 32 bphdc, 40bpdc, 4 sc, 4 (dc, ch 1, dc) corners
Rnd 11: Ch 1, sc
in same st, sc in next 4 sts, [hdc in next 5 sts, dc in next 5 sts, (dc, ch 1,
dc) in ch-1 sp, dc in next 5 sts, hdc in next 5 sts, sc in next 9 sts] 3 times,
hdc in next 5 sts, dc in next 5 sts, (dc, ch 1, dc) in ch-1 sp, dc in next 5
sts, hdc in next 5 sts, sc in last 4 sts, sl st in first sc to join. -36 sc, 40 hdc, 40 dc, 4 (dc, ch 1, dc)
corners
Rnd 12: Ch 1, sc
in same st, sc in next 10 sts, [hdc in next 5 sts, (dc, ch 1, dc) in ch-1 sp,
hdc in next 5 sts, sc in next 21 sts] 3 times, hdc in next 5 sts, (dc, ch 1,
dc) in ch-1 sp, hdc in next 5 sts, sc in next 10 sts, sl st in first sc to
join. Fasten off. -84 sc, 40 hdc, 4 (dc,
ch 1, dc) corners
Rnd 13: With CC,
join to any ch-1 sp, ch 2 (counts as hdc),
(hdc, ch 1, 2 hdc) in same sp as join, bphdc in each st across to next ch-sp,
[(2 hdc, ch 1, 2 hdc) in ch-1 sp, bphdc in each st across to next ch-sp] repeat
around, sl st to join. Fasten off. Block. –132
bphdc, 4 (2 hdc, ch 1, 2 hdc) corners (37 stitches on each side of square)