A Bit of a Color Change Difference

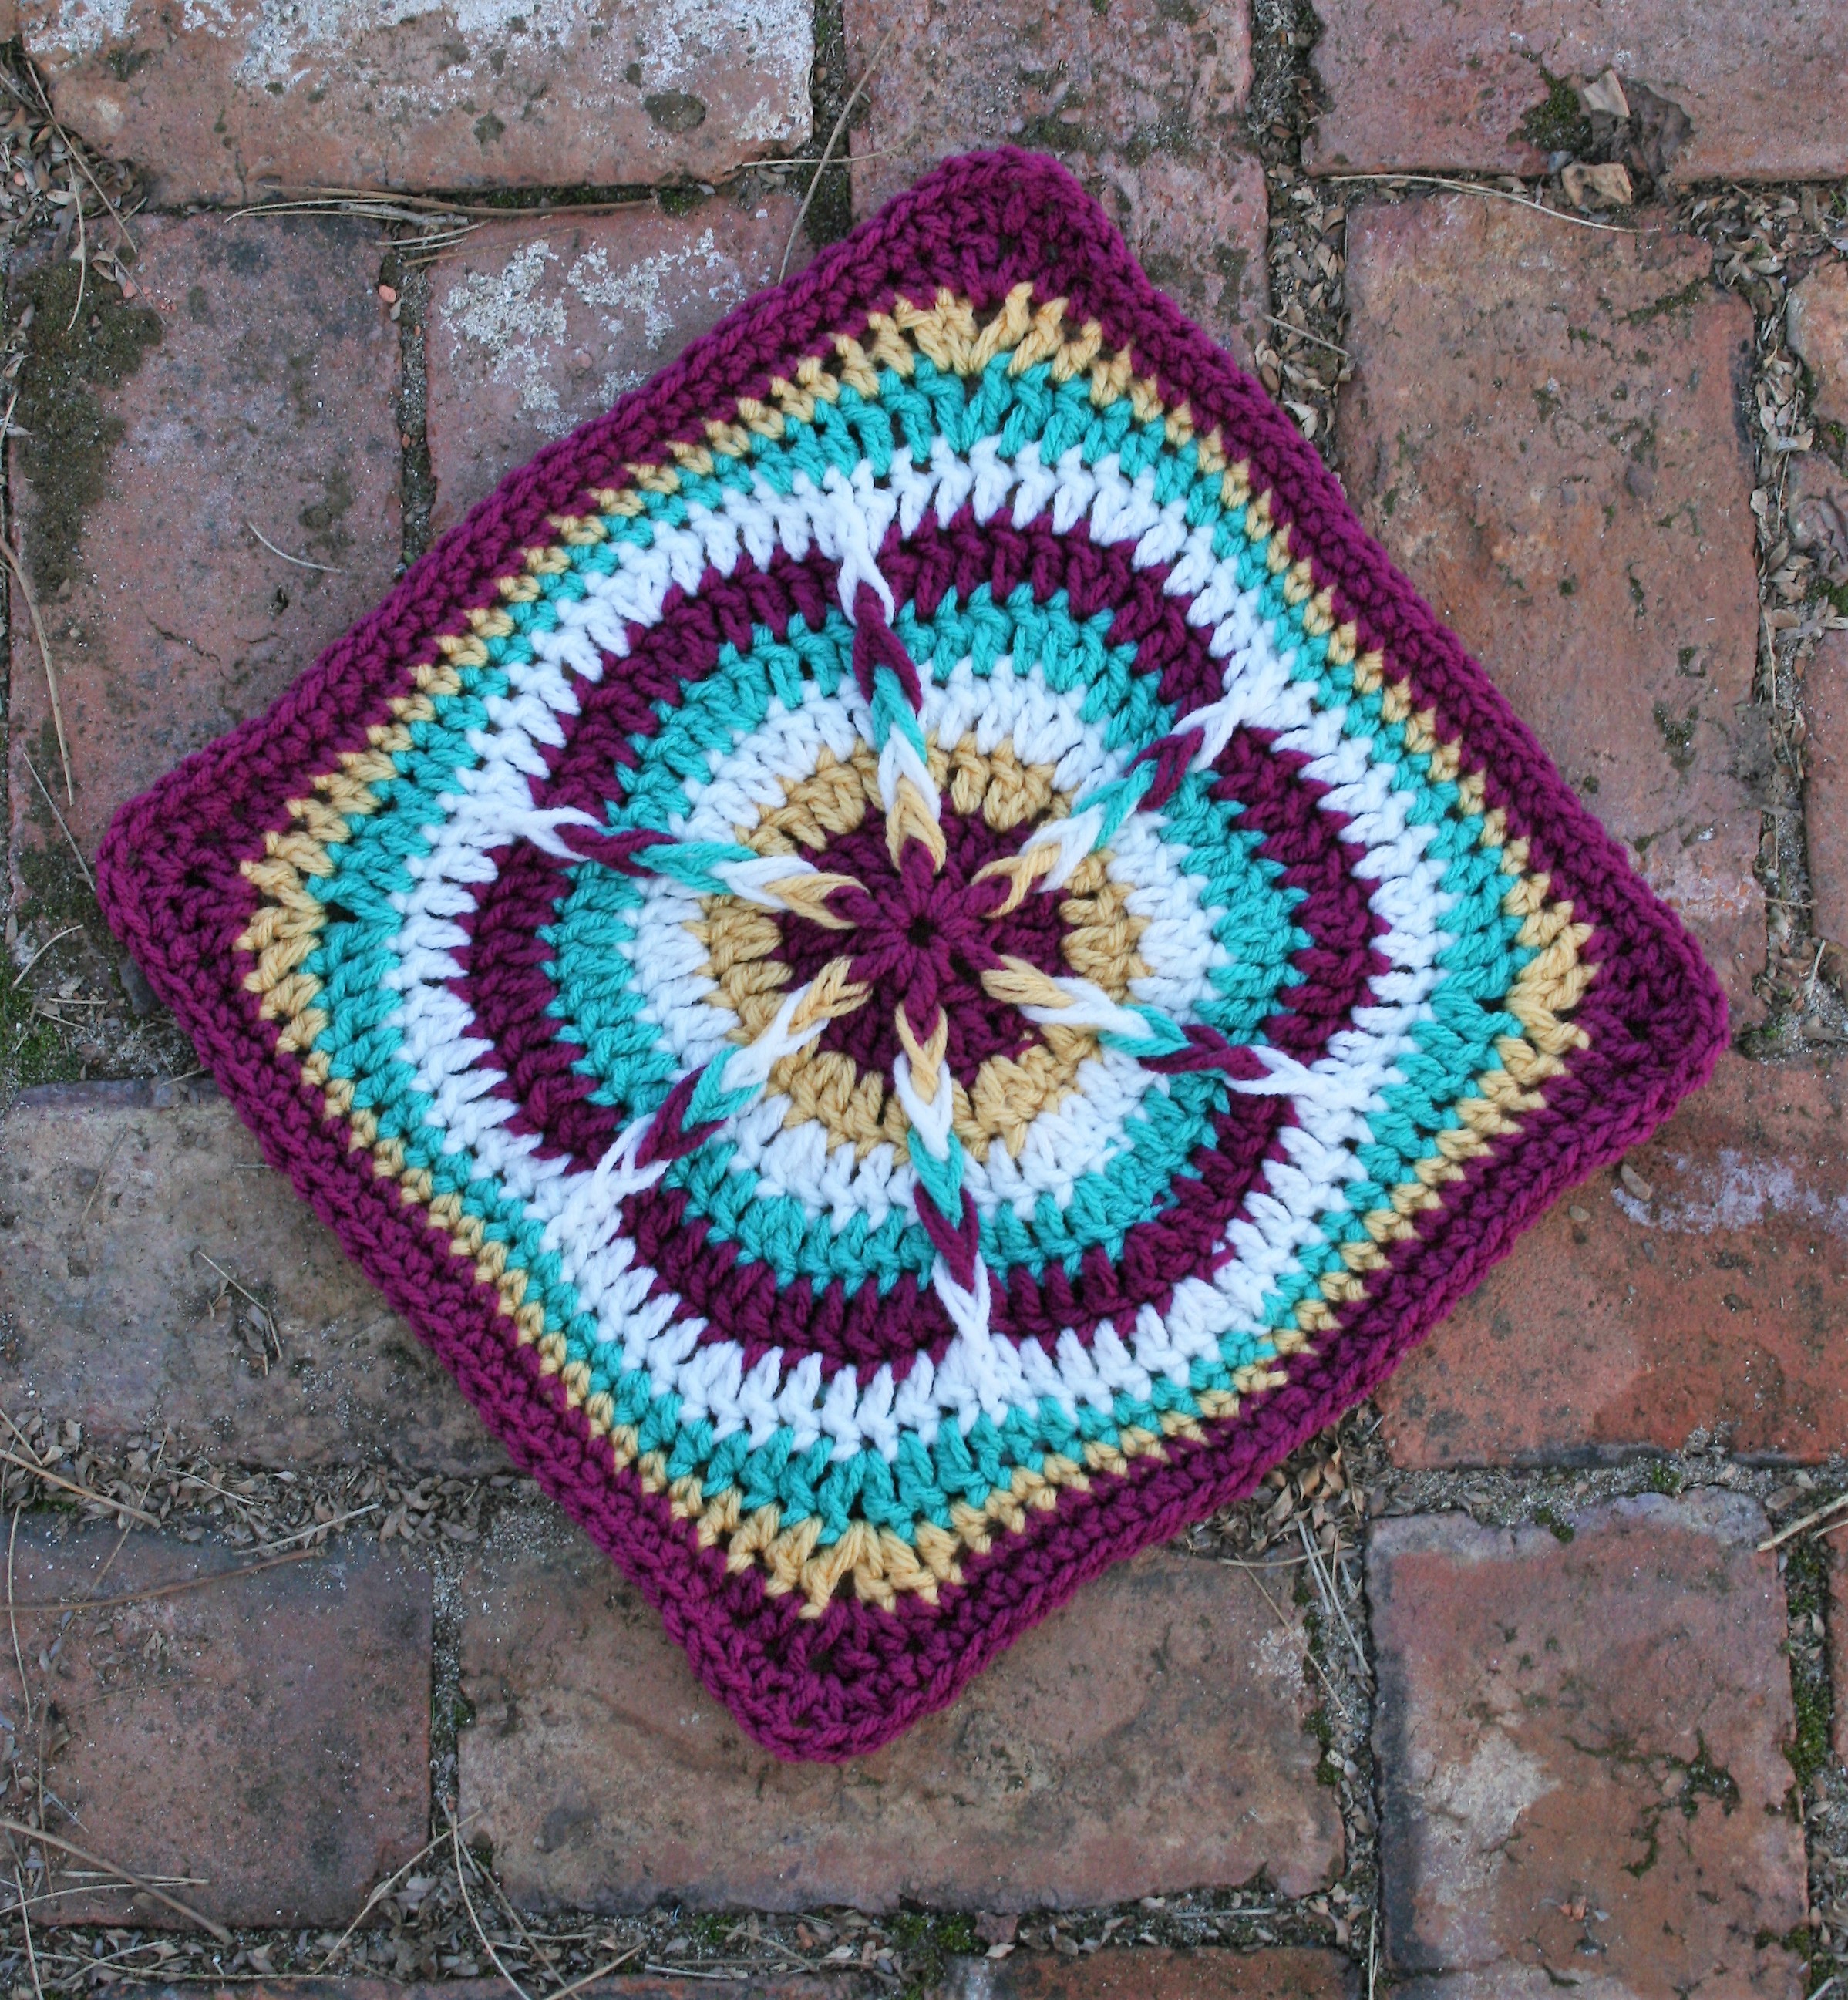
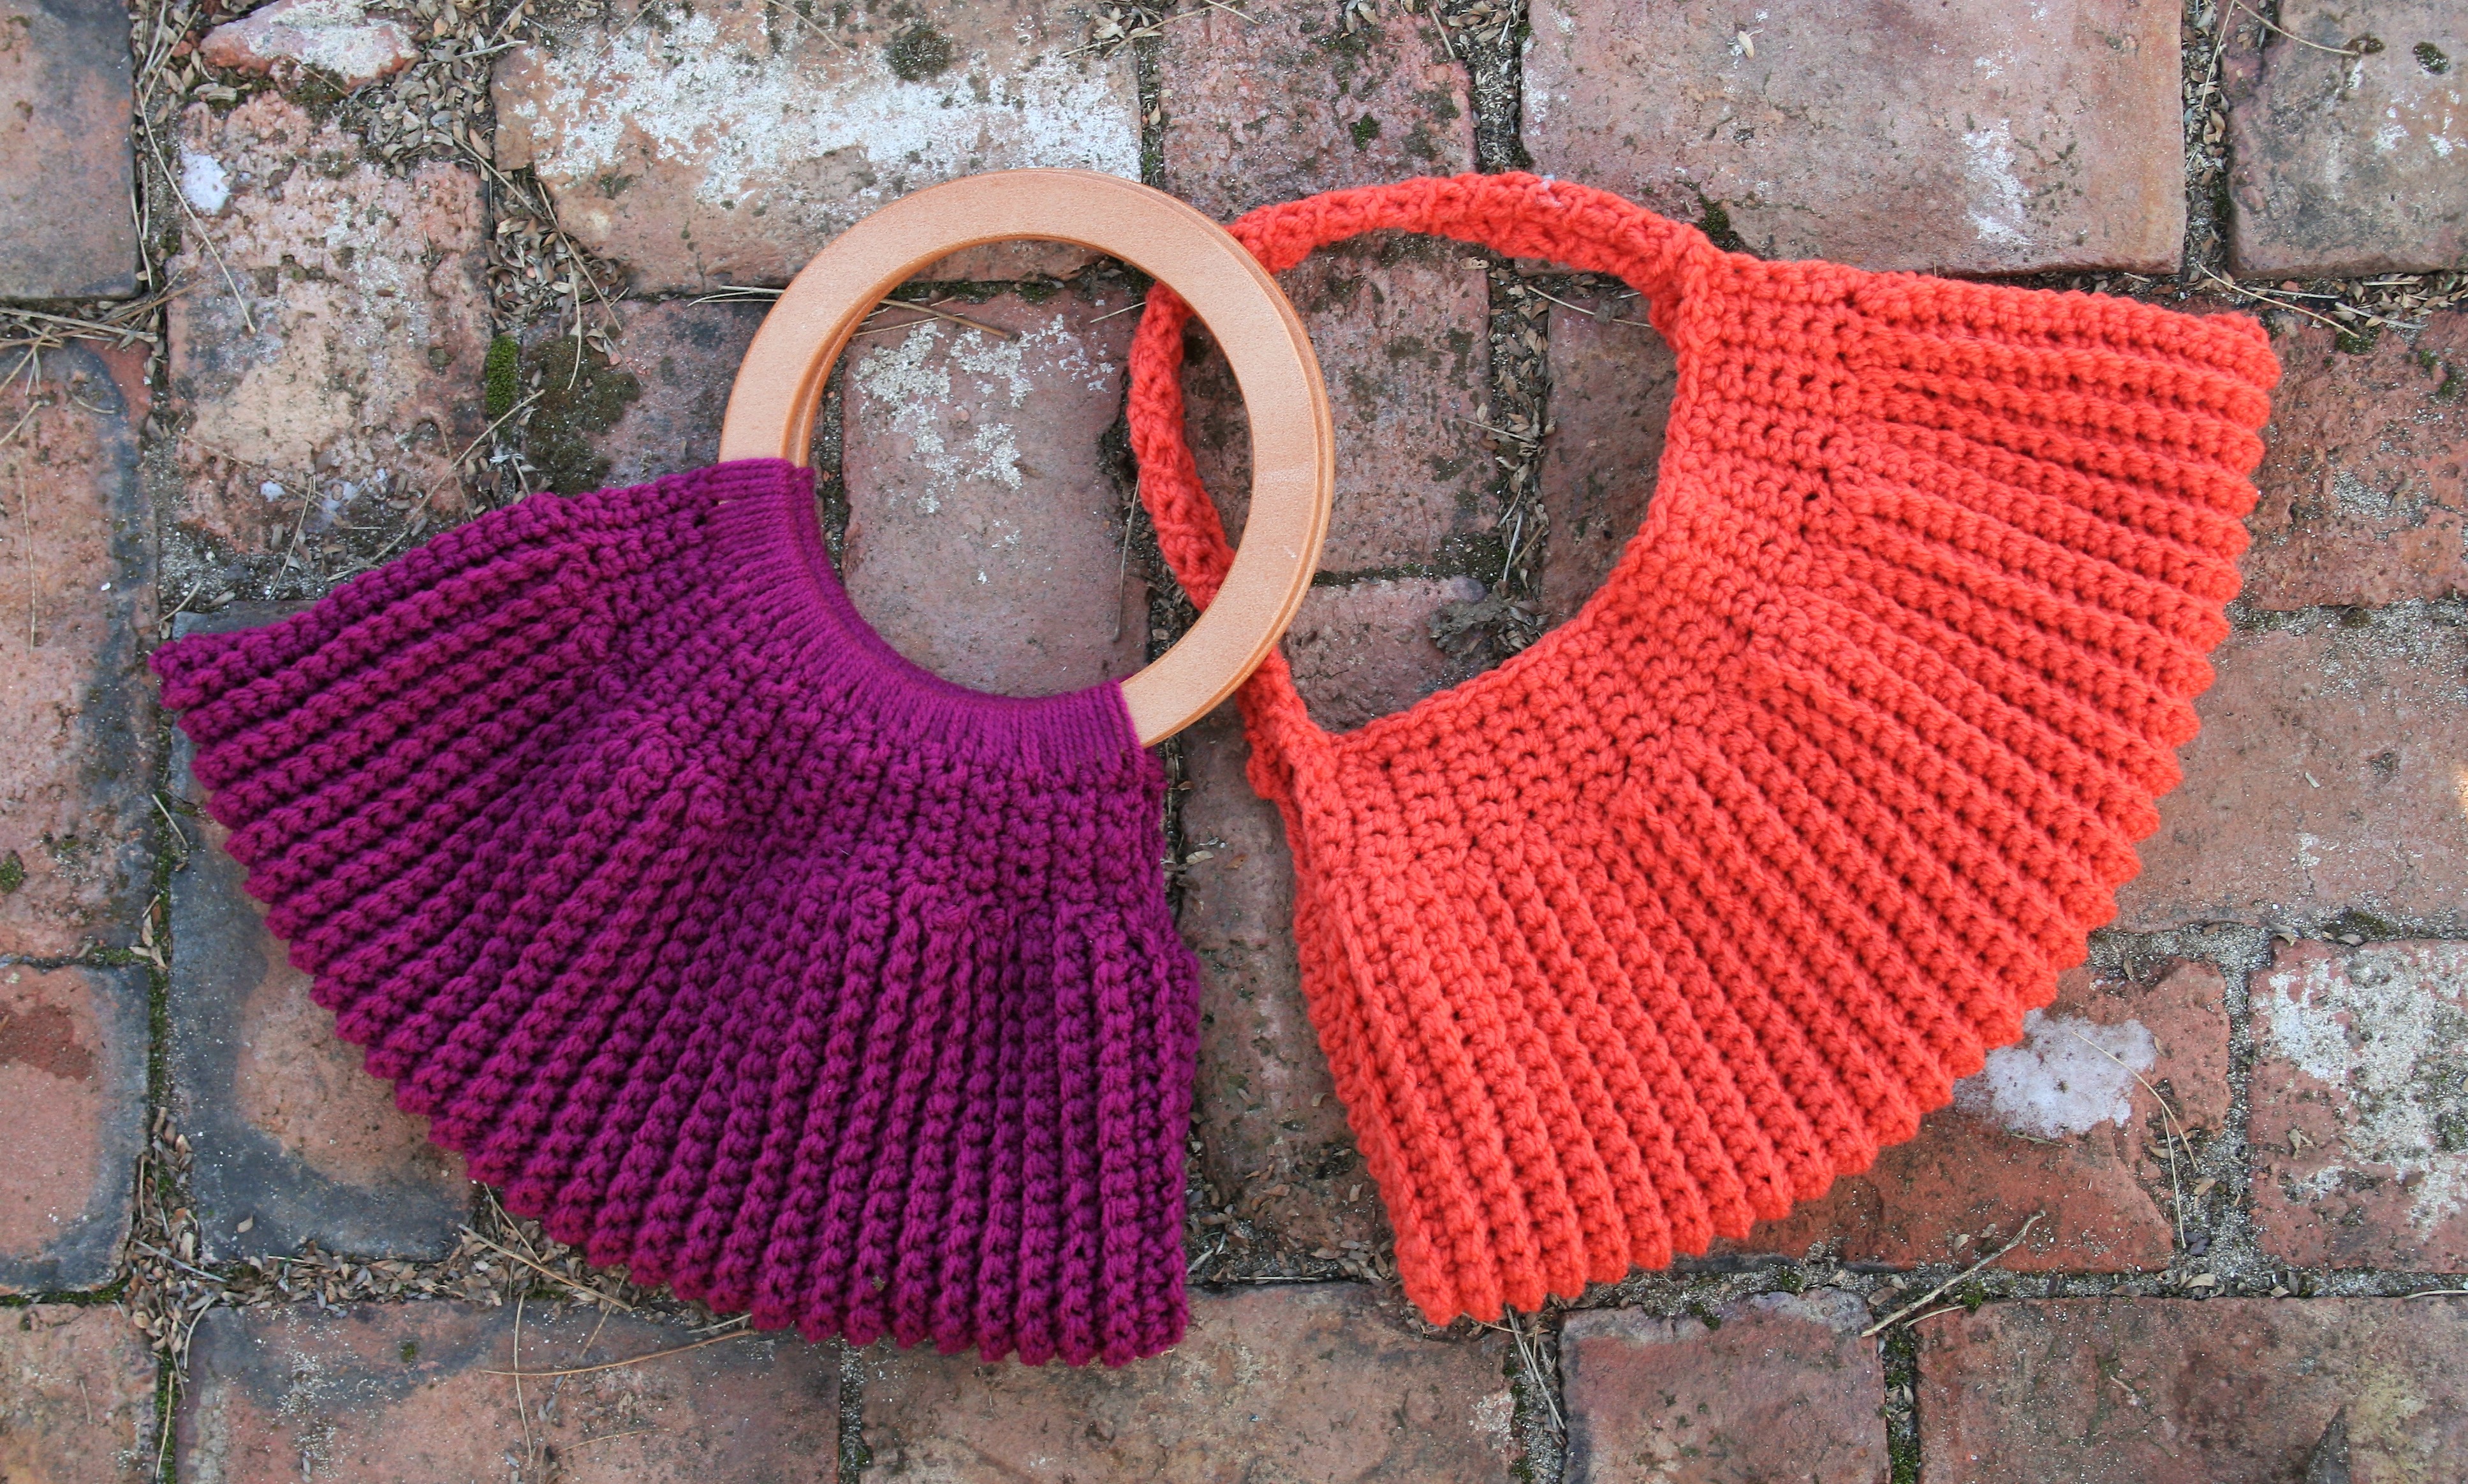
Some color changes are a bit different than others. The way to change the color in a stitch is the same, I discuss that here. However, there times when a couple of other little tricks can make the color change smoother, and your fabric much more eye catching.

One of these times is when the color change may occur within the rows with a shift of the stitches, like a line of color moving diagonally. The color change is not exactly in the same location as the row below, so to have a really clean look you may have to start a new yarn each time or end up with a color strand laying awkwardly across different color stitches.

A diagonal color change, without ends to weave in, and a visually consistent look.

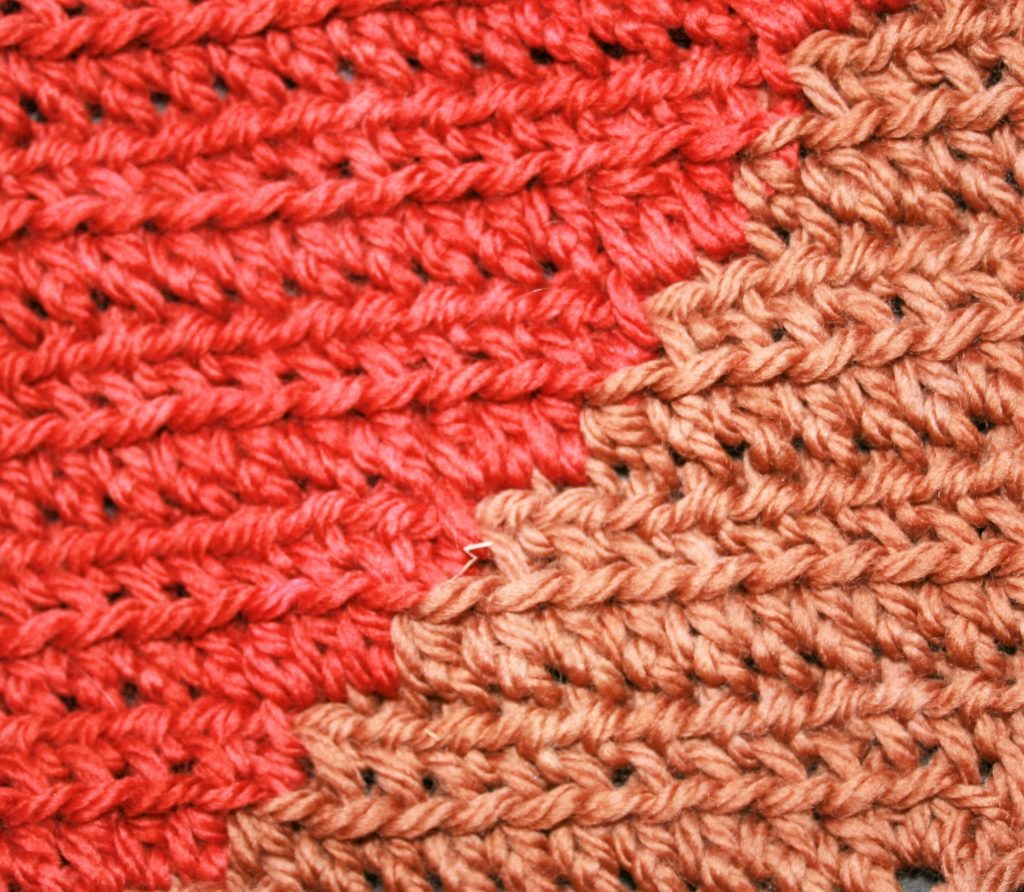
I for one really do not want to weave in as many ends as it would require to shift a color change every row, so there are a couple techniques I use to reduce the ends while keeping a smooth color edge.

For starters, when I change the color I toss the “old” color stand over the fabric, so that it is on top of the stitches. After completing the row of stitches and returning to the color change point, if I am changing the color before the last stitch of the color I change the color but leave a slightly loose tension in the new yarn. I then crochet over this yarn until I reach the same color, and crochet the next stitch over the loose tension strand in the same color stitch.

When the color change happens after the last time it was changed.
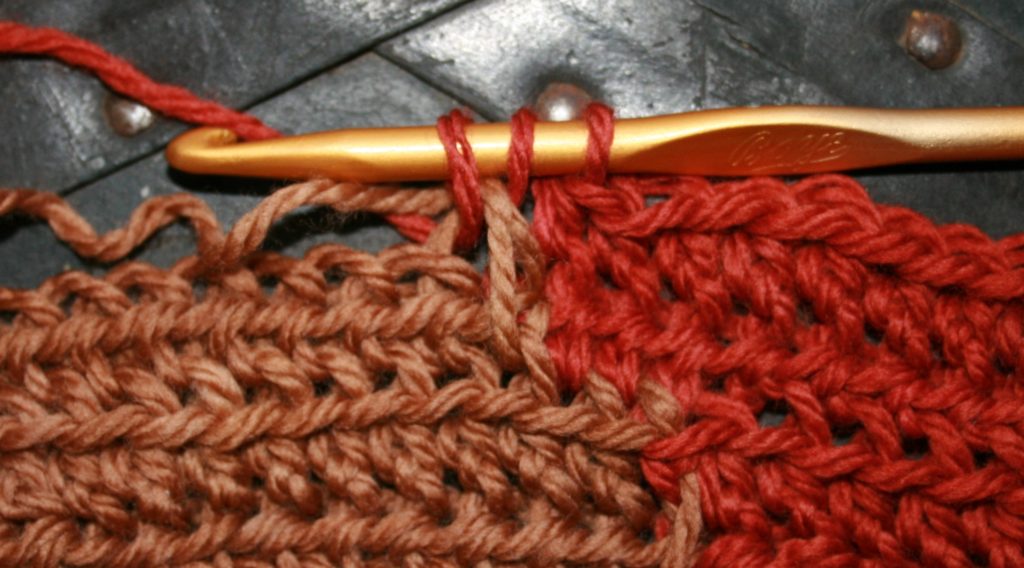
The loop brown strand, is the pulling up of the color a row below, then it is worked over until the color is changed.
The color change is completed, and the “old” yarn is then tossed to the opposite side of the fabric, over the fabric. This helps assure that the yarn is in the correct location for working on the returning row.

If the color change occurs after the last stitch of the color, I pull the yarn that will be changed up and crochet over it until the stitch it needs to be changed in.

When the color change happens before the last time it was changed.
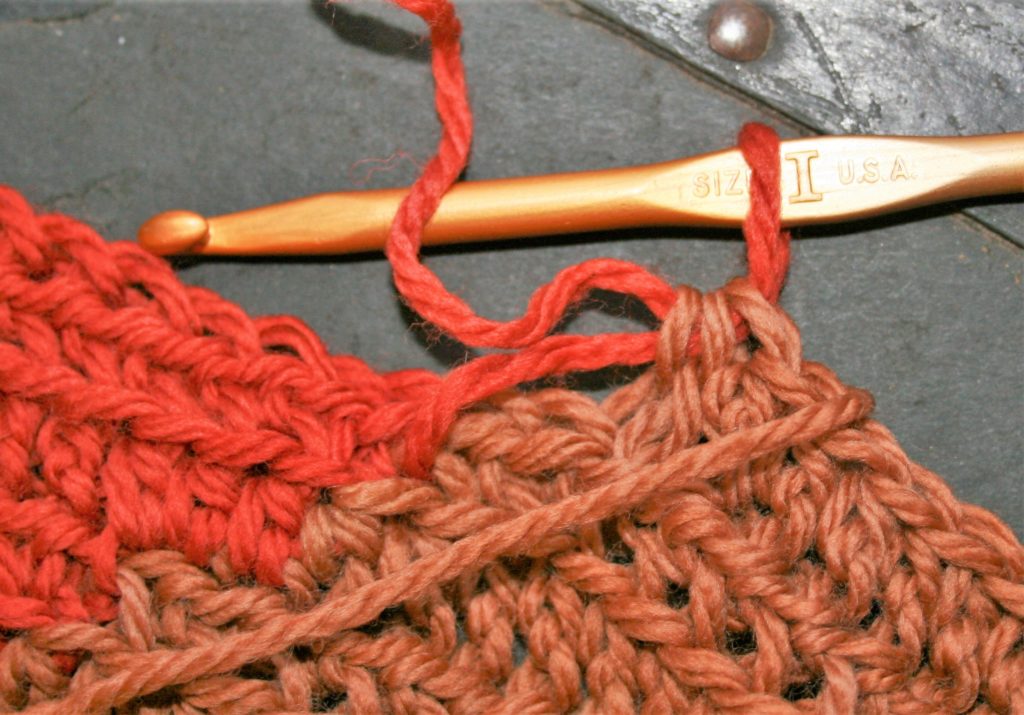
Leave a little slack in the yarn when it changes color.
Crochet over this “slacked” yarn, until at least into the same color below.

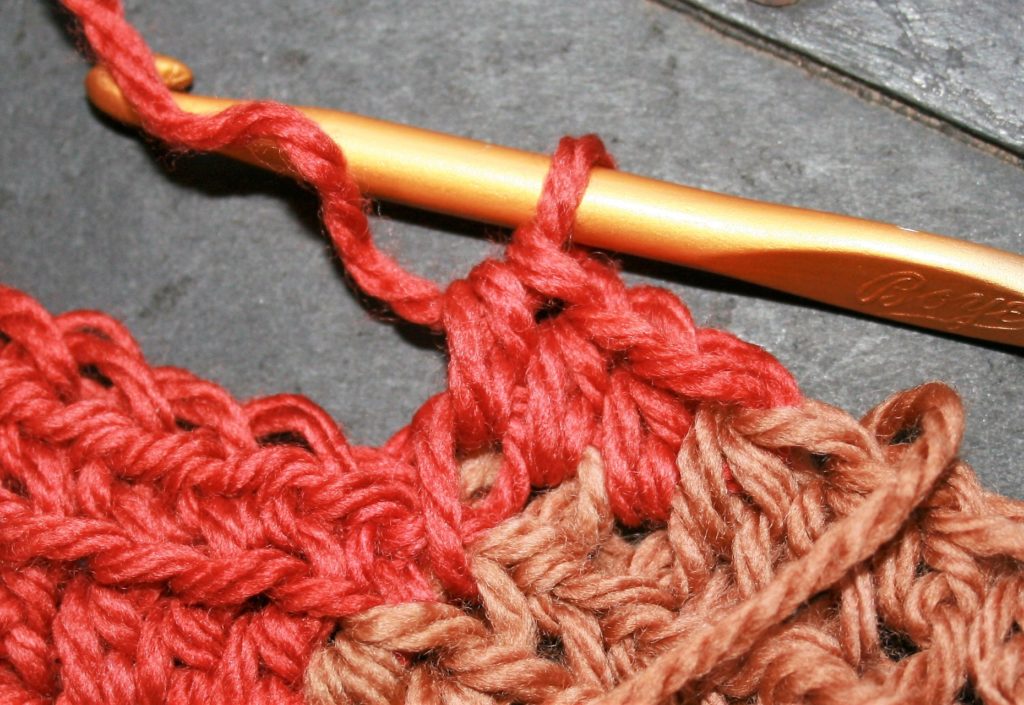
Essentially I am working over the color change yarn until it is needed. This helps me keep a smoother look while actually being able to stay sane while working up and finishing the fabric.

Hooks- Change Stitches

There are many things that I have taken for granted in my world of crochet over many years. One such things is the hook I use.

I have also found that it is one of the things that very few people consider when evaluating their crochet work, people consider the pattern, the yarn, even their ability before considering the tool that was used to make it. However there are differences between hook, aside from how it feels in your hand that can affect how you stitches looks.

The main parts of a hook, are well first of the hook. Is it an in-line or a taper hook? An in-line is essentially a tube, nice and smooth that has a slit cut into it, while a taper has a shaft that gets smaller as it approaches the hook, then gets larger again at the head of the hook. The most common hooks on the market that reflect this are the Susan Bates- inline, and Boye- taper.

In-line Hooks

The biggest difference I have found with these hooks and my stitches come into play when working stitches that have several yarn overs or “loops” to pull through, such as a bullion stitch. (A bullion stitch can have a several yarn overs, in some cases 10, before pulling through all the loops on the hook). For me the taper makes it difficult to keep these loops even when pulling through, and I have a tendency to fit it a bit to get all the loops off, while an in-line hook seems a bit easier.

Yet the gentle increase of a taper hook in general helps me to enlarge loops that might be getting to tight to pull through, simply by sliding the hook up the shaft. It gives me a bit more flexibility when transitioning between various stitch techniques, especially where stitches can inadvertently be pulled tighter. Whereas an in-line does not give me as much variety and option in this area.

Taper Hooks

However, if the taper is too great, giving a large finger support that creates a larger increase in the taper I find that my loops become a bit more inconsistent when working decreases or clusters.  Where I have to keep loops from other stitches on the hook to be worked off together, the large taper prevents the loop from being easily adjusted on the hook, and instead makes one of the loops tight while the other end are a bit loose.

So just this one difference in hooks, the simple shaft, either in-line or taper, can affect my work and my look. There are other factors, but this is just one that relates to my current projects. Never be afraid to try a different style hook, you might learn some subtle differences for yourself too.

My 1800’s Vacation, and Touchstone

I just took an unexpected vacation to the 1800’s, okay not quite literally but 66 hours without power, phone, or internet can feel a bit like it.
Now, some will instantly think this is torture and have tinges of sympathy. However, really it helps me stay humble and grounded…even in my crochet.


It is a time when the world makes me slow down, I am not tied up in the world of social media, I am not browsing Pinterest, I am not finding something to pull me away from the actually stitching of my fabric. I would spend the evening working on a shawl pattern, in almost darkness, with only a firelight and a candle flickering ensuring I found the right placement for my stitches. This is a design that I hope to share shortly, as it is almost complete.


This time also helps me to focus on the strong background of ancestors that formed me the way I am. I know that my grandmother didn’t have the luxury of indoor plumbing for most of her life, that my great grandmother never had electric lights to work by late into the night. Neither were distracted by the world of television, and made it through life just fine. Realizing that all the generations that came before me lived in a world without these modern conveniences, helps to keep me grounded it what is really important.


These 66 hours found my children talking to me, and each other more. Sharing more hopes, dreams and fears then in any given day of the week. They had the opportunity to experience true quiet and a dark night sky. It really can be just the simple things.
I was also able to play with new ideas in yarn, and sketch out ideas for new designs. It may have been an unexpected “vacation”, but sometimes it is exactly what you needed.

Festive Julie Ann Square- Moogly 2019 CAL

What a month…just last month I was working the last 2018 square for the Moogly CAL…now I am working up the second square of the Moogly 2019 CAL! Check out all the squares for 2019 here, and the 2018 square here.

I feel very privileged to be able to share with you this latest design, the Festive Julie Ann Square. Inspired by my student Julie Ann, who loves to work in the round, and makes a festive atmosphere where ever she is going.

The square uses long post loops, to create a stunning color play of the eye. Working this square for some reason always makes me think of flowers, I guess that is one of the reasons I see it as festive.

Festive Julie Ann by Linda Dean

Bring in the New Year with a bright star of festival with this square that elongates some post stitches to create a planned bleeding of the colors.

Materials:

*Red Heart With Love, #1907 Boysenberry (A), #1207 Cornsilk (B), #1101 Eggshell (C), #1562 Jadeite (D)

*Hook J/10/ 6.00mm

Gauge: 12”x 12” square (30.5 x 30.5cm) –After Rnd 3 you should measure approximately 4″ (10cm)

Long Loop Front Post Double Crochet (LLfpdc): Working over post stitch of previous round, YO, insert hook around post of stitch  2 rows below from back to front and right to left, YO, pull up a loop about an inch in height, (YO, pull through 2 loops) twice.

Note that you will work a double crochet and a post stitch in the same stitch.

Rnd1: With A, ch 4, 11 dc in 4th ch from hook, join to top of beg ch. -12 dc

Rnd 2: Ch 3 (counts as a dc, now and throughout), fpdc in same st, 2 dc in next st, [(dc, fpdc in next st), 2 dc in next st] rep around, join. -18 dc, 6 fpdc

Rnd 3: Change to B, ch 3, dc in next st, LLfpdc in same st as last, dc in next st, 2 dc in next st, [dc in next 2, LLfpdc in same st as last, dc in next st, 2 dc in next st] rep around, join. -30 dc, 6 LLfpdc

Rnd 4: Change to C, ch 3, dc in next 2 sts, LLfpdc in same st as last, dc in next 2 sts, 2 dc in next st, [dc in next 3, LLfpdc in same st as last, dc in next 2 sts, 2 dc in next st] rep around, join. -42 dc, 6 LLfpdc

Rnd 5: Change to D, ch 3, dc in next 3 sts, LLfpdc in same st as last, dc in next 3 sts, 2 dc in next st, [dc in next 4, LLfpdc in same st as last, dc in next 3 sts, 2 dc in next st] rep around, join. -54 dc, 6 LLfpdc

Rnd 6: Change to A, ch 3, dc in next 4 sts, LLfpdc in same st as last, dc in next 4 sts, 2 dc in next st, [dc in next 5, LLfpdc in same st as last, dc in next 4 sts, 2 dc in next st] rep around, join. -66 dc, 6 LLfpdc

Rnd 7: Change to C, ch 3, dc in next 5 sts, LLfpdc in same st as last, dc in next 5 sts, 2 dc in next st, [dc in next 6, LLfpdc in same st as last, dc in next 5 sts, 2 dc in next st] rep around, join. -78 dc, 6 LLfpdc

Rnd 8: Change to D, ch 1, sc in same st, [sc in next 4 sts, hdc in next 3 sts, dc in next 2 sts, (dc, ch 1, dc) in next st, dc in next 2 sts, hdc in next 3 sts, sc in next 6 sts] rep around, join. -40 sc, 24 hdc, 24 dc, 4 ch-1 sps

Rnd 9: Change to B, ch 1, sc in same st, [sc in next 7 sts, hdc in next 2 sts, dc in next st, (dc, ch 1, dc) in ch-1 sp, dc in next st, hdc in next 2 sts, sc in next 9 sts] rep around, join. -64 sc, 16 hdc, 16 dc, 4 ch-1 sps

Rnd10: Change to A, ch 1, sc in same st, [sc in next 9 sts, hdc in next 2 sts, (dc, ch 1, dc) in ch-1 sp, hdc in next 2 sts, sc in next 11 sts] rep around, join. -80 sc, 16 hdc, 8 dc, 4 ch-1 sps

Rnd 11: Ch 1, sc in same st, [sc in next 10 sts, hdc in next 2 sts, (dc, ch 1, dc) in ch-1 sp, hdc in next 2 sts, sc in next 12 sts] rep around, join. Fasten off. Block. Weave in ends. -88 sc, 16 hdc, 8 dc, 4 ch-1 sps

Cathy’s Classic Handbag- Make It For Me!

Thank you to ELK Studio for putting together this Make it For Me event! what a nice way to kick off the new year, after months of crocheting gifts for everyone else it is time to rejuvenate and focus a bit more inward and create something for you! (Check out the entire list of month long projects here)

I am thrilled to be able to join this event with my Cathy’s Classic Handbag. It is made with less than one skein, so you can reach into your stash. I even provided two options for handles…I really like the wooden round handles, but reality…I enjoy crocheting and getting to the craft store or even ordering on line means I am not finishing it the same day I start, so I provided a crochet handle option too. (If you want to learn how to attach the wooden handles, I have some instructions to help you here).

This handbag was inspired by one of my students. Cathy always has a smile and carries herself with a rural, country chic charm. She brightens the room no matter what her day may have contained, and to get all dressed up I could see her with this classic style.

Cathy’s Classic Handbag by: Linda Dean

A classic handbag that is fast to work up and has a lot of charm. A bit of stretch and a bell shape add to this great purse. With optional handle options you can utilize a simple round wooden handle or crochet your own. 

Skill Level: Advanced Beginner

Finished Size Approximately: 7”x 16” (18 x 40.5 cm)

Gauge: 12 sts /16 rows=4”

Materials List:

  • K/10 ½/6.50mm size crochet hook
  • Red Heart With Love medium weight 100% acrylic (370yds/338m/7oz/198g) Sample color: 1907 Boysenberry or #1971 Tigerlily
  • Tapestry needle
  • Everything Mary Round Wood Handle (optional)

Abbreviations:

blsc: back loop single crochet (need help identifying the back loop, check this out)

ch(s): chain(s)

rem: remaining

rep: repeat

sc: single crochet

sp(s): space(s)

st(s): stitch(es)

yo: yarn over

Pattern Notes

The body of the bag is worked from one side across the bottom to the other side.

The body of the bag is worked with short rows.

The handles of the bag are attached to the row ends of the bag.

There are 2 options provided for handles.

Row 1: Ch 45, sc in 2nd ch from hook, sc in each ch across, turn. -44 sc

Row 2: Ch 1, sc in next 5 sts, blsc in next 34 sts, leaving rem sts unworked, turn.  -39 sc

Row 3: Ch 1, blsc in next 34 sts, leaving rem sts unworked, turn. -34 sc

Row 4: Ch 1, blsc in next 34 sts, sc in next 5 sts of the row 2 below, turn. -39 sc

Row 5: Ch 1, sc in next 5 sts, blsc in next 34 sts, sc in next 5 sts of the row 2 below, turn. -44 sc

Row 6-61: Rep Rows 2-5 fourteen times.

Wooded Handle Attaching (Option 1)

Working along the row ends, sc around the wooden handle, working 32 sc across edge. Fasten off. (For tips on how to work around the handle, check out this tutorial)

Repeat on opposite side.

Crochet Handle Attaching (Option 2)

Ch 1, working along the row ends, 4 sc in first row end, working in a spiral (meaning that you are working in the round but are not joining the round, you continue working in the next stitch) to create a cord, blsc in the first sc worked in the end row, blsc in each sc until the cord measures about 14” (35.5cm), sl st to opposite end row from the beginning of the cord, sl st next 3 sts of cord to same st, sc in each row end across to beginning of the cord, fasten off.

Seaming

Folding handles together, whip stitch the open ends of the purse leaving between 1-2” open from the handles.

Weave in ends.